
AfterDawn Blu-ray Encoding Tutorial Lesson 2
Create AviSynth Script
This is the second of four lessons in the AfterDawn Blu-ray Encoding Tutorial. In part one you learned how to analyze your video file to determine the container and video encoding used, as well as how to use the tools included with MeGUI to open it using AviSynth. At this pont you should have your video open in the AVS Script Creator. In this lesson you will learn how to use the script creator, and if necessary the AVS Cutter tool to perform any necessary editing prior to encoding.
The Complete AfterDawn Blu-ray Encoding Tutorial
Encoding video for Blu-ray is easy, but not necessarily simple. To make it easier to learn we have divided this tutorial into four individual lessons, each of which addresses a single step in the process. At the top and bottom of each lesson is a navigation menu where you can jump to any other lesson in the series. You can easily return to a previous section for review or skip over any future section. It is recommended that you read the entire series at least the first time through.
Lesson 1 - Prepare Source Video
- In the first lesson you will learn how to analyze your source video, ensuring AviSynth will be able to decode it properly, and also formulate a plan for making any changes which may be required. In most cases this will also involve creating an index, which is a sort of map to the contents of a video.
Lesson 2 - Create AviSynth Script
- In the second lesson you will learn to use MeGUI's AVS Script Creator tool to provide instructions for loading your source video and performing any required processing. This may include resizing video to the desired resolution and either deinterlacing or bobbing interlaced video to make it progressive.
Lesson 3 - Create Chapter File and Calculate Bitrate
- In lesson four you wil learn how to create a file specifying chapter points and calculate the correct bitrate for your encoded video.
Lesson 4 - Encode Video
- In the last lesson you will learn about the proper settings for encoding your video. When you complete this step you will have a 100 percent Blu-ray compliant H.264 video file, suitable for using in the authoring program of your choice.
Official AfterDawn Blu-ray Encoding Tutorial feedback thread
We have created a dedicated discussion in our forums (open in new window) for feedback on this tutorial. We would love to hear your whatever thoughts you have. Tell us what you liked or what you didn't like. Let us know if there was something you didn't understand or even something that was just plain wrong. We strive for 100 percent accuracy in our guides, but nobody's perfect. Any help you can give us in getting a little closer to that goal is appreciated. Our goal is to help you out, and anything we can change to do a better job of that is an improvement.
Lesson 2 Objectives
- Identify the resolution, framerate, & scan type (interlaced or progressive) of your source video
- Resize your video for encoding at the appropriate Blu-ray compliant resolution
- Deinterlace or bob your video to encode an interlaced source as progressive
- Clean up minor imperfections in your source video
- Edit frames out of your video using the AVS Script Cutter
Step 1 - Familiarize Yourself With The AVS Script Creator
The AVS Script Creator is an extremely powerful tool which combines a number of preset options with a text editor which you can use to unlock the full power of AviSynth. This tutorial will not even scratch the surface of that power, but will offer some relatively primitive examples to show how you can do so yourself should you choose to.
The Script Creator Interface
Before you start using the AVS Script Creator, you should take a look at the three tabs to familiarize yourself with how it works. In fact, the first tab you should look at is one you may never need to visit at all during every day use, but which is the heart of the entire tool. It is essentially a text editor where you can view, and even directly edit, the AviSynth script which will be used for encoding your video. You can add, edit, or delete lines from the script manually.
1. Load External Plugin
- Many of the capabilities utilized by MeGUI, including loading files with FFMS2, require plugins to extend AviSynth's features. In lesson 1 of this tutorial I provided instructions for doing this by copying a plugin (DLL file) to AviSynth's plugins folder so it would automatically be loaded. If the plugin is located somewhere else it can be loaded using a line such as this one with the LoadPlugin filter.
2. Source Filter
- FFVideo is the source filter used to open a video file with FFMS2. This could, instead, use the MPEG2Source filter for an MPEG-2 video or DirectShowSource for loading a file using DirectShow.
3. Manually Load Plugin
- You can also load plugins yourself by using the Browse button at the bottom to select them. Keep in mind, any plugin located in the AviSynth's plugins folder will be autoloaded.
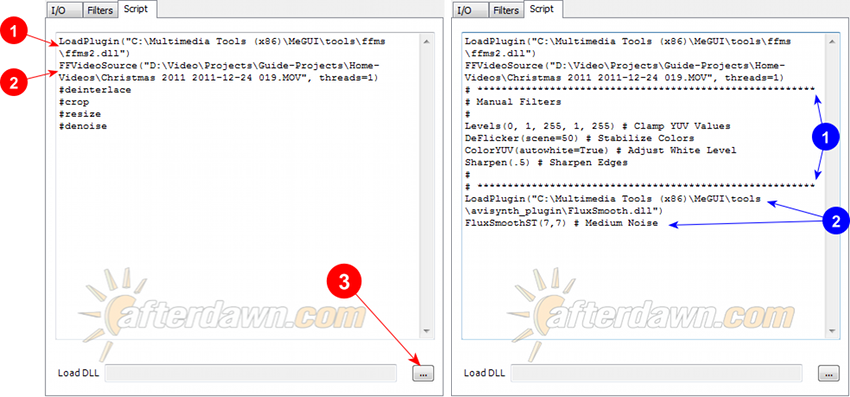
1. Manually Edited Section
- In this section of a completed script you can see a section which has been added manually. Notice the # character which begins several lines. This is a comment character. Anything to the right of this character will be ignored by AviSynth when interpretting your script. In this case I have used that not just for comments to explain what each line does, but also to make it clear that the middle section was added manually rather than being autogenerated by the Script Creator. This will make more sense once you look at the other options in this tool.
2. Autogenerated Code
- In the script example on the right you will see a number of comment lines without any associated code. These represent options which can be toggled on or off in other parts of the Script Creator. In this finished script the denoise section has been replaced by actual denoising code. Notice, once again, that this includes 2 lines. The first loads a plugin to provide the necessary filter and the second specifies the denoise filter and arguments telling it how to operate.
The Filters Tab
Working your way backwards through the tabs, the next one to look at is the Filters tab. Most of the settings on this tab determine whether filters will be added for cleaning up the picture and deinterlacing. In addition the resizing filter can be selected.
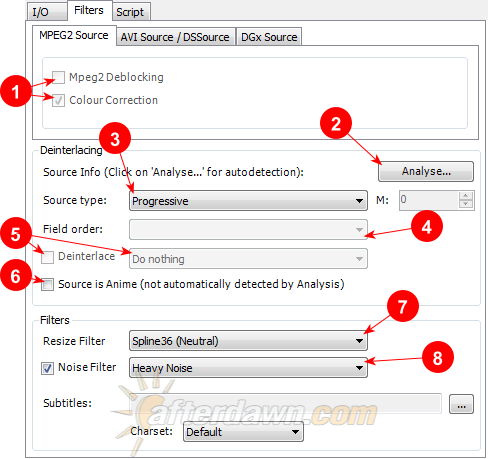
1. MPEG-2 Deblocking & Colour Correction
- As the captions for these options imply, they are only available for MPEG-2 video. Otherwise they will be unavailable, as they are in the example above. Deblocking is used to get rid of the lines which are sometimes visible on the edges of macroblocks in MPEG-2 video. Colour Correction is used to adjust the algorithms used to convert the YUV color used in MPEG-2 video to RGB. The first option should not need to be checked most of the time while the second can be checked for for every MPEG-2 source without worrying about causing problems. If the color information is already correct it will not do anything.
2. Frame Type Analysis
- Depending on the origins of your video, it may be progressive, interlaced, or a combination (hybrid) of the two. If you aren't sure which one it is, you can use the Analyze button to let MeGUI try to figure it out for you. While it may be tempting to rely on this analysis, in reality it is far less reliable than your own eyes and should generally be avoided.
3. Frame Type
- Rather than relying on MeGUI's Analysis tool, you can set the frame type manually. For progressive sources, this should be very simple. Set it to Progressive and move on. For interlaced video it (potentially) gets more complicated since it may originate from a progressive source and have some sort of processing applied to encode interlaced at a higher framerate. H.264 adds another layer of complexity since an interlaced video stream may consist entirely of interlaced frames, include progressive frames along with interlaced, or even have frames which are partly interlaced and partly progeressive. Continue on to the section on previewing your script for more ideas on how to identify interlacing.
4. Field Order
- This only applies to interlaced video. In any interlaced video stream either the top or bottom field must be rendered first. If you get this backwards the video will appear jerky. This will also be explained further in the previewing section below.
5. Deinterlacing Options
- MeGUI has several deinterlacers to choose from for automatic deinterlacing. Aside from choosing the deinterlacer itself, you should also consider whether you want to combine the two fields from each frame or bob your video. Bobbing turns each field into a separate frame, effectively doubling the framerate. Keep in mind, if you double the framerate of 1080i video, it will no longer be Blu-ray compliant. However, as an alternative you can bob the video and resize to 720p. Since each field begins at less than 720p resolution anyway, depending on your source and your own preferences this may be the best option.
6. Anime Sources
- Obviously this will only be an issue if you are starting with a TV capture or similar source, but if your video is anime you should select this option.
7. Resize Filter
- The filter used for resizing will change some characteristics of the image. In general, resize filters are divided into three types. Soft filters blur the image slightly, resulting in less detail (particularly on the edges of objects) but more compressability. Sharp filters do just the opposite, enhancing the edges of objects and reducing compressibility. Neutral filters keep the edges of objects essentially the same as the original, neither softening nor sharpening. While you can find plenty of advice all over the Internet about what type of filter you should use for different situations, only your own eyes can tell you anything useful about what you will prefer.
8. Noise Filtering
- You can clean up your video frames using a noise filter. The Script Creator offers four different presets for this, although you may be better served by doing some research and writing your own denoising code. Remember to check the Noise Filter box or nothing will be added to your script.
The I/O Tab
On the I/O tab you will find the basic options for cropping and resizing your video.
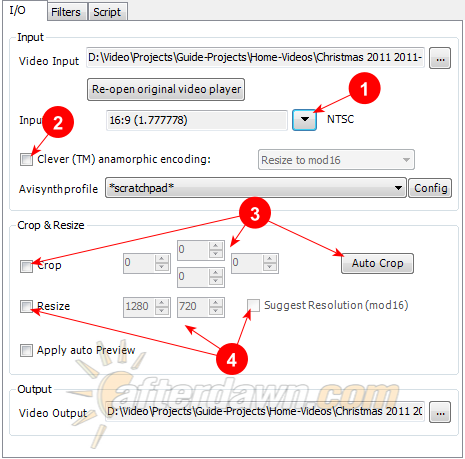
1. Source Aspect Ratio
- In order to ensure the resizing and encoding options are set correctly, it's important that you make sure the Input Aspect Ratio (AR) is set correctly. Most of the time this should be 16:9. Ignore the NTSC and PAL options since those do not apply to HD video.
2. Anamorphic Encoding
- Unlike DVD, Blu-ray discs almost always use square pixel video, meaning if you divide the horizontal resolution by the vertical resolution you will get the aspect ratio (SAR) it will be displayed at. The only exceptions are SD video (which isn't covered in this tutorial) and 1440x1080 HD video which is stretched to display at 1920x1080. If your video is going to be encoded at that resolution, make sure this box is checked. Otherwise leave it unchecked.
3. Cropping
- HD video generally doesn't need to be cropped, however if it is letterboxed you may want to enable cropping to remove the borders and then add them again. This is typically done to ensure they are pure black so they don't end up requiring extra bits to encode. You may also want to crop and then add borders to pad the frame back to standard Blu-ray resolution if the edges of your video frames have noise or artifacts which would cause the encoder problems. We will look at adding borders later in the Profiles section.
4. Resizing
- Unless either your video is not one of the three standard HD resolutions legal for Blu-ray or you want to switch from one resolution to another (such as downscaling from 1920x1080 to 1280x720), there should be no reason to resize. In any case, there is rarely anything to be gained from upscaling. Also, keep in mind that if you downscale 1080i to 720p, you will need to perform some type of deinterlacing on it. If you deinterlace by bobbine (separating each field into its own frame) you will actually be upscaling. This is the one time when upscaling may be your best option because it allows you to retain the temporal resolution of the original and may be less destructive than traditional deinterlacing, which essentially just combines the two fields in each frame together. However, as was mentioned previously, if your video is encoded as H.264 an interlaced stream may actually be composed exclusively of progressive frames, in which case there is no advantage to this approach.
Using The AVS Script Creator
Now that you have been introduced to the basic features of the Script Creator, you're ready to dive into creating your own script. The first step will actually be to use a feature which hasn't been introduced yet - the profile editor. MeGUI uses profiles to group settings for a particular tool together so they may be quickly assigned all at once. By creating custom profiles, you can customize your AviSynth settings for a particular type of video so you don't have to figure out or remember them every time you need to use them.

At various points during the creation of your script you may find it useful to preview the output, particularly when you are trying to decide between different approaches for deinterlacing, resizing, denoising, etc,... The Preview AVS Script button will provide you with just such a preview. Always keep in mind that your script may look different in motion than it does as just a series of still frames, which is what this preview provides.

Working With Profiles
To edit an existing profile or create a new one, click the Config button on the I/O tab.
Profile Configuration Basics
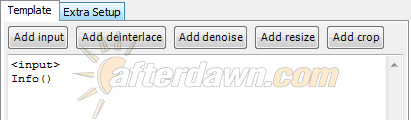
Template Tab
The Template Tab is used to set which automated options will be available through the main script creator environment. Any option which isn't selected here (as indicated by the relevant name in <> tags) will not be added to your script whether it is selected or not. For example, if you do not see <resize> listed, any Resize options you select on the I/O tab will be ignored.
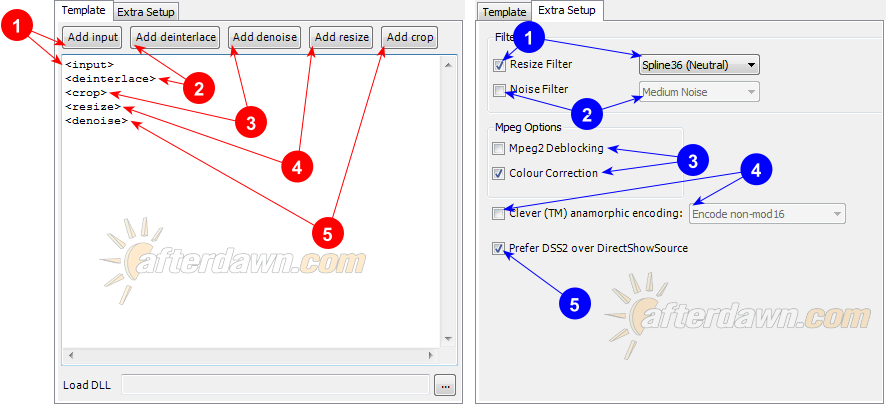
1. Source
- The Source filter should always be the first one listed for every profile. Without it AviSynth will not load your video file.
2. Deinterlace
- Deinterlacing should, as a general rule, be the first of the automated options after Source and precede any filters which alter the image. Otherwise you may find that deinterlacing produces inferior, or even unpredictable, results. One exception to this rule would be filters for color correction which should generally be applied prior to deinterlacing.
3. Crop
- This enables the Crop options on the I/O tab. If you are cropping borders from a letterboxed or pillarboxed image, you may need to manually add another filter called AddBorders() to add them again afterward. See the examples below for details.
4. Resize
- Resizing should almost always be one of the last operations applied in a script. However, assuming you are starting with a non-standard resolution, resizing should rarely be necessary. However, it doesn't hurt to leave the option available by keeping this in your profile.
5. Denoise
- Notice that the default location for the denoising filters is at the bottom of the script. As a general rule I actually recommend moving it above Resize. Otherwise both the resizing and denoising filters may suffer.
Extra Setup Tab
Where the Template tab selects the options which will be available, this tab allows you to set the default options for certain automated settings. These defaults can be changed when you create your script.
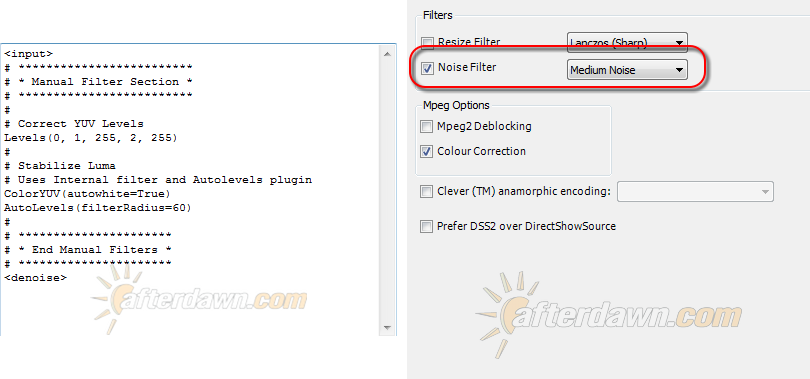
1. Resize Filter
- If you want to turn resizing on by default, check the box here. The dropdown list mirrors the one on the AVS Script Creator's Filters tab and allows you to select your preferred resize filter.
2. Denoise Filter
- Check this box if you want to apply denoising by default and select the default level of denoising from the dropdown list.
3. MPEG-2 Deblocking & Colour Correction
- Checking these boxes will enable the options by default for MPEG-2 video sources. Obviously they will have no effect on other types of video.
4. Anamorphic Encoding
- This box should only be checked if you are creating a template you plan to use for encoding video at a resolution of 1440x1080. As you will see in the example below, Encode non-mod16 should always be selected from the dropdown or else you will end up with an incorrect vertical resolution.
5. Prefer DSS2
- DSS2, or DirectShowSource2() is a plugin used as an alternative to AviSynth's built-in capability to open video files using DirectShow. As a general rule, DSS2 should be preferred, but if you run into problems with it you can always uncheck this.
At the bottom of this window you will see a variety of options for creating, updating, and deleting profiles for the Script Editor.

1. Profile Selection
- This dropdown selects an existing profile which you can then edit, delete, or use as the basis for a new profile of your own.
2. New Profile
- Use this botton to create a new profile. Initially it will be an exact copy of whatever profile is currently selected.
3. Update Profile
- Click this button to apply your changes to the currently selected profile. If you do not either update the existing profile or create a new profile after making your changes, you will be prompted to do so when you exit the profile editor.
4. Load Defaults
- This button will set the current profile to the default settings where all the automatic options are added and any custom text is removed.
5. Delete Profile
- This button will delete the currently selected profile.
Some Sample Profiles
To help you understand the power of profiles in the editing process, here are some examples. These are not necessarily suggestions for your own work, but rather are intended to illustrate the sorts of things you may want to do via a profile.
Source Info Profile
Rather than actual filtering, this profile is intended to be used for analyzing a video clip. The Info() filter adds text to the top left corner of your video detailing several properties, including frametype, resolution, and framerate. If you are working with a large number of clips with different properties in a single batch you could use a profile like this to remind you of the properties for the particular clip you are writing a script for at any given time. Notice that I have removed all the automated filters except the source as I am not interested in the properties after processeing.
Device Specific Filtering
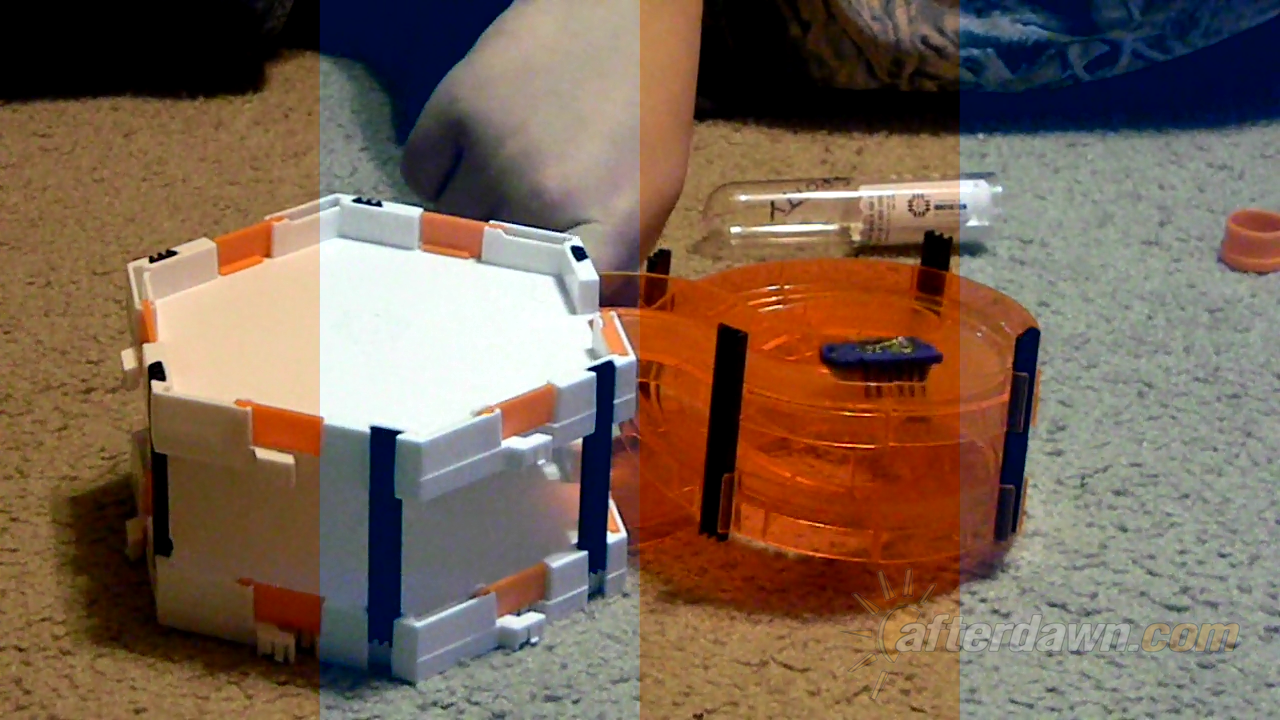
Consumer cameras, particularly low end models, may require additional processing for chroma (color) and/or luma (light intensity) correction. The example below is customized for a particular model of camera with a particular light source.
In this case the profile is specifically targetted to correct the problems inherent in using a specific digital camera. Since the video from this camera will always be in standard 720p resolution there is no need to include any cropping or resizing. There is, however, a problem with the luma levels in the video this camera produces under incandescent lights which results in an orange tint to the picture. To correct this I have added three filters, including one which requires a plugin, resulting in what you see below. To make the differences between the original and corrected frames obvious, I have edited the frame to show alternating sections of original and filtered video.
In addition, once again based on flaws in the camera which manifest in regular image problems, I have set it to automatically denoise using the Medium Noise setting. I can, of course, adjust this setting later. However, since I expect denoising to be required pretty much all the time, I have chosen to have some filtering done by default. You can click on the image below to see the frame full size.
Some Script Examples
Now it's time to put all the pieces together and look at some examples for specific sources. Each example will concentrate specifically on the bits of the script editor which are relevant to the operation being discussed. That doesn't mean you can't set other options as well. For example, you could deinterlace and resize both in a single script.
Prepare 1440x1080 Video For Anamorphic Encoding
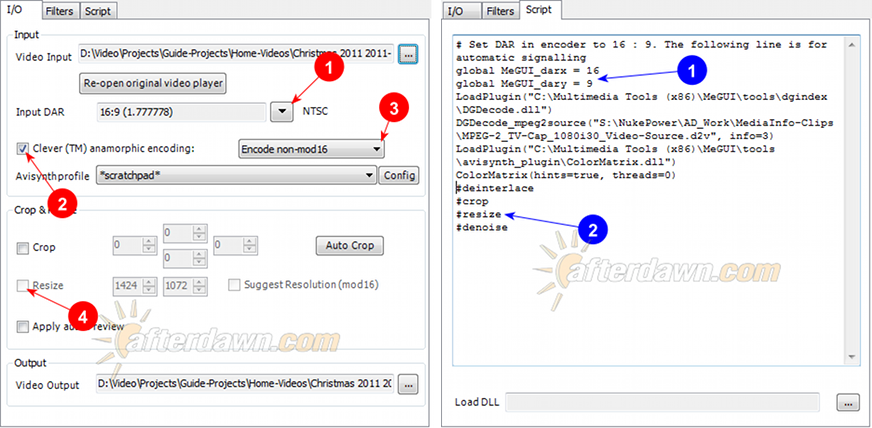
Even though it's the x264 encoder, rather than AviSynth, which is responsible for anamorphic encoding, MeGUI has a unique method of passing the required information to the encoder which uses some special lines in the AviSynth script. All the relevant options can be found on the I/O tab.
1. Input DAR
- If you want to make sure the proper aspect ratio (AR) is passed to x264, you must first ensure the Script Editor has the right information. Assuming your original video has an AR of 16:9 that's also what should be selected here. If, on the other hand, the resolution is 1440x1080 because it's a 4:3 video, set that here, continue reading the details of this operation, and continue to the next example where borders are explained.
2. Enable Anamorphic Encoding
- Make sure this box is checked or else no AR information will be passed to x264.
3. Encode non-mod16
- Make sure to select Encode non-mod16 from this list of options or else you will end up with a non-Blu-ray compliant resolution.
4. Disable Resize
- Unless the resolution of your source video isn't 1440x1080 you will need to make sure Resize is unchecked.. The point of this setting, at least for this operation, isn't actually changing the resolution. You just want to make sure the signalling information is added to your script.
1. Anamorphic Settings
- If you have followed the previous steps you should see these lines added to the top of your AviSynth script. If you prefer you can also add them manually or even create a profile which includes them.
2. Resize
- The presence of this text tells you no resize operation is actually being performed.
Cropping & Adding Borders
There are two possible reasons you may need to remove or add borders to your video. The first is for cleaning up letterboxes and pillarboxes. Those are the borders, either top and bottom or left and right, which are added to videos which do not have an aspect ratio of exactly 16:9 so they can be encoded into standard high definition video frames. Even though those borders should, in theory, already be pure black and therefore require next to no bits for encoding, it's almost always best to make sure by cropping them away and adding them back yourself.
It's also possible you may have a video which doesn't begin with a 16:9 AR, such as a 4:3 (fullscreen) video stream which doesn't have a pillarbox added yet. Or maybe you just have a video which has already had the letterbox or pillarbox removed. Whatever the reason, if your video needs additional vertical or horizontal borders added to reach one of the standard Blu-ray resolutions, you can use a simple AviSynth filter to do so. Remember that although 1440x1080 is a legal Blu-ray resolution, if your video with that resolution has a 4:3 aspect ratio, you need to pad it to 1920x1080 or else it will be stretched to fill the entire widescreen area when it is played.
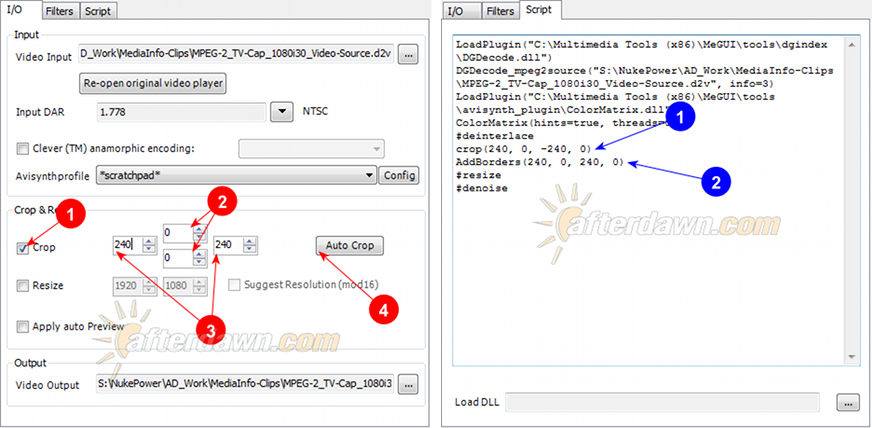
1. Activate Cropping
- Check this box to enable cropping.
2. Vertical Cropping
- These two boxes set the number of lines to be cropped from the top and bottom. The number of lines to be cropped from each must be divisible by two.
3. Horizontal Cropping
- These two boxes set the number of lines to be cropped from the left and right. The number of lines to be cropped from each must be divisible by two.
4. AutoCrop
- There is an AutoCrop tool which can be used to let MeGUI figure out where the existing borders are on your video and crop it away completely. In most cases it is very accurate but sometimes you will have to handle this manually. Except in the most extreme cases, you can at least begin with AutoCrop and then make fine adjustments manually.
1. Crop Filter
- If you have enabled cropping, a line like this one will be added to your script. Each number in parentheses represents one side of the video frame. The first number is for the left side, the second for the top, the third for the right, and the last one is for the bottom. Also notice that the crop value for the right side is a negative number. If the bottom were being cropped in this example it would also be represented as a negative number, but of course there is no such thing as -0.
2. Adding Borders
- Unlike cropping, adding borders requires some manual entry. If you are simply removing and re-adding borders you can simply copy the values from the Crop() line. The positions are the same for AddBorders() as Crop() but the values will all be positive so you can simply drop the - when you copy the numbers from above. Make sure you put AddBorders() below the Crop() filter and not above it. Obviously if you are not cropping first, you will simply put in the AddBorders() line with whatever values you need. If you have a 1440x1080 video which is fullscreen (4:3 AR) you will use AddBorders(240, 0, 240, 0).
Standard Deinterlacing
If you have 1080i video you are not required to deinterlace it for Blu-ray. Even though 1080p is standard for commercial discs, 1080i is also allowed. However, since all flat panel displays are progressive it is often preferable to do so anyway. It will make your video more compressible and your Blu-ray player or TV won't have to deinterlace when the video is played.
Traditional deinterlacing involves combining the two separate interlaced fields into a single progressive frame. If there is very little motion, and particularly if there is a lot of progressive content in your interlaced stream, this will generally give you the best results. Otherwise you may want to skip to the next example which explains bobbing.
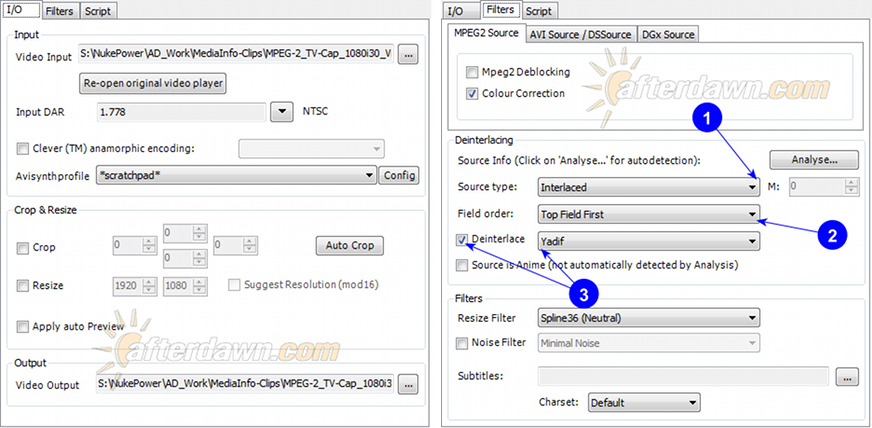
There are no deinterlacing options on the I/O tab.
1. Source Type
- In order to make the deinterlacing options available you must first set your source type to one of the options which includes the word Interlaced.
2. Field Order
- In an interlaced video stream, one field represents a moment in time slightly before the other. It's important to set this correctly so that any motion can be properly analyzed by the deinterlacing filter. If you aren't sure you could go back to the Source Info profile described above to find out the information.
3. Enable Deinterlacing
- Finally you will need to enable deinterlacing using the checkbox and select your deinterlacing filter from the dropdown list. Make sure not to select an option which includes the word Bob or else the framerate will be too high for Blu-ray compliance.
Bob Deinterlacing
Sometimes, particularly if there is a lot of motion in your interlaced video, you will get better results from bobbing than traditional deinterlacing. Bobbing is the process of creating a separate progressive frame from each interlaced field and then adding a line to every other frame so they are spatially aligned. This has the advantage of retaining more temporal information than normal deinterlacing. Keep in mind that video actually has three dimensions, not just two. In addition to spatial changes in the horizontal and vertical direction, there is the element of time.
Because this also doubles the framerate of your video, bobbing a 1080i video stream results in a framerate which is only allowed for 720p video. That means you will also need to resize to 1280x720 to maintain Blu-ray compliance.
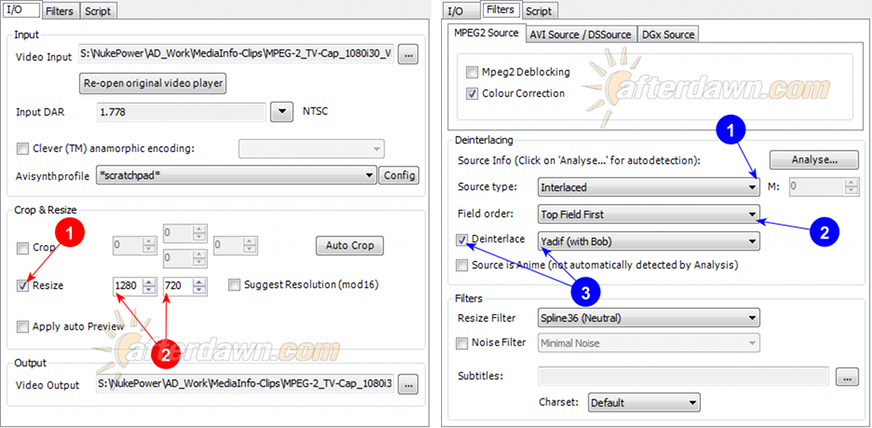
1. Activate Resizing
- Check this box to enable resizing.
2. New Resolution
- Set the new resolution to 1280x720.
1. Source Type
- Although the method is different, bobbing is still a form of deinterlacing which means you will have to set the Source type to interlaced in order to access it.
2. Field Order
- Set the field order to match your video stream, either Top Field First or Bottom Field First.
3. Enable Deinterlacing
- Check the box to activate deinterlacing and select a method which includes the word Bob.
