
The Add Clip Window
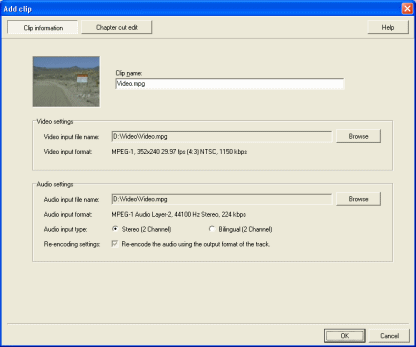 You have to add clips to a project or else you have no material to make up a track and in turn have nothing to author. Click the Add file button in the Source Setup window and select an MPEG file you wish to author. The Add clip window will now appear. Clip name is simply just a name you can put on the clip, it doesn't really matter what you call it.
The Video Settings are next. The Video Input filename field shows the path of the video source, and you can change the video source by clicking the browse button. Video input format gives you information on the input MPEG stream such as whether its MPEG-1 or MPEG-2, its resolution, framerate, Aspect Ratio, format and birate. You will need to be using files that have been encoded to the DVD standard for them to work with TMPGEnc DVD Author.
The Audio settings are next. Audio Input file name, displays the path to the audio input file and you can change this with the browse button. The Audio input format gives information on the audio streams format such as whether its PCM, AC3 or MP2, it's sampling frequency (which has to be 48khz) and its birate. Audio Input type lets you choose between 2 channel stereo audio and bilingual tracks which are audio tracks that contain audio in two languages. Re-encoding settings just lets you choose whether or not to re-encode your audio. If the input audio was not standard this will be selected by default. Also, depending on your environmental settings it might be selected by default to encode audio to AC3 format. Click the Chapter cut edit button now to Add chapter points to the clip and to cut any areas from the stream if needed.
The Chapter Cut Edit Screen
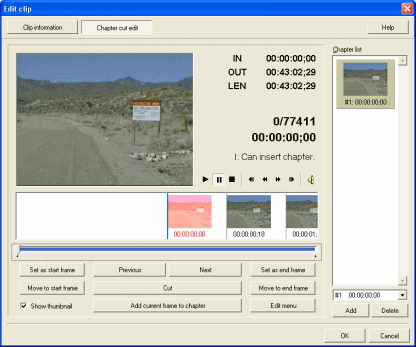 Here you can set chapter points in the clip and cut out any area's of the clip you don't want on the DVD. First you will notice the Preview screen, which we can use to preview any thumbnail frame we select. On the right hand side of the window is a chapter list that we can add and remove chapters in. Beneath the preview screen is the thumbnails, which represent multiple frames in the video stream. Below all this are buttons that allow you to edit the video.
We will look at the Status display first, which is right beside the preview screen. IN is the timecode of the selected start frame. OUT is the timecode of the selected end frame. LEN is the length of time between the start and end frames. Below these you will see the frame counter and the timecode. The frame counter shows the current frame, then after the forward slash is the overall number of frames. The timecode shows the timecode of the frame that's currently selected. Beneath these you will see the type of frame that is selected. I: insert chapter is possible means you are on an I frame where you can insert a chapter point. B: Insert chapter is Not possible means you are on a B frame and cannot insert a chapter there. P: Insert chapter is not possible means you are on a P frame and cannot insert a chapter. B: Insert chapter is possible is sometimes displayed too. Below these are the normal navigational buttons, Play, Pause, Stop, Back 1 frame, rewind, fast forward, forward 1 frame and toggle audio.
You have some Edit buttons below the preview screen that you can use also. Set start frame, begins a selection at the current selected frame. Move to start frame will move to the start frame that was set. Previous and Next just let you navigate through thumbnails. Set as end frame will set the end frame in a selection. Move to end frame will move to the end frame that was set. Cut will cut the selection (from start frame to end frame) from the video, this will NOT show up on the output DVD. Add current frame to chapter will add the current frame to the Chapter point list. Edit menu just has a small few extra options like the ability to cut everything except the current selection that has been made. Adding chapters is next.
Adding Chapters
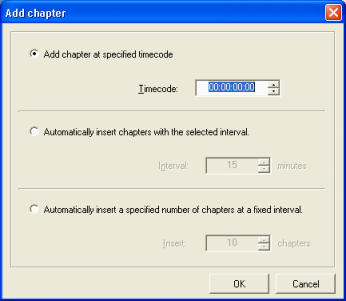 On the Chapter cut edit screen below the Chapter list is an Add and Delete button. The Delete button will delete a selected chapter but the Add button can be quite useful. A little popup window allows you to do one of three things. Firstly you can Add chapter at specific timecode. This means that whatever you put in the timecode, a chapter will be added at the nearest possible frame. Automatically insert chapters with selected interval lets you select chapters after a certain amount of time like every 15 minutes. Automatically create a specified number of chapters at a fixed interval will add the amount of chapters you select to relevant places in the video stream. So as you can see this little popup window is quite useful. Next we will look at track settings.
Track Settings
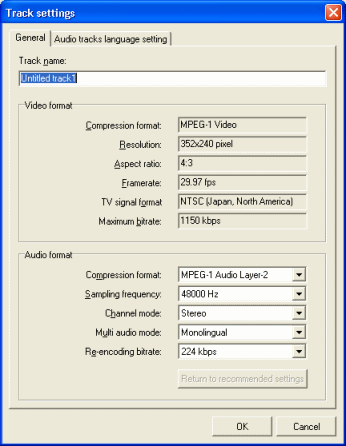 Since you have now added a clip and added chapters to it and done any other editing you need, we can now look at the track settings, so go back to the Source Setup window and click settings on the track button (it will probably be labeleduntitled track 1). The Track name can be changed to whatever you want.
The Video format information is first. The Compression format will tell you if it's MPEG-1 or MPEG-2 video. The resolution will have to be either 352x240, 352x288, 704x480 or 704x576 to be accepted by TMPGEnc DVD Author. The Aspect Ratio, framerate, TV signal format (either NTSC or PAL) and Maximum birate are also shown. This information more than likely will be locked and cant be changed. The audio settings can though.
The Audio format information is very important. The Compression format will allow you to pick a compression for the encoded audio (LPCM, MP2 or AC3 if you have the Plug-in). The Sampling Frequency has to be at 48000 Hz to be standard for DVD. Channel mode lets you pick between Mono and Stereo audio. Multi audio mode lets you pick if the audio is Monolingual (has only one language) or Bilingual (Has two languages) and the Re-encoding birate lets you select the birate of the output audio. You can specify what the language of your audio is under the Audio tracks language setting tab or if you have Bilingual audio you can specify what both languages are. With this much done we are now ready to create a menu. So click OK here and click the Create Menu button.
Written by: Juha Pihlajamäki
