
More DVD-Video Restrictions
Now that we have all our audio at the correct speed and samplerate we'll need to finish getting it DVD-Video compliant. Besides the requirements mentioned previously, there's one more that's good to understand. It has to do with how DVDs are organized into Video Objects (VOBs).
Video Objects
Each title on a DVD is a Video Object. You may be familiar with the files that contain these files also being referred to as VOBs. Although that's certainly what the file extension represents, in terms of DVD specifications a VOB is a title, not a file or set of files.If you've ever had the chance to use one of the more sophisticated DVD editing tools like DVDReMake Pro or VobEdit, you may have noticed that VOBs (titles) are sometimes divided up in strange ways on the disc. For example, not only is it common to have extras in a different titleset than the main feature, but often the extras are even divided between several titlesets. There are many possible reasons for this, but one of the more common has to do with using different audio formats.
VTS Restrictions
All the files in a given VTS (Video Titleset) must have matching audio streams. This means that if you have 6 VOBs in a VTS and one of them has 2 channel AC-3 audio encoded at 192kbps as the first audio stream, the first audio stream for every other VOB in that VTS must be 2 channel AC-3 at 192kbps. Since we have several MPEG files that came with audio encoded exactly that way, we have another reason to encode from MPA to AC-3 - even for PAL. If we're going to convert to a single standard to avoid authoring problems later, we might as well use the most standard format with the best hardware support. That's AC-3.Encoding AC-3
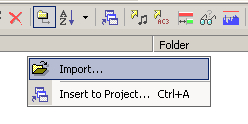 It's finally time to encode our files to AC-3. You'll need to have both DVD-Lab Pro and the TMPGEnc AC-3 Plugin installed to do this. Start by opening DVD-Lab Pro. Create a new project of any kind but don't save it since we're just encoding audio at this point. At the bottom of the window you'll see an assets section. The Video and Audio tab should be visible. Right click in the white area and select Import from the popup menu. You can hold down the [CTRL] key to select multiple files. If your audio files aren't all in the same directory you can repeat this as many times as it takes to get every WAV and MPA file you've saved loaded into DVD-Lab.
Correcting Samplerate
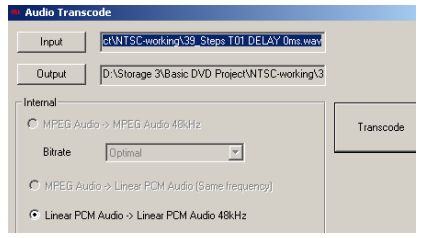
There are standard samplerates used for DVD-V audio streams. When DVD-Lab opens the audio files it will check each one for DVD compliance. A warning window will popup when it starts importing the audio for The 39 Steps because it's encoded with the wrong sampling frequency for DVD. Instead of DVDs 48kHz it's encoded at 44.1kHz, which is fine for CD Audio and VCD but not for DVD. Click the Ok button and you'll get another popup asking if want to run Audio Transcode Now. Click the Yes button and you'll get the Audio Transcode dialog. Click the Transcode button and wait for it to finish. When it's done you'll have uncompressed audio using the correct samplerate. The resulting Wave file can be encoded to AC-3 with the rest. The same thing will happen with the Arctic Giant.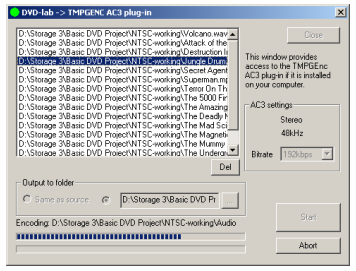
Using The AC-3 Plugin
Once you've imported all the MPA and Wave files from your sources, they can be encoded with the AC-3 plugin. DVD-Lab already has a menu item designed to operate various third party audio encoders, and setup by default to use the TMPGEnc encoder. On the Tools menu, select Transcode to AC3 (plugin). A dialog should appear with all the audio assets you imported. If you had also imported AC3 audio files they wouldn't have shown up here because they don't need encoded. Select 192kbps from the Bitrate dropdown (to match our existing audio assets. On the left side select the radio button marked Same as source if you want the AC-3 files created in the same folder as the corresponding source files. If you want to encode them to a different folder (I encode mine directly to my Audio Assets folder) you can click the button with ... on it and browse for a folder to put them in. Click the Start button and wait for the AC-3 files to be encoded.Next: Preparing NTSC Video or Preparing PAL Video
Version History
v1.0 2007.08.23 by Vurbal
v1.0.1 2007.09.04 by Vurbal
v1.0.2 2007.09.09 by Vurbal
v1.0.3 2007.09.09 by Vurbal
