
Change settings for Audio, Subtitles and Video Quality
Select Audio and Subtitles
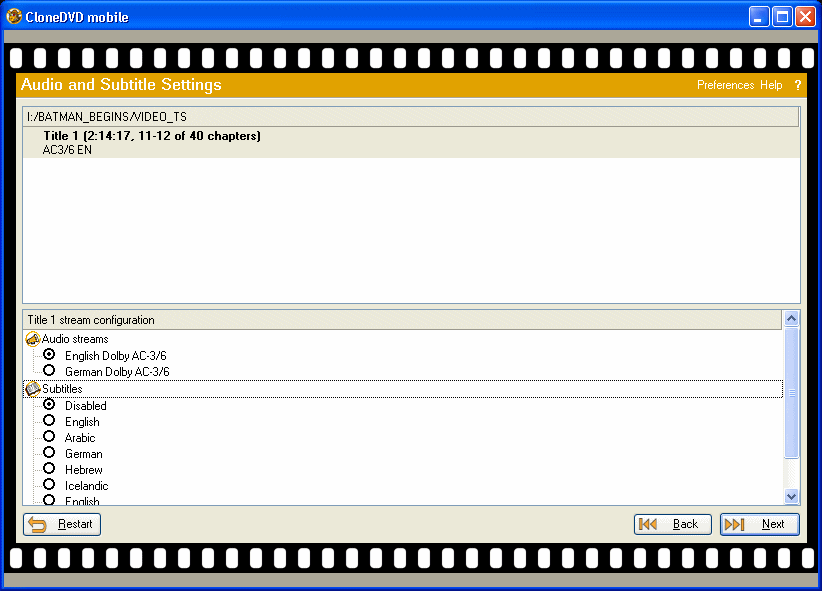 The next step is to pick out what Audio you want to keep and what Subtitles you want (if any). At the top, select the first title (usually you will only have one) and then from the list below, select which Audio Stream you want to keep and which Subtitles you want to keep.
Repeat this for any extra video titles that you may have chosen earlier on. When you are finished making your selection, click the Next button to get to the video settings.
Output Method Window
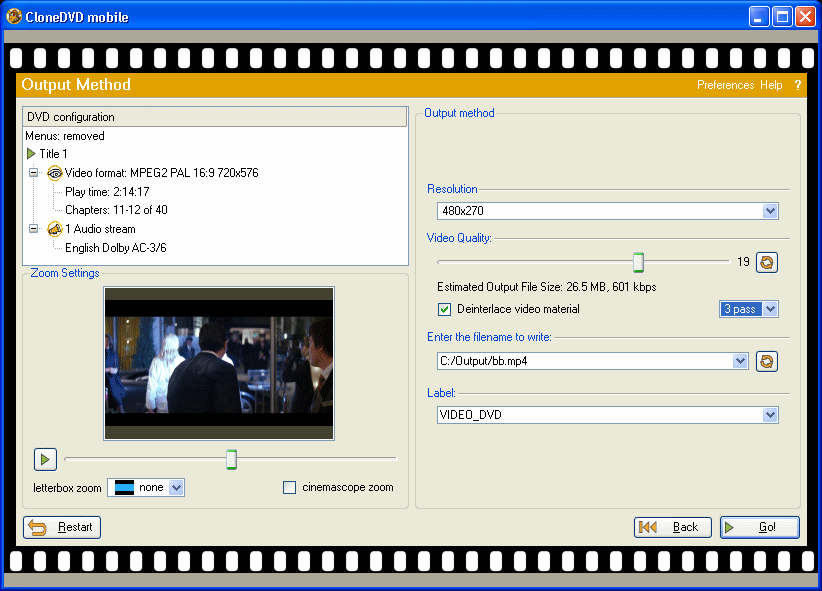 We are nearly at the end of the process now, but these settings are very important. What you pick and choose here will judge the overall quality of the output video, and so will judge the overall quality of it playing back on your multimedia gadget.
Let's just example this window a little bit before we get down to it. On the left there is more information on the video based on the settings you have previously chosen, under DVD Configuration. Below that we have some Zoom settings.
First on the right we have the Resolution below Output method. Usually this is predetermined to suit by the program. Below we have Video Quality, allowing you to slide the bar and judge the quality you want as well as how many passes of encoding. Then we have the output and label info.
Zoom Settings
The Zoom settings will allow you to Zoom in on the video for the output. This feature may be more important than you think. What if you have a letterboxed movie and a small iPod screen? Do you really want the black bars on such a small screen?
If your answer is no, then you can choose three options from "letterbox zoom"; none, half and full. Select half and full and keep your eye on the preview pane just above it. Alternatively, you can select cinemascope zoom. Whatever you think looks best, settle with it.
Output Method - Video Quality
Video Quality settings are obviously important. This is where you must choose between a fast encoding speed with lower quality results, or a slow encoding speed with higher quality results. First though, look at the resolution. CloneDVD Mobile will automatically select a Resolution for you that fits, but if there are other options in the drop down menu, then feel free to pick and choose. Generally, the higher the resolution the better the quality.
Now we see the Video Quality slider. Basically, the further toward the left, the lesser the quality and the smaller the output size, as you will see as an estimation below the slider. The further to the right, the larger the video file, but the better the quality. It's capacity vs. quality and is completely up to you.
Below this there is an option to deinterlace video, you should keep this selected for quality purposes. The last option allows you to select a number of encoding passes. A single pass will do the trick in much less than than 2 or 3 passes, but the great thing about multipass encoding is that the video stream is analyzed and CloneDVD Mobile can determine the best way to compress it. Basically, multipass encoding is superior in quality to single pass.
However, as you would imagine, multiple passes over the video will take extra time for the encoding process to finish up. However, 2 or 3 passes is highly recommended especially since your source is more than likely a high quality DVD, why ruin it?
Output setting
Now there are just some output settings to deal with before we are ready. Click the browse button, which looks like this --> When you are done here, click the Go! button to begin the process.
Written by: James Delahunty
