
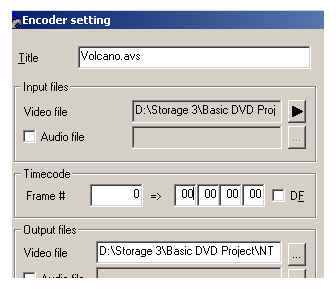
Encoder Setting
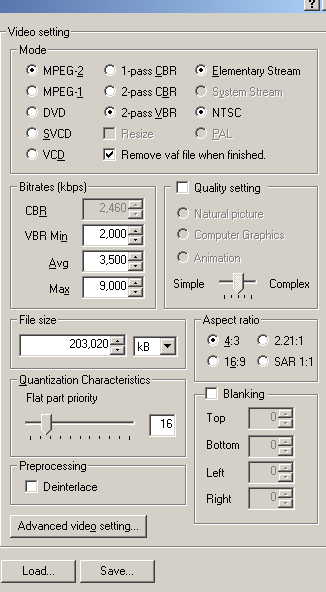
You can get to the Encoder setting page by either clicking on the active template at the bottom of the Template menu or double clicking on a source file that's visible in the main window. The main settings page has a lot of information on it. Fortunately a lot of it can be set once and forgotten immediately afterward. Some can even be ignored completely for as long as you have the software. For example, the Audio checkbox on the left side should be unchecked and left that way. CCE's MPEG encoder is known to be problematic, and except in rare cases you shouldn't have any need for that format anyway.On the right side, starting at the top, the Mode section should always have MPEG-2 and 2-Pass VBR checked. Since you won't have any audio in your output, Elementary Stream should be automatically selected. If not, make sure it is and leave it that way. Underneath the Mode section, Quality Setting should always be unchecked. Clear at the bottom, make sure Deinterlace isn't checked. Now you're left with a minimal number of settings.
Basic Settings
- Title
- This is a description of the settings you have open. If you're editing a template it will match the name used to save the template. If you have the settings for a particular input file open the name from the main CCE window will appear here
- (Input Files) Video File
- The video file you have the properties open for will be listed here. You can't change this from the Encoder setting dialog.
- Holding your mouse over the filename will bring up a tooltip with information about the video and audio streams of your input file.
- (Output Files) Video File
- The button to the right of the Video File field will bring up a file browser window you can use to navigate to whatever folder you'd like your new MPEG to be stored in. When changing this you can also specify the name of the output file if you don't like the default value.
- Timecode
- The timecode setting determines what the timecode of the first frame in the output video file is. Each box represents a different unit. From left to right the units are hours, minutes, seconds, and frames. I always set this to all 0's because that should be the timecode a video starts at.
- The manual for CCE Basic as well as CCE SP have always indicated that a value of all 0s will cause problems, but as I'm not aware of anyone ever reporting problems with all 0s, that's what I recommend using.
- Remove vaf file when finished
- The vaf file stores statistics gathered during the first pass of a 2 pass encode. The information in the vaf file is used to decide where bits should be allocated in the output MPEG video file on the second pass.
- Checking this box deletes the vaf file when the encode process either completes or is aborted. Since CCE Basic can't do the first pass, shutdown, and then run the second pass later, there's usually no reason not to have this checked.
- (Bitrates) VBR Min
- This is the lowest the bitrate in kbps (kilobits per second) for your VBR (variable bitrate) encode will get.
- It's good to have this as close to 0 as possible, but sometimes if the bitrate falls too low there will be visible problems in the output video. I recommend setting this no lower than 500.
- All numbers are in metric notation instead of binary, so 1000Kbps = 1Mbps. The lower case b denotes bits.
- (Bitrates) Avg
- This is the average bitrate for a VBR (variable bitrate) encode. It determines the final file size.
- When you change this value you'll see the resulting filesize displayed in the File size field below. Likewise, when the File size field is changed, the average bitrate will change automatically.
- All numbers are in metric notation instead of binary, so 1000Kbps = 1Mbps. The lower case b denotes bits.
- When editing a template, the File size field isn't available because there's no specific input file to apply it to. Average bitrate can still be applied to the template.
- (Bitrates) Max
- This is the maximum bitrate for a VBR (variable bitrate) encode.
- MPEG video encoded for a particular standalone player type will generally have an upper limit for maximum bitrate.
- All numbers are in metric notation instead of binary, so 1000Kbps = 1Mbps. The lower case b denotes bits.
- File size
- This is the size of the encoded video file. It's divided into a measurement and the units used for that measurement.
- Units with an i in them, namely KiB and MiB, are binary units where 1KiB = 1,024B and 1MiB = 1,024KiB.
- Units without the letter i in their abbreviation are in metric units. 1KB = 1,000B and 1MB = 1,000KB. B stands for Bytes.
- The arrow keys next to the number can be used to adjust the size. Changing this number automatically changes the average bitrate noted above, and changes to that bitrate are also automatically reflected in this one.
- When you're editing a template this field won't be available because templates don't have specific input file settings. You can still set the average bitrate.
- Flat Part Priority
- Flat part priority determines how high a priority solid surfaces are when bits are allocated during a VBR (variable bitrate) encode.
- Although large areas that are the same color don't need as many bits as fine details do, if the encoder doesn't devote enough bits to them you can end up with solid colored surfaces that appear to be made up of slightly different colored lines.
- Raising this too far will cause too few bits to be used on edges, resulting in tiny lines near those edges. These lines are known as mosquito noise, although technically both effects are artifacts (errors) rather than noise.
- Flat Part Priority can be adjusted from 0 all the way up to 100. Anywhere between 12 and 24 could be considered a good default.
- You're best off leaving it at it's default value of 16 unless you're having problems with artifacts.
- Aspect Ratio
- The aspect ratio should be the same for your input and output video.
- 4:3 (aka 1.33:1) matches the dimensions of an SDTV (standard definition television) and is also generally used for older film, some newer independent films, home movies, and most VHS or DV camcorders.
- 16:9 (aka 1.85:1) matches the dimensions of an HDTV and is the most common formats for film transfers.
- 2.21:1 is only useful for computer playback, but is much closer to the actual aspect ratio of many widescreen movies than 16:9.
- SAR 1:1 gives the output file the same aspect ratio as the input file has.
- Blanking
- As I'll explain later in this guide, you'll probably be using AviSynth to help CCE read your input files. Assuming you are, you should never have any need to set Blanking values.
- If you're not using AviSynth, turning Blanking on (by checking the box next to it) will tell CCE to turn the pixels on one or more sides of each video frame black. For example, setting a value of 2 for top and 8 for left will give you a file where the top 2 pixels of each column are black and so are the 8 pixels on the far left of each horizontal line will become black.
- This doesn't change the resolution. It just changes the color of existing pixels. This is useful if you have some type of noise or artifacts along the edges of the video and don't want to waste bits attempting to reproduce them.
Written by: Rich Fiscus
