
Finding and adding subtitles through Media Player Classic
In this guide we will teach you how to use the excellent freeware program Media Player Classic to find and add subtitles to your video files that may need them. We will show two different methods of obtaining these subtitles, and then how to play them along with your video.
Requirements
For this guide you will not need much else besides Media Player Classic and a working Internet connection. You will also either need the video file you want the subtitles for or at least the title of the movie, etc. You may also need WinRAR for some files that are packed in .RAR files so I will include that in the requirements.
Media Player Classic- You can download the latest version of the software here at Afterdawn.
WinRAR-Download the latest beta version here at Afterdawn.
If you are unfamiliar with WinRAR, please read this easy to read guide on some of the features of WinRAR: RAR playback and extraction guide.
Getting Started
First Method: You already have the video file
Ok so now that you have MPC installed as well as WinRAR lets move on to the guide itself :) The first method we will be going over is how to find and add subtitles if you already have the video file available and downloaded.
With MPC open, take your video file and open it in the program. You can do this by either dragging the file right into the playback window or by hitting Ctrl+O and browsing for the file. Once it is open, quickly pause it. You can do that by either clicking on the screen once or hitting the pause button.
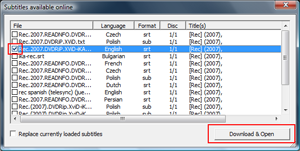
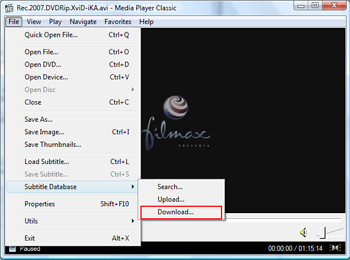
Now to get the subtitles, hit File then navigate to Subtitle Database and finally hit Download.... You will then be greeted with a Subtitles available online window which will show you all subtitles available for your selected video file. Look through and find the language you want and hit Download and open. From there just un-pause your movie and begin watching, this time with the subtitles of your choice. If the subtitles do not work, or are out of sync, it is always possible to go back and pick out a different one from the list although most work perfectly.

Your movie should now continue on with the subtitles playing. If you want to watch the movie at a later time or have to reboot or something of the sort, you can save the subtitles you just downloaded by going to File->Save Subtitle and saving the file with the name of your choice in the destination of your choice. When you start up the movie again, hit File->Load Subtitle and navigate to where you saved the file. Simple as that.
Second Method: You do not have the video file yet
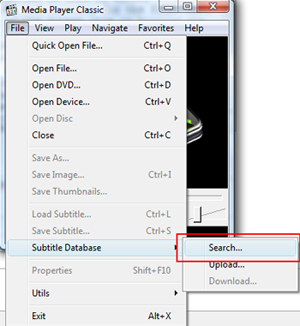
The second method, if you don't have the video yet but want to get the subtitles in preparation, is almost just as easy. For this part, make sure you have an active Internet connection and then hit File then navigate to Subtitle Database and finally hit Search. You should be led to a web page (a new tab in IE or FF) called http://www.opensubtitles.com/en.
Open Subtitles
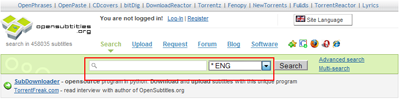
Now that you are at Open Subtitles, you want to search for the movie you are looking for. Take note of the language drop down button and choose the language you are looking for. It should be by default whatever language your browser is in but if it is not then make sure to change it. For my example, I have chosen *ENG for English. In the Search bar type in the name of the movie you are looking for and hit Search or just hit enter on your keyboard. You will then be led to a results page.
Working with the results
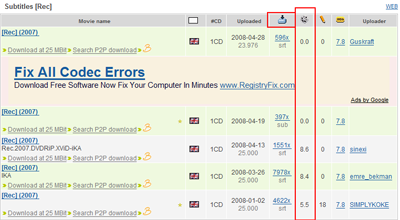
The results page can be somewhat tricky to decipher so I will go over the options. My results page brought me only 5 options, each exactly for the movie I was searching for. I have highlighted the two important columns (see picture at right) which are the download column and the rating column. As you can tell from the picture, one of the sub packs has an 8.6 rating and another has an 8.4. The other three have much lower ratings and I would not bother with them. Once you have found the highest rated one, or one that you think will fit your needs, hit the download button which is the only hyperlink in the download column. My example, the download button is 1551x.
Although not highlighted it is also important to note what kind of video file standard your movie is in, either PAL (25.000 fps) or NTSC (23.976 fps). You can do this by either right clicking on your file and checking the Properties tab. If it is unavailable that way, please use this guide here to find out the framerate of your file: How to use GSpot for video file details. The framerate of the subtitles will be under the Uploaded column and take note that the subtitles must be the same framerate as the video file or the subtitles will not fit the dialogue. For my example, the video file is in PAL format, so the 25.000 fps subtitle with the 8.6 rating is perfect. When you download, most will be packed in a RAR or ZIP file which is where WinRAR comes in handy. Extract the .sub or .srt file and there is your subtitle file, waiting to be loaded whenever you decide to play the movie. Hit File->Load Subtitle and navigate to where you saved the file.
Changing the Style
You are now done with the main part of the guide, but you now have some small options we can go over. That option is the ability to change the style and placement of your subtitles, although for me the default has always worked great.
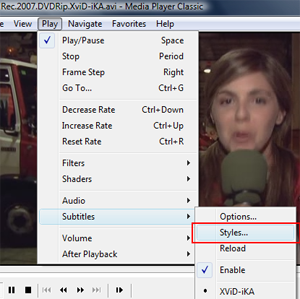
To access these options, hit Play then Subtitles and finally Options. From there you will be greeted by the Subtitles portion of the Options menu where you have three options, subtitles, default style and database. Database is just the default database (opensubtitles.com) so I would recommend keeping that as it is a great resource.
For Subtitles, there are very few options, but it will allow you to override the subtitles programmed placement and put them higher or lower on the screen or on a higher resolution video. I would recommend leaving this as is, unless the subtitles you downloaded are horribly positioned :-D
Now finally the changing style page is where you can play around with the subtitles to your liking. Here you can change the font, add borders, shadow, change the color of the font, change the size, and also move the positioning again. When you are done here, hit Apply and finally OK and you are finally done.
Finishing Up
Ok well that concludes our finding and adding subtitles guide and I hope it was informative. Media Player Classic is a great video player, and I would recommend it for all users who are tired of using bloatware products such as Windows Media Player.
There are also a few terms that I feel are good to read into especially when dealing with subtitles and I will list them here with links to full descriptions. Of course this optional :)
.SUB- A .sub file is one of three files that make up a CloneCD Image File. There should also be a .img file and a .ccd file. A .SUB file stores sub channel data on all tracks of the CD. It must be used with the .IMG file and the .CCD file to properly burn the contents to a CD.
.SRT- .srt is the standard subtitle format produced by SubRip and is supported by virtually all subtitle manipulation and playback tools. Recommended player that supports the format is the open source media player Media Player Classic.
If you have any other questions or comments, please visit our Discussion Forums and post it there.
Version History
v1.0 -- First Version Published-- by DVDBack23 (29/06/2008)
Written by: Andre Yoskowitz
