
How to sync your iPod Touch or iPhone without using iTunes

In this simple to follow guide we will teach you how to sync your new iPod Touch or iPhone without using Apple's iTunes platform. For this guide we will use the lightweight and very flexible audio/video player Winamp. This program is free as is the open source plug-in we will be using to get your media player to sync.
Requirements
Winamp Full- Nullsoft Winamp is a fast, flexible, high-fidelity media player for Windows. Winamp supports playback of many audio (MP3, OGG, AAC, WAV, MOD, XM, S3M, IT, MIDI, etc) and video types (AVI,ASF,MPEG,NSV). Winamp has a nice, sleek interface, a handy media library, and lots more.
mlipod plug-in- This plug-in is the most important, as it is what makes your Touch viewable by WinAmp. Make sure to download and install the latest version.
If you have an iPod Touch then Winamp and the plug-in is all you need but if you have an iPhone than there have been reports that you will need to have a few of the MSI files from an iTunes installation available or it will not work. If that is the case, then please download and install iTunes, although you will never have to open or even use it.
iTunes- iTunes is a media player and organizer software for Windows platform from Apple that allows tight integration with the iPod players.
Introduction
Before getting to the actual method of syncing the iPod Touch or iPhone with WinAmp it is important to thank the developers of the plug-in, the boys over at Sourceforge.. They have also compiled a list of what is currently working which includes:
* Automatically recognizing iPhone after attaching it
* Reading iPhone database
* Transfer songs or playlists to iPhone
* Creating/rearranging playlists on iPhone
* Album art, cover flow
* Gapless playback
* Podcasts, Audiobooks
* Sync ratings and playcounts to iPhone
* Transfer songs from iPhone to PC (aka reverse sync)
* Deletion of tracks from iPhone
* Database cleanup tools, finding and removing orphan tracks etc.
* Free space calculations. This means, if your iPod is getting too full, you will correct error messages now.
* Updating progress meter during transfer of a huge file
Getting Started
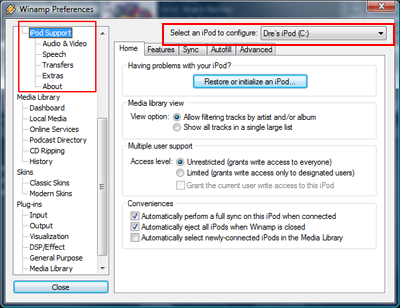
Now that you have installed WinAmp, the plug-in, and possibly iTunes we can begin. If you have not already imported all your music to WinAmp please do so now. Open WinAmp, hit Ctrl+P and you will be greeted by the Preferences page.
Plug in your iPod you want synced and make sure it shows up in the top right under Select an iPod to configure.
Under the iPod Support tab I have not found anything that needs to be changed from the default, but by all means look though to see if there is anything that caters to your needs. There is also the option to restore the iPod to its default state to start fresh if you are so inclined.
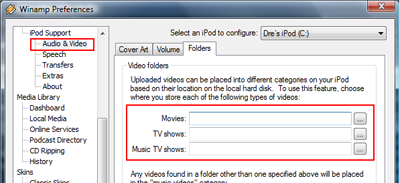
In the next tab, the Audio & Video tab, there is one setting that can be edited and that is in the Folders tab. From there you have the option to split your videos into Movies, Music Video and TV Show folders and have them separated that way when the device is synced. Of course you will have to manually separate your videos into these folders so if you do not care then leave this blank. If you have not added your videos to WinAmp yet, this would be an optimal time to do so.
Syncing your device
After you have made sure the device connects (it shows up in the preferences page), restart Winamp and re-connect the device you are trying to sync. This time underneath the player, a small screen (as pictured) will show up and show that their is a transfer of metadata in progress. Once that is done, you will be able to sync the device.
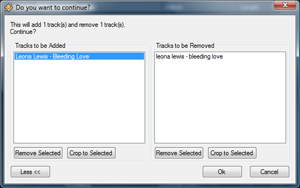
If this is your first time syncing the device then then next screen could potentially have thousands of songs and videos. It will automatically select all the tracks to be added from what is in your media library but you can selectively remove tracks if you choose to do so. From that point all that is left to do is hit OK and let the syncing do what it does. This could take up to 20 minutes depending on how much content is moving to your iPod. Once it is done, you have successfully synced your iPod using WinAmp :)
Finishing Up
From there you can eject your device as you normally would from WinAmp and then there is one last step before all of your newly synced content can be played. You have three options, all of which work if your iPhone/iPod Touch are jailbroken or not.
1. Start the music application and then hold the Home button for about 5 seconds, "killing" the application and forcing your device back to the home menu. When you restart the music application all of your newly synced content will be there. If that does not work, then option 2...
2. Turn the iPod/iPhone off completely by holding the home and standby buttons for a couple of seconds and then using the touchscreen to "Slide to power off". Then turn the device back on and check the videos and music to see if they are available.
3. This third option is for users with jailbroken devices that have Summerboard installed. Simply hit restart from the Summerboard options and the content will show up. Please note however that you will lose your usage data on the iPhone.
Extras with mlipod
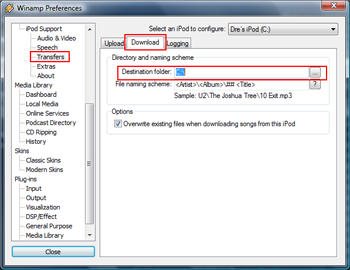
Another interesting feature of using WinAmp and mlipod is that you can grab the music that is already on the iPhone and bring it to your computer. This is useful if you ever have to reformat an HDD and want all your music back easily. From what I can tell however, this only works with the iPhone and not with the Touch, currently.
Head back to Preferences, to the iPod Support and finally to Transfers. Head to Download and select the directory you want to save the files to. From there you can transfer the files like any other portable player.
Well that is all for this guide and how to use one of the best Media Players around to sync your iPod Touch or iPhone. Using this method, all of your files can remain in the format they are and not transcoded to Apple AAC. You also are not forced to use iTunes, which is always a plus.
I hope this guide has been helpful and informative and if you have any questions please visit our Discussion Forums and ask there.
Version History
v1.0 -- First published -- July 21st, 2008 by DVDBack23
Written by: Andre Yoskowitz
