
AviSynth Script Creator
At a very basic level, AviSynth sends video, one frame at a time, to the XviD encoder. Besides simply telling the encoder what's in the video file, AviSynth can also be used to re-create original film frames from telecined video, deinterlace, sometimes mask imperfections in the source, transfer, or DVD encode, and occasionally aid compression. If you find yourself setting up very similar scripts you may want to look into creating profiles to save time.
Video
Near the top of the window in the Options tab, under the Video Input field, is a button that can be used to re-open the video preview if you close it before you're done and need it back. Below that is a dropdown list for Input DAR. The Input DAR, or Display Aspect Ratio, for a DVD will be either 4:3 for fullscreen or 16:9 for widescreen. MeGUI should already have populated the correct value here. If the movie is widescreen you can either encode to the correct aspect ratio (AR) for the movie or encode an anamorphic video. Your choice will probably depend on your playback device or software. If you want an anamorphic encode check the box next to Clever (TM) anamorphic encoding.
Resolution Crop
At the bottom of the Options tab you can add lines to your AviSynth script. Check the box next to Crop to remove extra black borders. If you check the AutoCrop box MeGUI will suggest settings that will remove all black borders. The video player window will also be updated to show white where the borders were removed. The Resize checkbox enables lowering the resolution. If you check the Suggest Resolution box MeGUI will suggest a resolution based on a Pixel Aspect Ratio (PAR) of 1:1. This means a 720x480 fullscreen DVD would be re-encoded to 640x480, and widescreen movies could be any number of different resolutions, depending on the amount of cropping and the original AR. If you're not sure what resolution to use it's a good idea to let MeGUI decide for you.
Filters Tab
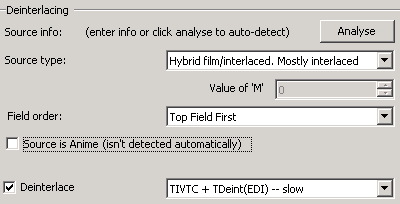 On the Filters tab are options for more advanced video processing. If you don't recognize any of the options (Field Order, Deinterlace, Decimation, Noise) you should either stop and do some research before you change settings here. If you know the values for all these settings for sure you can set them yourself. Otherwise click the Analyse button and wait for MeGUI to figure out what you have. If you're playing back your XviD file on a computer monitor you should make sure that either the source is progressive or it's deinterlaced. If you're deinterlacing you need to make sure that MeGUI has picked the best option available. If the value in Source Type looks right the deinterlacing approach selected will be the best available without manually editing the script.
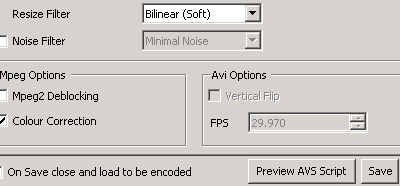 If you're resizing you can select the resize filter to be used in the Resize Filter dropdown. Like other options on this tab, if you don't know what the option does leave it alone. If your source is anime make sure to check the appropriate box. Also, check the Colour Correction checkbox. In order to verify that the script is correct, click the Preview AVS Script button at the bottom of the window. The video player will be updated with the script you'll be encoding from. Use the Play button to watch the video in motion or the >, <, >>, and << buttons to move one or more frames forward or backward.
At the bottom of the AviSynth Script Creator window is a checkbox that determines what happens when you save an AviSynth. If the checkbox marked On Save close and load to be encoded is checked, as soon as you save the script it will be loaded for encoding. Leave this checked the first time through. If you want to create more than one script at a time in the future you can change it.
Written by: Rich Fiscus
