
How to play MKV files on the PlayStation 3 (MP4)
Currently the PlayStation 3 does not have native playback support for HD files such as MKV (Matroska) and therefore in this guide we will teach you how to store that MKV file in a supported container such as MP4 or AVI. By doing this method, we are simply removing content from one container and placing in a supported container, thus avoiding the lengthy process of re-encoding the whole video. Also, for this process we will be using only freeware products.
Requirements
The following software table is all the programs you will need if you are following all pages of this guide. There are programs if your file is MKV and programs for if your file is DivX or XviD. There are programs to check the info of your media file, as well as programs to re-encode your audio. Simply, every program you could possibly need is listed here and I would recommend downloading all of them, even if you don't end up using them.
| MKVToolnix | This is a software package of tools for MKV files provided by the team behind Matroska. |
| MKVExtractGUI | This is a GUI for MKVExtract.exe which is found in the installed directory of MKVToolnix. |
| Media Info | This is a video file information tool. It will tell us about the streams container in our MKV files. |
| Nero AAC files | These are free files for encoding/decoding AAC streams provided by Nero AG. |
| MeGUI | This is a frontend program used to accomplish many tasks including encoding and muxing. |
| h264info | This tool can change the level setting of an AVC stream if required. |
| MP4Box | This is a command-line based tool for creating MP4 files. |
| YAMB | This is a GUI for MP4Box. |
| WinRAR | This item is required to extract files from some of our download archives. |
| VirtualDubMod | This is a modified version of the popular VirtualDUB tool. This supports opening and saving MKV. |
Step 1 - Find important information on MKV streams |
Using Media Info
Now that you have downloaded and installed MediaInfo, open it and check the interface for a minute. It should be pretty straightforward and there shouldn't be much for you to change by way of options unless of course you are more comfortable with a language other than English.
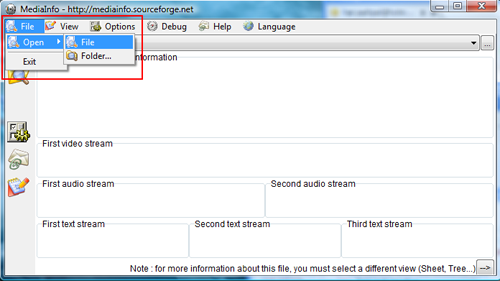
The first step is to open up the MKV you want to re-encode (or other video file for that matter). There are a couple of ways to do that. You can either drag and drop the file into the program, go to File->Open->File or hit the first icon under File, which is the Select a file to study button.
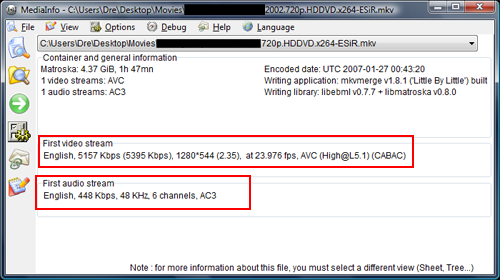
You will now see all the info from your file and there are a few that you must take note of. As you can see, the file is in an MKV container but is also an AVC, which is very common for files with such a high resolution as this file (720p). Unfortunately you can note that the video is in High@L5.1) which will be a problem as the PlayStation 3 can only play up to level 4.1. This is easily corrected later however and we will go over it. Also the audio is AC3, which is fine as the PlayStation 3 will play it flawlessly. If you file has DTS audio then you will have to first follow this simple DTS to AC3 guide here on Afterdawn. If your file is not AVC and is instead an XviD/DivX then you can feel free to move onto the second page of this guide as the remainder of this page is for files with AVC video streams :) That is all for MediaInfo for now, but I would recommend keeping it open in the background.
Step 2 - Prepare MKVExtractGUI |
MKVToolnix
Once you have run through the installation of MKVToolnix, you now should be left with a start menu group for it that allows you to access MKVmerge and MKVinfo GUI. However, what I want you to do is instead navigate to the installation directory of MKVtoolnix. In most cases, and in the picture shown with this text, this directory is C:\Program Files\mkvtoolnix
If you cannot find the installation directory, then click Start --> All programs --> MKVToolnix. Right-click on the MKV merge icon and click Properties. From here, click the Shortcut tab. Now click the Find Target button and the installation directory should open much like the image accompanying this text.
Keep this folder open now, as it is time to copy in the files from the MKVExtractGUI RAR archive.
Setup MKVExtractGUI
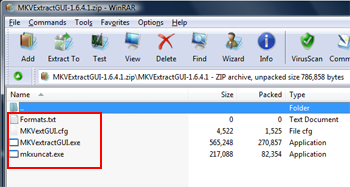
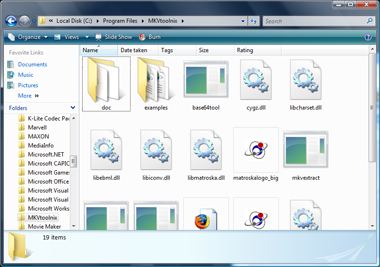
Download MKVExtractGUI. You will get a RAR file. You may need to install WinRAR to open it as seen in the picture beside this text. Once you get it opened, you will notice there are four files there, mkvuncat.exe, mkvextractgui.exe, mkvextgui.cfg and formats.txt.
We now must copy these files into the installation directory of MKVtoolnix which you should already have open from the last step. To extract into this folder in the easiest way possible, simply select all the files in WinRAR (CTRL + A) as shown in the picture, and now drag and drop these files over into the folder.
Once that is done and the files have been successfully extracted from the RAR archive and appear in the MKVtoolnix folder, you can close WinRAR again.
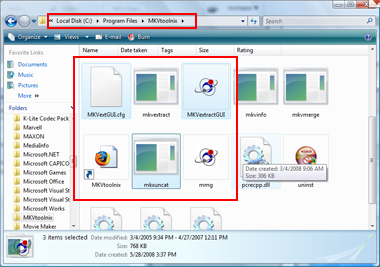 Now as you can see the four files will be apart of the MKVtoolnix folder. The reason they had to be copied is that mkvextract.exe is part of the mkvtoolnix installation. As a Graphical User Interface for mkvextract.exe, what we have just done will speed things up and simplify the process overall for a user of any knowledge level with computers. Make sure to keep this program files folder open as we will need it for the next steps.
Step 3 - Extract Video and Audio streams from MKV file |
MKVExtractGUI
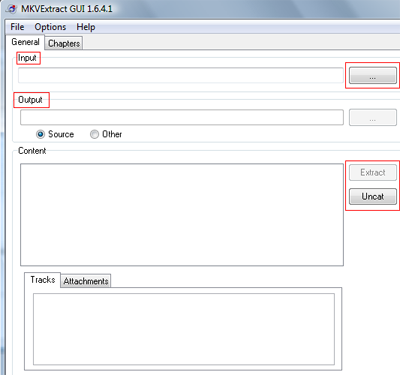
Hit the MKVExtractGUI.exe. Once again the interface should be pretty straightforward, and there aren't even too many options. There is an input field and output field, a box to show details of the MKV files' contents, an Extract button and Uncat button and a small box with more information.
Click the button beside the input field to attempt to open your MKV file.
Identifying your video
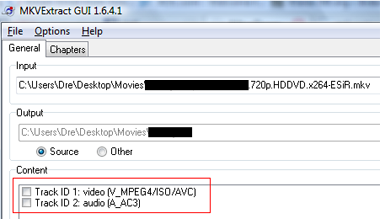
You should now be able to see some streams in the Content box like in the image (click to enlarge). If streams did not actually display, then attempt clicking the Uncat button. Please note that this will mux an entirely new MKV file in the same folder as the source with a slightly altered filename (an added 0), so make sure you have enough space for that. Give it time to complete and when you have a file almost exactly the same as your original, open it with MKVExtractGUI and this time it should work.
Now, look at the content. For this example, the video stream is "V_MPEG4/ISO/AVC". Notice the AVC, this indicates I have a H264/AVC stream, which will definetely playback flawlessly on the PlayStation 3. Again, if your results indicate XviD or otherwise, then go right to the the second page by clicking here so you can follow a VirtualDubMod method.
For the example, and as we figured out before, we have AC3 audio. This works great as well, as the PlayStation 3 can playback AC3 flawlessly as well. All that left now is to extract both the video and audio stream we need (extract all audio if there are multiple).
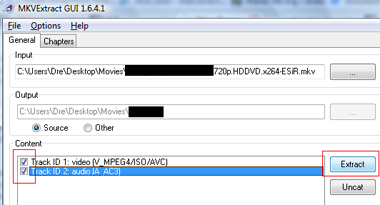
Tick the boxes beside any streams you want to Extract. You will notice the Extract button is now clickable. It is also worth mentioning that the Output folder for this process is generally the folder as the original file. If you want to set it elsewhere (like the desktop) then hit Other and choose the file you want your output files to save to.
Select all your streams and click the Extract button. Now give MKVExtractGUI some time to save these files to your disk (the larger the file the longer the process. For example, this process took me just under 4 minutes for a 4.37 GB file using a 2.2Ghz Core2Duo processor. Once the program is done, go to the folder where you saved your files and open them.
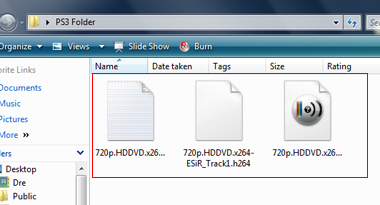
You should now be able to find the raw video stream, which will have a .h264 extension. For the example, which is also pictured, the raw h264 video file is titled 720p.HDDVD.x264-ESiR_Track1.H264 and my audio is 720p.HDDVD.x264-ESiR_Track2.ac3. The first file in the picture is a text file with Chapter information. If that text file is empty, feel free to discard it. Also, if your audio had not been AC3 and was instead AAC or MP3 it would have a corresponding file extension such as .AAC or .MP3 and so on. The filenames of the raw video and audio will be the same as the original file with the track number added to the end of the filename.
If you have multiple audio tracks, please play them one by one (VLC Media Player recommended) and determine which audio stream you want to keep. Mainly, if there are multiple audio tracks, they are either in different languages or a Director's Commentary track. We can only keep one, so make sure to keep the one you want most. Delete the rest and just keep the audio file that you require for the completed output MP4 file.
Converting AC3 to AAC
Although the PS3 can accept AC3, unfortunately at the time of writing, the muxer we will be using in the next step does not. In that case, I want to direct you to Step 4 of Dela's excellent preparing content from MKV for Xbox 360 guide here. When you get there, use the find function of your browser and search for Step 4 - Convert AC3 (multichannel) audio (or MP3) to AAC LC. After you have converted your files, please come back to this guide and we will move on to Step 4, the actual muxing. Please note however that for my own example I am converted my AC3 to MP3 instead of AAC, just as a personal preference for time and speed.
Step 4 - Mux H264/AVC video with AAC LC audio using YAMB/MP4Box |
Setup YAMB with MP4Box
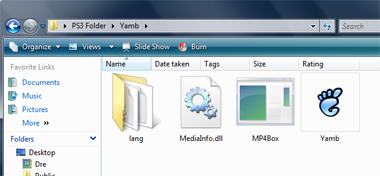
Download YAMB and MP4Box. The YAMB and MP4Box downloads are ZIP files that will open with WinRAR. Open the YAMB ZIP file first. Create a new folder anywhere on your hard disk drive and drag all the contents of the ZIP file into this new folder. When you have done that, now open the MP4Box ZIP file and drag mp4box.exe into the same folder that you placed the YAMB files into.
MP4Box is a command line tool and YAMB is a GUI that can utilize MP4Box.exe, making it a lot easier on you to make MP4 files. Now its time to open YAMB.exe.
YAMB/MP4Box
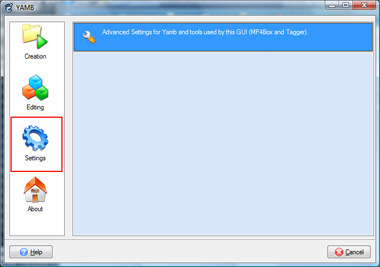
YAMB is a very useful and user-friendly GUI tool for MP4Box. It is incredibly easy to setup also. There is only one thing you need to do before you can use YAMB properly, and that is to specify where MP4Box.exe is, even though you have it in the exact same folder.
Click the Settings button on the left hand side of YAMB.
Specify location of MP4Box.exe
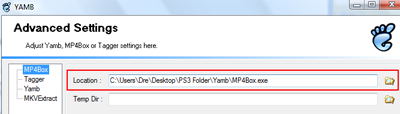
Click MP4box.exe on the left side of the window. Now beside the location field, click the small folder icon which will open an Explorer File Browser. Navigate to the YAMB folder that you created and double click MP4Box.exe. Hit Next and you will come back to the YAMB main page. Go back to Creation and double click the Click to create an MP4 file with multiple audio, video, subtitles and chapters streams option.
Add Video and Audio stream

You will now be able to select the files you wish to mux into a new MP4 file to play back on your PlayStation 3. Remember the .h264 file you got from MKVExtract and the .MP4 file you got from MeGUI containing your AAC audio? Click the Add button and Navigate to the folder they are stored in and select both.
Here comes a little snag however. Remember I noted before that the PS3 can only handle AVC up to Level 4.1. Our file is 5.1 however, so we will need to go through a quick workaround to get the file to 4.1.
Now, look at your file, if it is 4.1 then you are fine and continue with the guide. If it is a 5.1 high level, then you will need to head over to this optional page here that covers a workaround for this problem using a tool called h264info. When you are done, click the "Go back to muxing step" link on the page to come right back here.
Step 5 continued
The Muxing Process
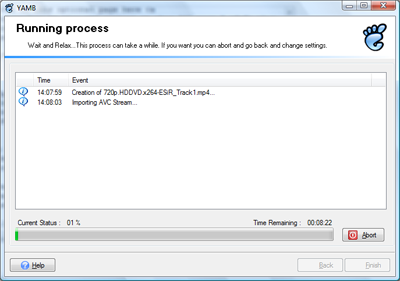
YAMB will now use MP4Box.exe to mux the video and audio stream that you used as your input streams. The amount of time this will take depends entirely on the speed of your computer and the files themselves. This final process took me about 10 minutes to complete, a much improved speed over re-encoding which takes about an hour and a half.
When it is finished, check the resulting MP4 file with something like VideoLAN client to make sure you have perfect sync and proper playback (note that HD playback may be poor on older computers). You can then burn it to a DVD-R or place it on a USB flash drive. The PS3 will read it as an MP4 and play it back.
That concludes the instructions for Extracting streams from an MKV file and muxing them into the MP4 container for the Playstation 3. If you have any questions, please visit our Discussion Forums for help.
Written by: Andre Yoskowitz
