
DVD Author Pro Interface - Source Screen
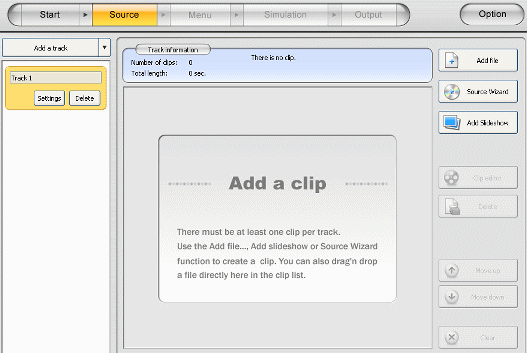 When you start a new project, you are taken automatically to the Source screen. It can be easily explained so let me try. On the left is a list; this is your track list. You can have many tracks on a DVD. You add clips to tracks. Clips are movie files. If you add multiple they will play back in the order they appearing the clip list.
The clip list is right in the center of the program. When you add files, they will appear here.
On the right side of the clip list you can see several buttons. Add file allows you to add a video file to the clip list. Source wizard is a wizard to import files from DVD etc. Add slideshow allows you to create a slideshow that will be added to your DVD. Clip Editor opens the cut-edit window. Delete allows you to delete a selected clip from the Clip list. Move Up and Move Down allow you to change the position of selected clips in the clip list. Clear will delete the entire clip list. So let's add a file to the program. Click the Add file button and open one of the supported input formats I mentioned in the Introduction & Requirements section of the this guide.
DVD Author Pro - Clip Information Window
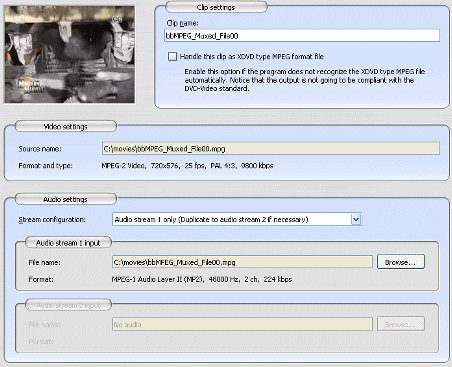 When you add a clip this is the window you will see (although I have cropped and resized the accompanying screenshot for layout purposes). The first thing you can do is edit the clip name to anything you want (this is really just for convenience if you are adding a lot of clips). Handle this clip as XDVD type MPEG format file can be selected if the source file is XDVD format, this will prevent the program from giving related error messages.
Under Video settings all you can do is change the Source name, also beside Format and Type is some information on the specs of your clip if you are interested to know.
Next are the audio settings. You have 5 options. No audio will completely leave out audio (even if the input file had an audio stream). Audio Stream 1 only, is the usual setting if you input an MPEG file with just one audio stream, it can also be selected if you are inputting audio from a separate source. Bi-audio (Left input channel to audio stream 1, right to 2) means that the left channel of a stereo audio stream will be copied to audio stream one, and the right will be copied to audio stream two, both of which can be selected with a DVD remote. This is necessary for files with two languages - one on each channel. Bi-audio (Right input channel to audio stream 1, left to 2) does the exact same thing but in reverse. Multiaudio allows you to select up to two audio streams to include on your output DVD.
Audio stream 1 input and Audio stream 2 input allow you to specify audio files to be included on the DVD with this clip. Make sure that the audio formats are supported by checking the Introduction & Requirements section of this guide. With that done, we can now edit our clip, click the Cut-edit and Chaptering button (not shown on the picture above).
DVD Author Pro - Cut-edit and chaptering window
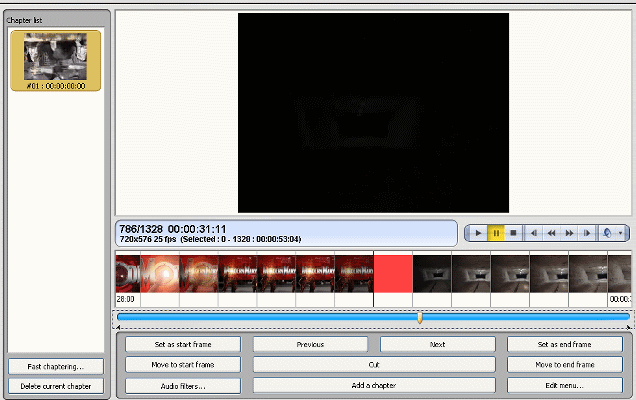 Ok, this is a pretty busy window so let me try to explain it first. On the left we have a chapter list, you can add chapters from frames of the video stream using buttons on this window. In the middle there is the preview window, any selected frames show up here or if you click the Play button, it will pay here. Below this are thumbnails for the video stream for easy selecting with the mouse. Below all this is a series of buttons you can use for editing the clip.
I'll just point some useful buttons. Set as start frame and Set as end frame allow you to make a selection of the video stream. If you select a certain part of the video stream, then you can completely cut this out using the Cut button in the center. Also if you make a selection and then exit the clip editor, ONLY the selection will be included on the DVD and the rest will be lost. Also as you can see the Add chapter button allows you to add a chapter on a current selected frame. There are two extra buttons here that are useful, Audio filters and Fast chaptering. I'll take a look at both now. Click the Audio filters button first.
DVD Author Pro - Audio Filters
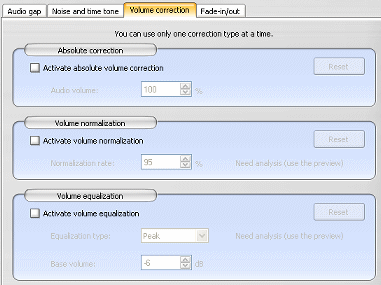 The audio filters included with DVD Author Pro are excellent. Since this software is made to give highest possible quality output, TMPG Inc. added these extra features for users who experience bad audio that may need cleaning that can be covered here.
I won't actually go into them but I thought it would be worth a mention. There is a volume correction option, Noise and time tone settings, Audio gap correction and fade-in/out effects. When you have selected anything, there is also an Audio filter preview button (not shown on this picture). Click that to make sure it sounds fine.
When you are done here, click OK and then click the fast chaptering button.
DVD Author Pro - Fast chaptering
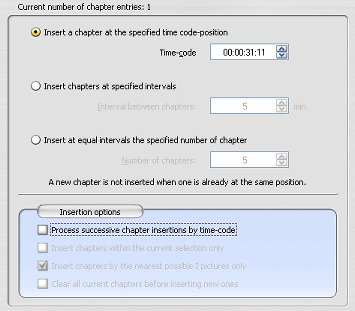 The fast chaptering window is another feature included for users to save time. If you would like to have chapters but don't want to use the cut-edit window to wade through the whole stream and add them one by one then this window is for you. The first option is Insert a chapter at the specified time code position. This only creates a single chapter at the time you give.
The second option is Insert chapters at specified intervals. This is a given number of minutes between chapters being added the entire way throughout your clip. Basically it is set at 5 minutes by default so if you selected it you would get a chapter every five minutes of the clip.
Insert at equal intervals the specified number of chapters allows you to set a amount of chapters you want added to the video stream. They will be added at equal intervals so the space between chapters depends entirely on the length of the clip. When you are finished, click OK, and then click OK on the cut-edit and chaptering window. This should take you back to the source screen.
DVD Author Pro - Source Screen 2
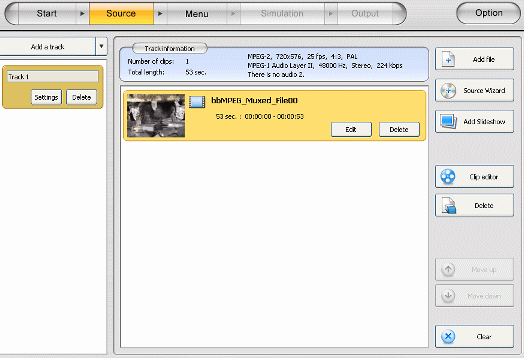 This is what the source screen should look like now. As you can see you now have that clip in the clip list. This means that that clip is included in Track 1. I am now going to add a slideshow to the DVD compilation, but I do not want it on the same track as my clip. Therefore I would have to click the Add a track button over the track list. This will give me a Track 2 and select if for me automatically. Now I need to Click the Add Slideshow button. Continue to the next page to see this process.
Written by: James Delahunty
