
Depending on the original source of your MPEG, you may want to perform some repair operations on it before or just after opening for editing, starting with Quick Stream Fix. Quick Stream Fix doesn't actually repair information in video or audio frames. What it does do is demux and remux the video and audio streams, making sure that audio and video are in sync and time codes are all sequential. Depending on your source, there may be no reason to do this. VideoReDo Plus also does this when it opens a file, but doing it ahead of time may avoid errors opening.
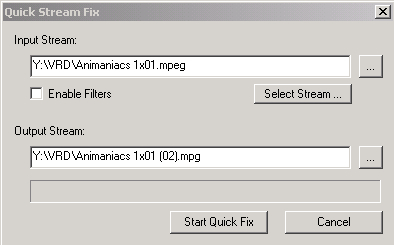 To use Quick Stream Fix before opening an MPEG first, from the Tools menu select Quick Stream Fix. The Quick Stream Fix tool asks for an Input Stream, in this case meaning a muxed file and not an elementary stream. Remember, VideoReDo Plus doesn't support elementary stream files as inputs, and since this is essentially remuxing with some basic error correction there would be no point in using demuxed files as a source. Click the button to the right of the text box for Input stream and the Open dialog will popup. If your video is located in one of the folders you've selected as your Favorite Places you can navigate directly to it using the icons on the left side of the dialog. Otherwise navigate normally to your MPEG to open it.
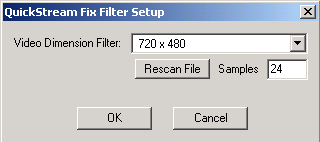 If your video may have frames that are a different resolution from the rest of the video you should check the box to Enable Filters. If there are frames with different resolutions VideoReDo Plus won't be able to edit it properly. If that occurs, you should run Quick Stream Fix again and change the Quick Stream Fix Filter Setup settings. The dropdown box at the top lists different resolutions found in the file. Select the resolution of the frames you want to keep and it will discard any frame that doesn't match. If it doesn't detect more than one resolution, but you know the frames are present, change the Samples setting to a higher number and click the Rescan File button by default VideoReDo Plus only looks in eight evenly spaced spots in the video for frames that should be removed. Click the button to select an Output Stream, which once again actually means a muxed file as this is a remuxing process. Once your "fixed" MPEG is done you can try opening it. If you already have a file open, the open file is automatically selected for the input for Quick Stream Fix.
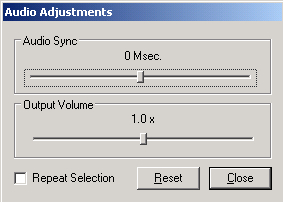 Once your video is open you should check it for audio/video sync. If the audio is out of sync at a regular interval throughout the file you can adjust it using the Adjust Audio option from the Tools menu. The Audio Adjustments dialog allows you to change the position of the audio, relative to the video to fix sync issues that are constant throughout a file. It also allows you to increase the volume in the output file. If Audio/Video sync gets progressively worse or better through the MPEG you might want to edit into multiple MPEGs and correct them individually afterward.
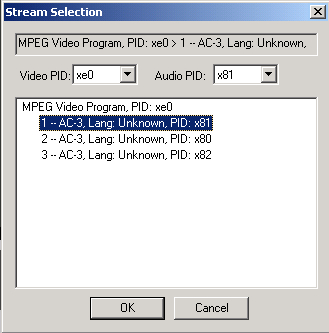 Since VideoReDo Plus can currently only edit and output a single video and single audio stream at a time, you may need to select a different stream for your output than was opened by default. If you need to end up with a video file with multiple audio streams you can edit the same source file more than once, selecting different audio streams but the exact same edit points each time, and output to Elementary Streams, overwriting the video stream each time. When you have all your streams you would need to mux them with a different tool, like DVD authoring software. Select Streams, from the Tools menu, shows you a list of video and audio streams that you can choose from. The currently selected streams are listed at the top. If there are multiple audio streams to choose from, the current selection will also be highlighted in the list. Click on the stream you want to use for editing and click the OK button to save your selection.
Using Quick Stream Fix
To use Quick Stream Fix before opening an MPEG first, from the Tools menu select Quick Stream Fix. The Quick Stream Fix tool asks for an Input Stream, in this case meaning a muxed file and not an elementary stream. Remember, VideoReDo Plus doesn't support elementary stream files as inputs, and since this is essentially remuxing with some basic error correction there would be no point in using demuxed files as a source. Click the button to the right of the text box for Input stream and the Open dialog will popup. If your video is located in one of the folders you've selected as your Favorite Places you can navigate directly to it using the icons on the left side of the dialog. Otherwise navigate normally to your MPEG to open it.If your video may have frames that are a different resolution from the rest of the video you should check the box to Enable Filters. If there are frames with different resolutions VideoReDo Plus won't be able to edit it properly. If that occurs, you should run Quick Stream Fix again and change the Quick Stream Fix Filter Setup settings. The dropdown box at the top lists different resolutions found in the file. Select the resolution of the frames you want to keep and it will discard any frame that doesn't match. If it doesn't detect more than one resolution, but you know the frames are present, change the Samples setting to a higher number and click the Rescan File button by default VideoReDo Plus only looks in eight evenly spaced spots in the video for frames that should be removed. Click the button to select an Output Stream, which once again actually means a muxed file as this is a remuxing process. Once your "fixed" MPEG is done you can try opening it. If you already have a file open, the open file is automatically selected for the input for Quick Stream Fix.Audio Adjustments
Once your video is open you should check it for audio/video sync. If the audio is out of sync at a regular interval throughout the file you can adjust it using the Adjust Audio option from the Tools menu. The Audio Adjustments dialog allows you to change the position of the audio, relative to the video to fix sync issues that are constant throughout a file. It also allows you to increase the volume in the output file. If Audio/Video sync gets progressively worse or better through the MPEG you might want to edit into multiple MPEGs and correct them individually afterward.Multiple Streams
Since VideoReDo Plus can currently only edit and output a single video and single audio stream at a time, you may need to select a different stream for your output than was opened by default. If you need to end up with a video file with multiple audio streams you can edit the same source file more than once, selecting different audio streams but the exact same edit points each time, and output to Elementary Streams, overwriting the video stream each time. When you have all your streams you would need to mux them with a different tool, like DVD authoring software. Select Streams, from the Tools menu, shows you a list of video and audio streams that you can choose from. The currently selected streams are listed at the top. If there are multiple audio streams to choose from, the current selection will also be highlighted in the list. Click on the stream you want to use for editing and click the OK button to save your selection.
Written by: Rich Fiscus
