
Now that you've loaded your video, repaired it if necessary, and gotten hints for finding commercials you're ready to remove commercials. If you haven't already done so, you should look through the Options window to see whether you're in Scene or Cut Mode, and how far you'll navigate using different mouse and keyboard combinations. You can find more information on that in the VideoReDo Plus Installation and Configuration guide.
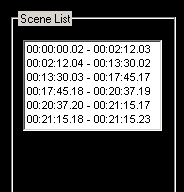 Removing commercials is a process of selecting either the video to keep or to be removed, depending on whether you're working in Scene or Cut Mode. In Scene Mode, navigate to the first frame of the section you want to add to your output file and click the Sel. Start button to mark the beginning. Navigate to the last frame you want selected and click the Sel. End button. Then click the Add Selection button at the bottom of the window. The selection will be added to the Scene List to the right of the video. If you're working in Cut mode you'll follow the same procedure to select the beginning and end of a section, but it will be a section you want to remove. The list of edits to the right of the Video pane will be called a Cut List.
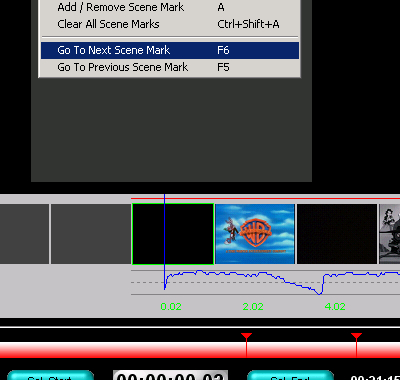 If you ran Ad-Detective you can start by looking at the area around each Scene Mark. I prefer to use the F5 (previous mark) and F6 (next mark) to move from one to another. If Ad-Detective found a block of commercials you can arrange your edits around it. I generally recommend having the navigation buttons and keyboard shortcuts set to different scales. If one navigates in frames and the other in seconds, it can speed up evaluating video quickly, while still being able to move through frames to set as endpoints for a cut or scene one at a time.
Once you have a little practice navigating through video with VideoReDo Plus you should be able to find and mark commercials quickly. It may take several tries to set the navigation distances to your liking, so experiment until you find settings you're comfortable with.
Once your edits are set you can output the new video file. You can also save the edits in a project file to be opened later. This is also the point where you can make a chapter file if you haven't already set VideoReDo Plus to create it automatically. To create the output file, select Save Video As from the File menu. If you haven't defined any scenes or cuts you'll see a dialog asking if you want to remux the entire file.
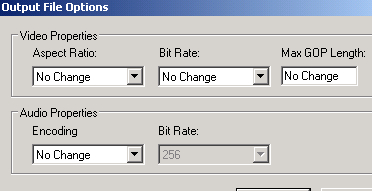 In the Save As dialog, there's an Options button in the lower right corner. Clicking this button gives you additional options for the MPEG output. Changing the value for Aspect Ratio or Bit Rate sets the MPEG header values for each one. Neither one actually changes the video or audio information. Setting Max GOP Rate ensures that no GOP in the video exceeds the number of frames you specify. This is normally used to make sure the video stream is DVD compliant but may require re-encoding quite a few frames. It will also usually result in a larger MPEG file. The Audio Properties section of the window allows you to change the audio stream encoding to MPEG or LPCM (uncompressed). If you're changing it to MPEG audio you can also change the bitrate.
Once your output file is done you'll see the Output Processing Complete dialog. It will tell you the number of video and audio frames in the new file, processing time, how many frames were processed per second, and the actual (not just header value) video bitrate.
Setting Edit Points
Removing commercials is a process of selecting either the video to keep or to be removed, depending on whether you're working in Scene or Cut Mode. In Scene Mode, navigate to the first frame of the section you want to add to your output file and click the Sel. Start button to mark the beginning. Navigate to the last frame you want selected and click the Sel. End button. Then click the Add Selection button at the bottom of the window. The selection will be added to the Scene List to the right of the video. If you're working in Cut mode you'll follow the same procedure to select the beginning and end of a section, but it will be a section you want to remove. The list of edits to the right of the Video pane will be called a Cut List.Ad-Detective Scene Marks
If you ran Ad-Detective you can start by looking at the area around each Scene Mark. I prefer to use the F5 (previous mark) and F6 (next mark) to move from one to another. If Ad-Detective found a block of commercials you can arrange your edits around it. I generally recommend having the navigation buttons and keyboard shortcuts set to different scales. If one navigates in frames and the other in seconds, it can speed up evaluating video quickly, while still being able to move through frames to set as endpoints for a cut or scene one at a time.Manual Commercial Detection
Once you have a little practice navigating through video with VideoReDo Plus you should be able to find and mark commercials quickly. It may take several tries to set the navigation distances to your liking, so experiment until you find settings you're comfortable with.
Creating The Output File
Once your edits are set you can output the new video file. You can also save the edits in a project file to be opened later. This is also the point where you can make a chapter file if you haven't already set VideoReDo Plus to create it automatically. To create the output file, select Save Video As from the File menu. If you haven't defined any scenes or cuts you'll see a dialog asking if you want to remux the entire file.
In the Save As dialog, there's an Options button in the lower right corner. Clicking this button gives you additional options for the MPEG output. Changing the value for Aspect Ratio or Bit Rate sets the MPEG header values for each one. Neither one actually changes the video or audio information. Setting Max GOP Rate ensures that no GOP in the video exceeds the number of frames you specify. This is normally used to make sure the video stream is DVD compliant but may require re-encoding quite a few frames. It will also usually result in a larger MPEG file. The Audio Properties section of the window allows you to change the audio stream encoding to MPEG or LPCM (uncompressed). If you're changing it to MPEG audio you can also change the bitrate.Once your output file is done you'll see the Output Processing Complete dialog. It will tell you the number of video and audio frames in the new file, processing time, how many frames were processed per second, and the actual (not just header value) video bitrate.
Written by: Rich Fiscus
