
| Complete Nero Vision 5 AVCHD Authoring Guide | You are viewing Page 2 of 4 -- Go to page 1 , 3 , 4 , |
Getting Started with Nero Vision 5
Ok, so now that we are more knowledgeable about the players in this guide, lets move on to the actual process. For that I am assuming you have Nero 8 installed and ready to go.
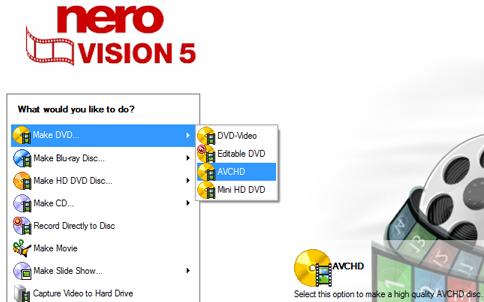
Open up Nero Vision 5 (either straight through, or through Nero Start Smart) and you will be greeted with a screen that has many options. Select Make DVD... and hit AVCHD.
You will then be greeted by Content page where you create and arrange titles for your project. You can capture video this way as well from HD camcorders but for right now we have some options to fix.
More options

On the bottom of the page, hit the More button and 6 more options will show up underneath it.
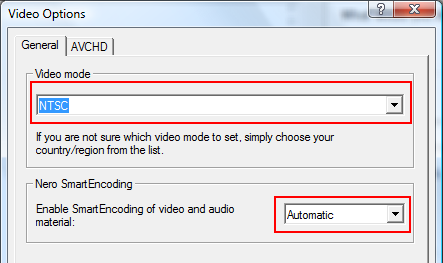
Hit the Video Options tab, and you will greeted by another window. Under the General tab there are two options that need to be set. The first is the output video mode you want for your file. The options are NTSC and PAL and if you are unsure which video mode you need, Nero conveniently allows you to scroll down to your country and select the video mode that way.
The second option that will need to be fixed is the enabling of SmartEncoding. It is by default at Automatic but should be set to Enable to allow Nero to assume what are the best settings to re-encode with. We can change those manually later anyways so no harm done.
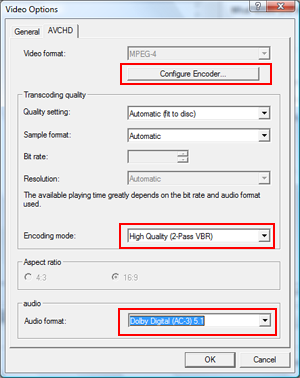
These next settings are important so make sure to pay careful attention. Hit the AVCHD tab an you will see another set of options. These options are mainly to improve the quality of the encoding done, so first hit Configure Encoder and change the setting to High. This will give you higher quality then Normal and will also not that much time to the total encoding process. If you are a real quality junkie and have a high performing computer, then by all means hit Highest. Not that the time of processing will be substantially longer!
You can leave the next two options on Automatic but for Encoding Mode make sure you select High Quality 2 pass VBR, as that will significantly improve final quality as well. Under Audio it is necessary here to change the format to Dolby Digital AC-3 5.1 as it will save you massive amounts of space during the re-encode and the format is compatible with all Blu-ray players including the PlayStation 3 which currently does not have support for full LPCM or DTS on AVCHD discs. When done hit OK and you will be returned to the Content screen.
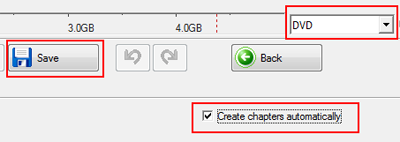
There are a couple of final options before we can finally start the actual project and they are seen on the picture to the right. The first is to check the DVD dropdown. This is the size of the disc you will be making the AVCHD for. There are really only two options, DVD and DVD-9. DVD is a single layer (4.37GB capacity disc) while DVD-9 is a dual layer (8.5GB capacity disc). This choice is really up to you depending on how big your input files are.
Underneath the DVD dropdown box, there is an option to create chapters automatically I would suggest hitting this as it allows Nero to create equal minute interval chapters for your video automatically. It is much easier than Nero's almost impossible method of custom adding chapters.
Finally there is the Save button. Save your project regularly to avoid losing anything.
On the next page we will finally get to the good stuff, starting with the input of your HD file.
| Complete Nero Vision 5 AVCHD Authoring Guide | You are viewing Page 2 of 4 -- Go to page , 1 , 3 , 4 , |
Written by: Andre Yoskowitz
