
Using Jubler to create or edit subtitles
Starting a new project
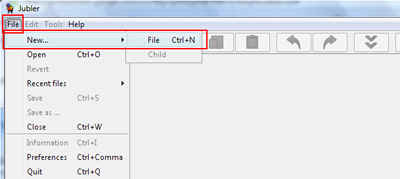
Open up Jubler and start a new project by either going to File -> New -> File or alternatively hitting Ctrl + N. The screen should then change somewhat to show that you have begun a new project.
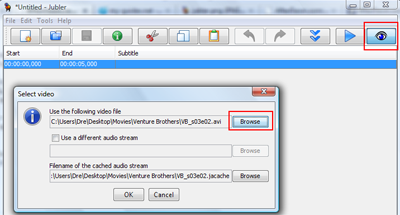
From here, click on the Eye icon and a new window will come up asking you to browse for the video file you want to add subtitles too. Do so and when you have found that file, hit OK.

At this point you should be greeted with a new screen that shows a preview screen as well as a waveform of the audio.
Fixing you preferences:
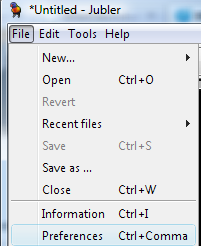
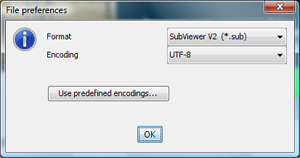
At this point, before we can continue, we need to change a few preferences, namely the output of your subtitle file and the frames per second that your video is in. To get to Preferences, you can either hit File -> Preferences or alternatively hit Ctrl + , (comma). The first tab in the preferences we need to explore is Load.
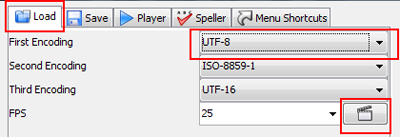
Under First Encoding set your option to UTF-8 if it is not there by default. If you are a Mac user move the option down to MacRoman or whatever language you prefer. Under frames per second, set the FPS of your video if you know it and if you don't hit the button to the right of the numbers and the program will find it for you and add it automatically.
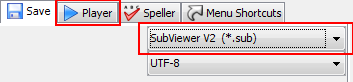
Move onto the Save tab, and change the Format to Subviewer V2 (*.sub) which I find to be the easiest format to use later on. Another very popular format is that of SubRip (*.srt) so feel free to use that if you are more familiar or comfortable with that format.
Although not pictured, there are a couple of options you can play with in the other tabs,, so lets do that now. If your preview is not showing, it is because MPlayer has not been located by the program. Hit the Player tab and manually lead the program to the mplayer.exe that should be in a folder wherever you saved it before. Next, head to the Speller tab and make sure aspell is selected. This is the built-in spell checker and is very useful.
Finally, hit Accept to save all the changes and we can get to creating the subtitles :)
Creating the subtitles for your video
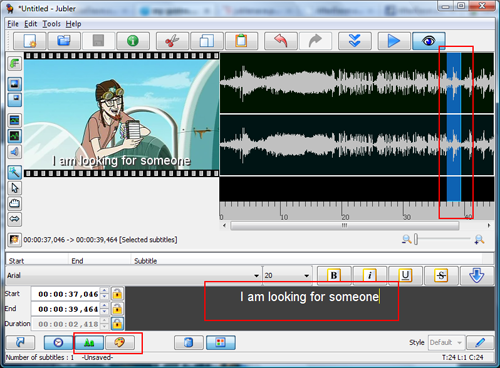
To begin you must first know where the first voice that needs subtitles is, so when you have figured that out, move the blue waveform bar to fit the area that needs it. If you need to be more exact, you can "zoom" in on the waveform using the magnifying glass right underneath it.
Once you have found the necessary area, drag the waveform together (from the left and the right) and begin typing the subtitle in the provided area. From here, you can edit the color, size, font, etc by hitting either the Aa button (for editing) or the color palette to change the color tones. More importantly, in the Aa menu when you are editing, you can use the directional arrows to move the subtitle to wherever you want it on the screen.
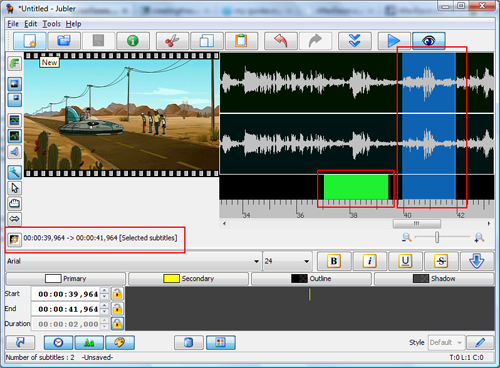
The next part is one of the best features of Jubler and that is the automatic selection of the next voice part of your clip. Hit the New subtitle after the current one button and the program will automatically move the waveform to the next area that has dialogue that may need subtitles. Old parts of the dialogue that have subtitles will show up as neon green under the waveforms. Move the area of the waveform to fit how long you want the new subtitle to be. From here, begin typing you latest subtitle and continue the process until you have completed the full video.
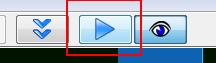
Before saving your newly created subtitle stream, it is important to preview what you have made. Hit the Preview button (looks like a Play symbol) and MPlayer will load and preview your video along with the subtitles you created. If it is up to your standards all that is left to is save the subtitle stream.
Saving your subtitles
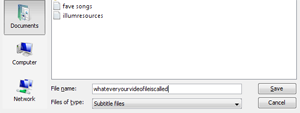
Go to File -> Save As... and make sure to save the file with the same name as the video file and in the same folder. That is optional but I find it makes it much easier to find them later when you need them.
If you plan to add the subtitles externally, than this is the end of the guide for you. However, if you want to embed them please move onto the next page where we use AVIdemux to embed the subtitles into the video file, hardcoding them.
Written by: Andre Yoskowitz
