
Burning image files to CD using CloneCD

There are many different types of image files around the Internet, the most popular being .BIN/.CUE, .IMG, .ISO, .CCD and .MDF/.MDS. But how do you burn these files to a CD? Luckily, there is an all-in-one program for burning these image files to CD and that program is CloneCD by Slysoft. For all those with past experience using Slysoft products know that the company makes exceptional programs and CloneCD is no different.
Requirements
All that is necessary for this guide is an image file you want to burn, a blank CD-R, and the program CloneCD.
CloneCD- You can trial and purchase the fully unlocked version there.
Download and install the software to a folder of your choosing.
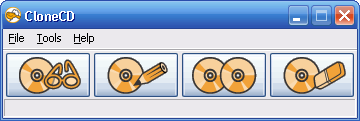
Ok, so lets open up CloneCD and check out the interface. Very simple right? :)
There are four options and I will quickly run through them.
Read to Image File
Selecting this option will allow you to make an Image File from a CD of your choice. You can use this option if you would like to keep the non-copyrighted contents of the CD on your computer or would like to send it to friends or upload it to file sharing sites.
Write from Image File
This is the option to choose if you want to burn an image file to disc. We will be using this option soon, so this description is short.
Copy CD
Select this option if you would like to do a 1-1 copy of one of your CDs as a backup. This option only works if you have two drives that can read and write CDs.
Erase CD
Use this option if you would like to erase data from a CD-ReWritable disc.
Settings
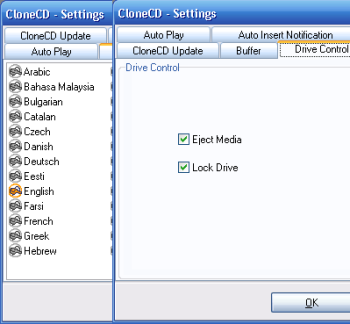
Now lets press S on the keyboard to get to the settings section of CloneCD.
First, press on Languages and select whatever language you are most comfortable with.
Second, press on Drive Control and make sure both boxes are checked.
The other tabs should be left on default but feel free to look through them if you so choose.
That is all you need for settings so you can press OK to close out of the section.
Write from Image File

Well, lets get down to it then.
Click on the second option in the interface, Write from Image File.
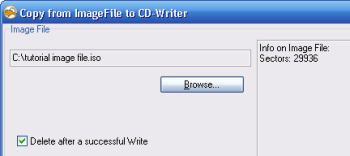
Hit the Browse button and navigate to where your Image File is saved. Make sure when browsing that Files of Type is set to Image. For this guide I am using a .ISO but it works the same for all different image files.
Once you have found the file, information on it will appear to the right. For example, my file is only 30 MB, hence the "29936 sectors."
When you are done with that, press Next to move onto the burning part of this guide.
Burning and Finishing Up
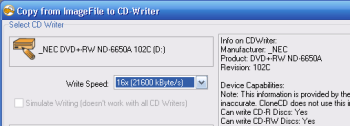
Select the CD/DVD writer you want to burn with, and insert a blank CD-R.
My recommendation is to set the burning speed to 16x for all CD burning, but the choice is up to you.
When you have selected your writer and burn speed, hit OK and begin the burning. This should take only a couple of minutes depending on how large of a file you are burning.
When the program is done, it will eject the CD and the process is done. Time to enjoy your newly burnt CD :)
Finishing Up
We hope this guide has been informative and if you have any questions or concerns, please post them in our Discussion Forums.
Version History
26th November 2008, Completely redone layout (DVDBack23) V2.0
10th July 2007, First Version Online (DVDBack23) V1.0
Ok, so lets open up CloneCD and check out the interface. Very simple right? :)
There are four options and I will quickly run through them.
Read to Image File
Selecting this option will allow you to make an Image File from a CD of your choice. You can use this option if you would like to keep the non-copyrighted contents of the CD on your computer or would like to send it to friends or upload it to file sharing sites.
Write from Image File
This is the option to choose if you want to burn an image file to disc. We will be using this option soon, so this description is short.
Copy CD
Select this option if you would like to do a 1-1 copy of one of your CDs as a backup. This option only works if you have two drives that can read and write CDs.
Erase CD
Use this option if you would like to erase data from a CD-ReWritable disc.
Settings
Now lets press S on the keyboard to get to the settings section of CloneCD.
First, press on Languages and select whatever language you are most comfortable with.
Second, press on Drive Control and make sure both boxes are checked.
The other tabs should be left on default but feel free to look through them if you so choose.
That is all you need for settings so you can press OK to close out of the section.
Write from Image File
Well, lets get down to it then.
Click on the second option in the interface, Write from Image File.
Hit the Browse button and navigate to where your Image File is saved. Make sure when browsing that Files of Type is set to Image. For this guide I am using a .ISO but it works the same for all different image files.
Once you have found the file, information on it will appear to the right. For example, my file is only 30 MB, hence the "29936 sectors."
When you are done with that, press Next to move onto the burning part of this guide.
Burning and Finishing Up
Select the CD/DVD writer you want to burn with, and insert a blank CD-R.
My recommendation is to set the burning speed to 16x for all CD burning, but the choice is up to you.
When you have selected your writer and burn speed, hit OK and begin the burning. This should take only a couple of minutes depending on how large of a file you are burning.
When the program is done, it will eject the CD and the process is done. Time to enjoy your newly burnt CD :)
Finishing Up
We hope this guide has been informative and if you have any questions or concerns, please post them in our Discussion Forums.
Version History
26th November 2008, Completely redone layout (DVDBack23) V2.0
10th July 2007, First Version Online (DVDBack23) V1.0
Written by: Andre Yoskowitz
