
| DVD to AVC with MeGUI Part 3 | You are viewing Page 2 of 5 -- Go to page 1 , 2 , 3 , 4 , 5 |
The Bitrate Calculator
Before a video encoding job can be created and queued you'll need to select a profile, which determines most of the settings required for x264 to encode. If the name of a profile doesn't mention Constant Quality, CQ, Constant Quantizer, or CRF it will be bitrate/size based. This means MeGUI will need to know what bitrate to use. If you don't already have a pre-determined bitrate you want to use the Bitrate Calculator can be used to add this to the selected profile so you don't have to edit it manually.
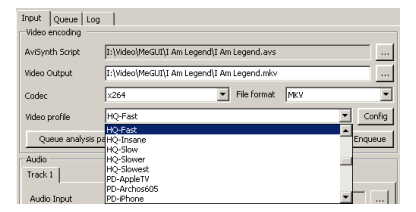
Select A Source and Profile
MeGUI includes a wide variety of profiles, most of which are optimized for computer playback. If you're going to be playing your files on something else, such as an iPod or Xbox360, you should make sure to look for a profile written specifically for your device. Otherwise your primary consideration should be the type of encoding. If you've just created your AviSynth script it will be listed as the AviSynth Script already. Otherwise you'll need to select it first. The playing time and number of frames will be automatically loaded in the Bitrate Calculator so you don't need to worry about them.
1 Pass Encoding
For single pass encoding it's best to use a CRF based profile like CQ-ASP_Q2_eq(crf). Although file size is unpredictable, if you reduce the CRF value used you'll get a smaller file. Setting CRF manually will be covered in more detail in Section 4 on Video Encoding. Although there are also single pass bitrate based profiles (any that say 1P with no mention of quality or quantizer), these tend to produce lower quality than either 2 pass bitrate based or constant quality encoding. It's best to stick to either CRF based encoding if you're not doing a second pass.2 Pass Encoding
The majority of profiles (all except 1P or Constant Quality in the name) encode in 2 passes to a specific bitrate. If you wish to reach a specific filesize these are the best profiles to choose. I'll be using HQ-Fast for my examples.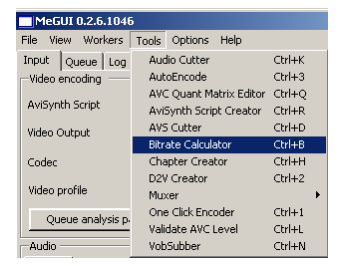
Starting The Bitrate Calculator
If you're using a Constant Quality profile you can skip to the next page where we'll look at Audio Encoding. Otherwise you should open the Bitrate Calculator from the Tools menu.
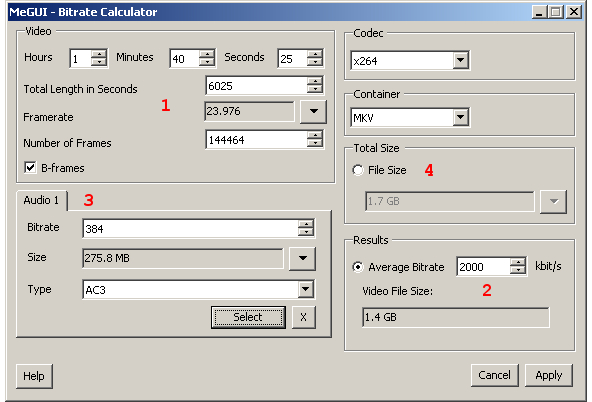 |
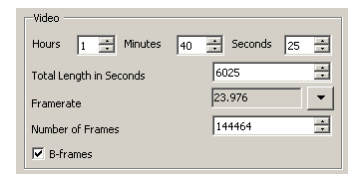
1. Length and Framerate
The length in both playing time and number of frames is displayed, along with the framerate. If you haven't loaded an AviSynth script for the Bitrate Calculator to get this information from you can enter the length and set the framerate manually.
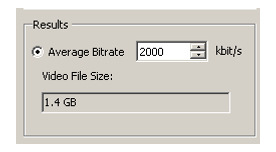
2. Average Bitrate
If you already know what bitrate you'd like to use for encoding you can enter it directly here. When you click the Apply button the bitrate shown will be automatically used to update the profile to create your encoding job from.
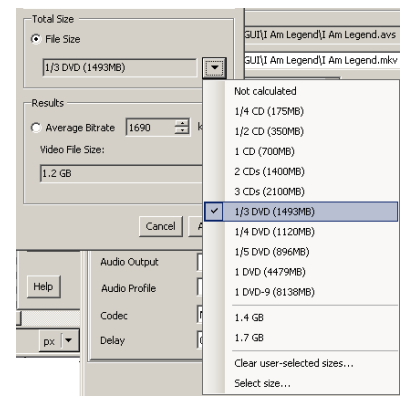
3. Encoding For a Specific Output Size
If you're encoding to fit on a particular media, like a percentage of a DVD or number of CDs, you can select it here. The bitrate calculated below will reflect the size entered minus the space required for audio (see below). Use the Select Size option to set a custom output size.
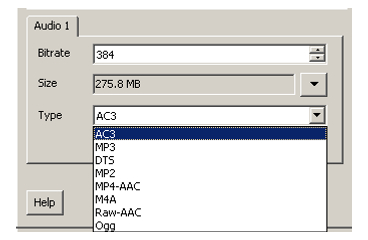
4. Audio Type and Bitrate
Obviously the only way for MeGUI to determine the output size with audio included unless it knows the total size of the audio streams. You can specify up to 3 audio streams. Since it's possible to use varying bitrates, and even audio formats for different streams. Make sure each stream has the correct settings for accurate output size prediction. To remove a particular track from calculations use the X button.
Loading Audio Files
If your audio is already encoded you can simply use the Select button to specify the audio stream that will be in your final file. This is particularly helpful if you're keeping the original Dolby Digital or DTS from your DVD since those files should have been created at the beginning of the process, along with the D2V project. MeGUI will detect both the Type and Bitrate for you.Transfer Bitrate Information To Your Profile
Once your bitrate is set you can click the Apply button to save the bitrate in your profile and close the Bitrate Calculator window. Now you're ready to start the actual encoding process for both audio and video.
Continued On Page 3Next we'll encode the audio, either using one of the encoders that's automatically downloaded by MeGUI or the free Nero AAC audio encoder. Page 3 - Audio Encoding | |
| DVD to AVC with MeGUI Part 3 | You are viewing Page 2 of 5 -- Go to page 1 , 2 , 3 , 4 , 5 |
Written by: Rich Fiscus
