
SVCD to DVD±R with DVD-Lab (From CD's)
If you have just gotten a DVD Burner and still have SVCD's lying around, you probably thought already of putting those SVCD's on DVD but the thought of re-encoding might put you off. Well, thanks to DVD-Lab, you can now put SVCD on DVD without re-encoding the video. Basically, SVCD resolution, which is 480x480 (NTSC) or 480x576 (PAL), not a DVD standard so some DVD Authoring Software like TMPGEnc DVD Author (at the time of writing) wont accept SVCD Video Streams. DVD-Lab will accept them with just a small warning. Whether the output will work or not depends on your Standalone DVD Player but most DVD Players will manage to play these Discs. The only other problem is SVCD encoded audio is 44.1khz. This is not a DVD standard either and the audio will have to be converted to 48khz audio. This Guide assumes you have SVCD's on at least 2 or more CD's (but of course will work if only on 1 disc), there is also a guide for SVCD MPEG files and CD Images on this site.
Requirements
VCDEasy - You need this to extract a TRUE MPEG file from your CD(s).
Womble MPEG VCR - You need this to merge multiple MPEG files to one MPEG file + encode the audio to 48hz (This can be skipped if you only have 1 MPEG file from 1 disc).
DVD-Lab - You need DVD-Lab to make and burn a DVD Compilation.
In this guide we wont be making any DVD Menu's or converting the audio to AC3. For PAL, mp2 audio doesn't give many problems but for NTSC, some DVD Players don't like AC3 audio. Soon I will write a guide to encoding the audio to AC3 in case its needed.
Step 1. Ripping The TRUE MPEG File(s) from the CD(s) with VCDEasy.
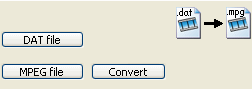 On SVCD disc's, the actual movie files are contained in the MPEG2 folder with names similar to AVSEQ01.mpg. You may have more than one file in here. First go to the MPEG2 folder on the CD using Windows Explorer and play these files to find out which one is the movie file you will need. If all the files are the movie, then rip them all with this method but for most good SVCD disc's, there should only be one file. Open VCDEasy and click Tools, then click MPEG Tools. At the end of VCDEasy you will see an option to Convert a MPEG file with Riff Header (.dat file) to True MPEG File. Click the DAT file button and locate the file on your SVCD disc in the MPEG2 folder, then click MPEG file and choose somewhere to save the file as a TRUE Mpeg file on your HDD. Now click Convert. In a matter of second/minutes, it will have saved the MPEG file to disc. If you have more than 1 file in the MPEG2 folder that you need to Rip, then make sure you use the same method to rip all the files. Use this method as well for a second disc and anymore that come after.
Step 2 (Pt.1). MPEG-VCR - Open files and paste all to one Stream.
After you have used VCDEasy to make your TRUE MPEG files, you will have to open all of them in MPEG-VCR. Simply click File - Open to open a file. Make sure you open all the files of your movie. This guide will assume there are 2 files so open both of them. Now what you have to do is trim any bad frames from each file.
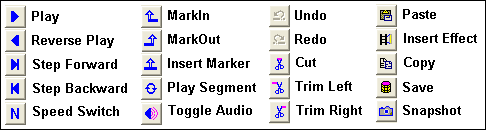 Before we go ahead and do that, look at the pic that comes with this text that show's you what each button means in mpeg-vcr. Out of all of these buttons, the buttons we will need are Step Forward, Step Backward, MarkIn, MarkOut, Insert Marker, Trim Left, Trim Right, Copy and Save. The 20 buttons you see are arranged nicer than you see them here and you wouldn't believe the hell I went through to get that image to actually look ok and at least a small bit in line! It took about 40 minutes to do, things kept going wrong but I think it looks pretty decent. Anyway, You have already opened the 2 MPEG files (or more), now we have to trim off bad frames from the start and end of the movie file. We are going to edit, the last Segment (mpeg file) first.
When looking at the last Segment, have a good look at the frame. Does it appear blocky or does the pic appear corrupt in any way? If it does, hit the Step Forward button until you get to a frame that appears properly. Now click the MarkIn button followed then by the Trim Left button to cut off the frames. Now the good frame should appear first and timer should be 0:00:00:00. Now click the Insert Marker button. Now we will process the First Segment (first mpeg file/first half of movie). Now when you view it in MPEG-VCR, you should see the very first frame and the timer should be 0:00:00:00, click the Step Backward button and it will take you to the last frame of the Segment. Now if the last frame looks blocky or corrupt in any way, keep clicking Step Backward until you come to a frame that appears correctly. When you find one, Click the MarkOut button and then click the Trim Right button to remove the bad frames. With this is done properly, click the Copy button and you should see a little thumbnail image of the first Segment in the Video Clipboard on the left of MPEG VCR. Now go back to the Last Segment and drag the thumbnail from the Video Clipboard, right over the video of the second segment and release. If you did everything right, you will now be able to add the first segment to the second.
Note: If you had more than 1 MPEG file, then process the last first, then merge the second last to it. Now the file before the one you just merged etc. until you manage to get them Fully merged. If you had just one file, then none of this text above had to/could have been done.
If you need a bigger guide on merging files with MPEG-VCR, Mattrage (mrage) has written and excellent guide that you can find here.
Step 2 (Pt.2). MPEG-VCR - Converting the Audio and Saving the File.
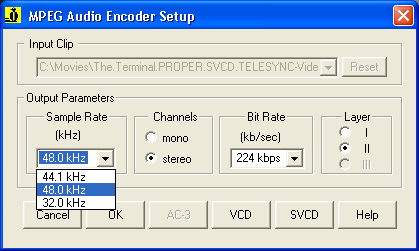 So now that you've managed to merge the 2 segments as one, you have to Save it. MPEG-VCR also gives you the option of making changes to the video or audio stream while saving which is very handy. So click the Save button BUT when the dialog box appears, click Audio. As you can see by the pic with this text, all you need to do is select 48.0 kHz and click OK. You might want to make the Birate higher if you wish but this wont have any major noticeable effect on the output audio at all. Make sure Layer is set to II (MP2). Now click OK. Enter the File Name you want it saved as and Click Save. It can take up to 15 minutes to save the file completely.
Step 3 (Pt.1). DVD-Lab - Add Movie File(s) and Edit Connections.
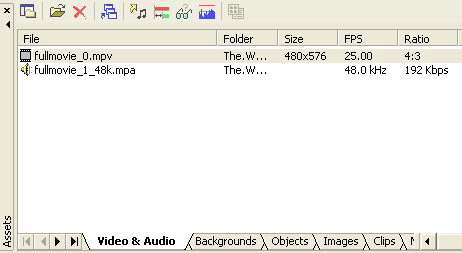 Open DVD-Lab and have a good look at it. You have a Project Window to the left, an Assets Window underneath it (see pic) and a Work Area in the middle where you should now see Movie 1. Of course there is no Video or Audio stream loaded into Movie 1 so we will do that now. First however, you have to add the movie to the Assets window so right click in the assets window and click Import or click the Import Files button. Now you will be alerted immediately with how to handle the MPEG file. Allow DVD-Lab to de-multiplex the file's into elementary streams. Basically this means it will separate the Video Stream from the Audio Stream as it's easier to compile this way and will give less problems. As soon as the de-multiplexing is finished a second alert will come up telling you that the Resolution is not Standard for DVD, but ignore this alert, just click OK. A good idea now would be to check the Project Properties and make sure you have it set to the right format (NTSC or PAL). Click Project - Project Properties and set it. NTSC is most used in North America and Japan and PAL is most used in Europe and Australia. Now that you have this done, look at the DVD-Lab screen and you should see Movie 1 selected in the work area and if its not, Select it in the Project Window. Drag the Video Stream from the Assets Window into the Movie 1 window. A series of thumbnail images should now appear. Now drag the Audio Stream from the Assets Window to the Movie 1 window. Next we have to edit the Connections
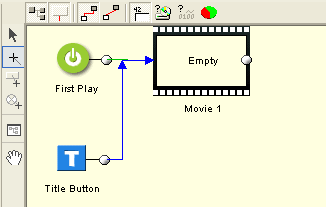 Basically the Connections on a DVD deal with, What is played first, and what the Title Buttons links to etc. Double click Connections in the Project Window and the Connections Window should appear. Now look at the button that is selected in the pic, click this button. Now click on the little dot beside the First Play icon and drag across into the middle of Movie 1 (which appears as empty in this pic but should have a thumbnail on your screen). Now do the same from the dot beside Title Button. If there is also a Menu on your screen, the select Menu 1 in the Project Window and hit the delete key to get rid of it. You have now successfully setup the connections for your DVD to playback properly. Now it would also be nice to add some chapters to your DVD. Select Movie 1 again and click Movie - Auto Chapters.
Step 3 (Pt.2). DVD-Lab - Adding Auto-Chapters and Compiling DVD.
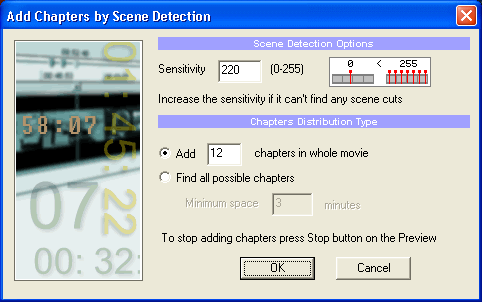 Now if you wish you can add the chapters to the DVD yourself using the little + button on top of the video stream in the Movie 1 Window but to make things fast, use Auto-Chapters. As I said already, Click Movie - Auto Chapters. As you can see by the diagram, the Sensitivity is set by numbers. I find the default 220 to work fine. I haven't had much time to experiment with different quality's and brightness yet however. Set the number of chapters you wish add and click OK. You will now see DVD-Lab adding chapters to Movie 1 extremely fast with good enough accuracy. When it has finished, you now had made the basic DVD and all that is left to do is make the DVD files themselves. So click Project - Compile DVD.
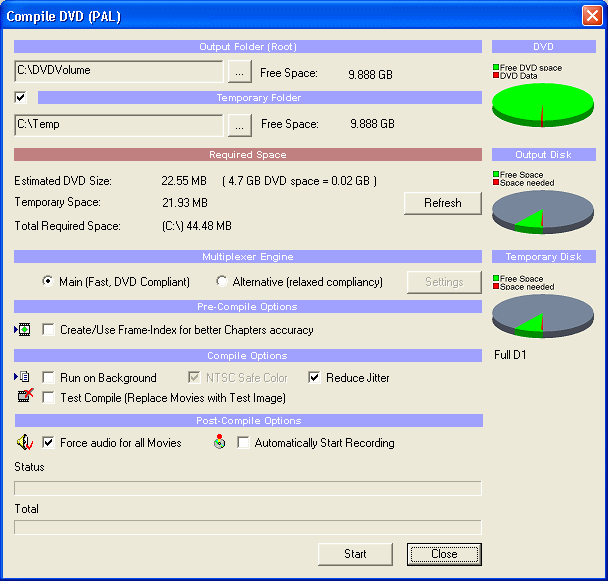 Here you have some more options. The Multiplexer Engine has the option of DVD Complaint and Relaxed Compliancy. I always Choose the Main option (DVD Complaint) but some users, (especially those using NTSC) have told me that its better to choose Relaxed Compliancy if you are using a non standard resolution and mp2 audio. So I will leave this option up to you, If you are using NTSC, I do suggest you select Alternative. The default output folder will be on your hard drive in a DVDVolume folder but you can change to whatever you want here too. Its actually good to get used to selecting a different folder all the time in case you accidentally over-write an existing compilation. When you are ready, click the Start button and your DVD will be Compiled. It will take some time depending on the length of your movie. When it is done you have only one thing left to do, and that's burn to disc.
Step 3 (Pt.3). DVD-Lab - Burn DVD.
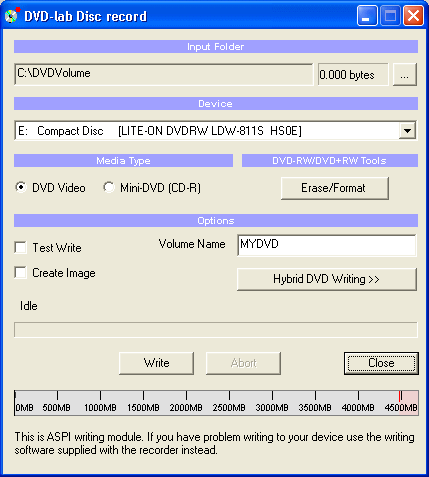 If you would prefer to use Nero to burn, that is fine, but I have used DVD-Lab to burn a lot and it does a good job for me. This step is not very, or not even one bit complicated really. Select your burner and make sure DVD Video is selected. You can choose whatever Volume Name for the disc that you wish. Make sure you Input Folder is the same folder you used to Compile the DVD. Just Click Start and your DVD should begin burning in No time. However, DVD-Lab does not work very well with some burners so if it fails to burn you may be better off with Nero.
 Last Words.
There are many guides on the Net for SVCD to DVD using DVD-Lab. This is the method I prefer. Some guide will tell you not to merge, just to link the end of the first half to the second half, I don't like that method because I would prefer that its all in 2 full streams (audio and video). Some guides suggest TMPGEnc to merge but I have found MPEG-VCR a little more reliable and it also encodes the audio while merging. Some will tell you to encode to AC3 which you might need to do if you are making an NTSC DVD but most DVD Players, especially PAL players can play mp2 audio perfectly. I will update this guide as the software advances :-)
Finally
If you experience problems with this guide, or have other problems relating somehow to Digital Video or DVD, visit our Discussion Forum. If you would like to help out by answering some questions on the forum, that would be very appreciated as the current regulars give up a lot of their free time to keep the forums alive. Please read the rules before posting. Good luck and I hope this guide helps you :-) - Dela
All are welcome to our IRC channel - irc.addictz.net:6667 #ad_buddies
Read Darthnips Newbie IRC guide here.
Version history
v1.0 -- 31st August, 2004, First version online (Dela)
Written by: James Delahunty
