
Video Encoder Settings
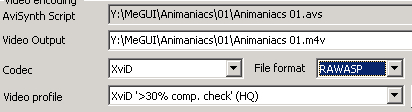 After the AviSynth Script Creator window closes, it will be entered in the AviSynth Script box on the Input tab. Below that is the output file. Click the button to the right of it to change the location or name. Select the dropdown menu next to Codec and set it to XviD. File Format should be set to AVI, MKV, or RAWASP (MP4). To select a Video Profile, determine what percentage of original DVD's bitrate will be used for the XviD encode. If you're not sure, compare the combined size of the VOB files to the intended final size of the XviD. The profiles are named by what amount of compression they're designed for. For example, XviD '>90% comp. check' means it's for encodes that are 90% as big as the original or more. Find the largest percentage that's smaller than or equal to the amount of compression your encode will have. Each compression level will have a fast and HQ option. As the names suggest, one will give you faster encodes, and the other a little higher quality.
Audio Encoder Settings
 If you intend to keep the original audio from the DVD you don't need to do anything here. If you're going to use the MP4 container MeGUI will require you to re-encode. You can specify up to two audio streams to mux in your final file. For each one, select the input file by clicking the button to the far right of Audio Input. Use the button to the far right of Audio Output to change the location or name of the encoded audio. Select the codec underneath that and the container (file format) it will be saved in. Like the video settings, there are audio profiles to select from. The profiles specify the encoder to be used and the bitrate. In general, you'll probably be using either MP3 or ND AAC (Nero Digital).
AutoEncode
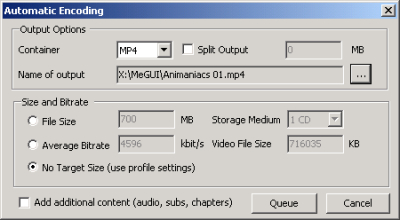 Once you have the video and audio encoder settings done you're ready to start the encoding and muxing jobs. Click the AutoEncode button. Select the container from the dropdown at the top left of the window. If you're going to have to split the output files across 2 or more discs, check the Split Output box and set the desired size of each file. Below those options is the name and location of the output file(s). Under Size and Bitrate you can override the size settings from the video profile by selecting File Size and entering a size (or selecting a media size from the dropdown. You can also specify the bitrate by selecting Average Bitrate and specifying the desired bitrate. If you want to use the values from the profile select No Target Size (use profile settings). Set your desired options and click the Queue button. The video and audio will be encoded and muxed and your final file will be written.
-
previousAviSynth Script Creation
Written by: Rich Fiscus
