
Running Nero Vision
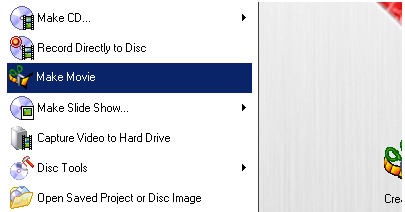
The initial window that appears for Nero Vision gives you a number of options for different types of projects. Move the mouse pointer over an option to find out what it does. Various options are given for encoding different types of content to different formats to fit different discs. At the bottom you'll even find disc tools, primarily designed to work with rewritable media. Since we're not going to be creating a disc intended for a particualar standalone format, we'll select the Make Movie option.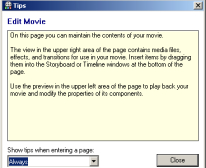
When the Nero Vision editor window appears for the first time there will be a Tips window with a tip for doing something with Nero. I personally never find these sorts of windows useful since I probably won't even remember it by the time I need it. If you want to see the Tips window whenever you get to the editor you can either click the Close button or simply click anywhere else on the screen to make it disappear. Otherwise you can select one of the options on the dropdown menu at the bottom of the Tips window - I prefer Never.
Interface
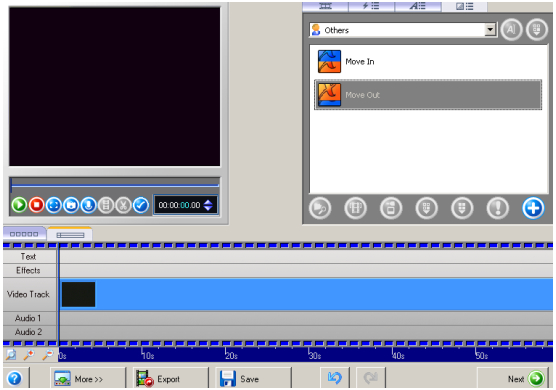 Before you start trying to use Nero Vision I recommend taking a look around to see where things are and how they work. The first thing you should be aware of is how to get tool tips. Holding your mouse pointer over an option, whether it's a button, checkbox, or dropdown, will give you a tool tip that will hopefully answer any basic questions you have about it. At the top left of the window is a player that you can use to preview your project. To the right of that is an area with several tabs at the top. The left-most tab is where you select video and audio assets for your project. The next tab is a selection of video filters (effects). The third tab has text effects for subpicture streams, and the one on the far right has transition effects for transitions between imported clips.
Timeline and Storyboard
The middle portion of the window is where the Timeline and Storyboard are. The storyboard is simply a list of clips in the order they appear on the timeline and the transitions that fall between them. The Timeline is a standard feature of visual editors which shows not only where each object is relative to each other, but also where they are relative to the beginning of the project. You'll also see a More button at the lower left of the window. Clicking this will reveal some options that are normally hidden. They aren't things you need to look at every time you work on a project, but they are important to be able to find and change.Options

There are a lot of configuration options you can set for Nero Vision. Most should be left at their default values but others are more a question of personal preference, and the more you understand about what you're doing, the more likely you are to consider changing them. I'm not going to cover every single setting, but instead will try to mention what I consider the settings you're most likely to have a good reason to change.
Application Setting
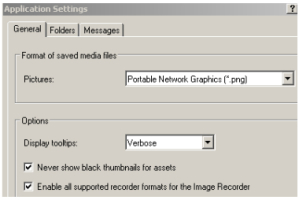
Clicking the Configuration button on the far left brings up the Application Settings window. On the General tab you can set the format Nero Vision uses when it saves still images. The default is Portable Network Graphics, which is a lossles compression format that results in much bigger files than some other formats you can select. Tagged Image File Format will create even bigger files (with the same quality), while CompuServe GIF and JPEG File Interchange Format will create smaller files more suitable for posting on forums and publishing on web pages. Unlike PNG, JPEG and GIF both use lossy compression, so the image won't be identical to the original.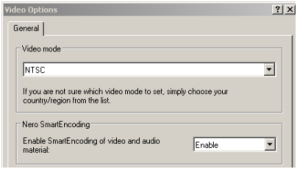
Video Options
The Video Options button covers two different options for video encoding. If you change these settings, when you close the window you'll be asked if you want to change the defualt settings. If you're changing them for a single project only, make sure you answer no. Video mode determines whether the project will be designed for PAL or NTSC televisions. It should be correct for your television automatically, but if you want to double check that it's correct or create a project for a different television system than the one you use, you can look through the dropdown menu for the geographic location and select it.Nero SmartEncoding
SmartEncoding is one of the most crucial parts of Nero Vision to understand. As a rule, every time you re-encode video or audio you'll lose quality. There are exceptions (lossless compression) but not here. If you don't need to re-encode you don't want to. The question is whether you want Nero Vision to decide whether to encode or you want to do it yourself. Setting it to Disable will force all vidoe to be encoded. Enable will stop any video or audio that's already compatible with your project's destination format from being encoded. Automatic mode will avoid encoding video or audio if it's format compatible and there's enough space for everything, nothing will be encoded. If there are space considerations, even content already in the correct format may be encoded.
Written by: Rich Fiscus
