
| Convert MKV to DVD with freeware | You are viewing Page 3 of 5 -- Go to page 1 , 2 , 3 , 4 , 5 |
Avi2DVD Output Settings
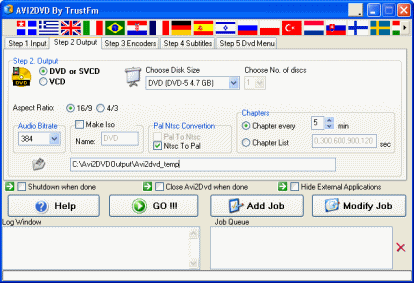 Now that the Input settings have been complete, you must set some goals for your output DVD-Video. Click the Step 2. Output tab. Here we will be able to manipulate many aspects of the output video and audio quality.
Avi2DVD Output Settings - Disk Size and Aspect Ratio
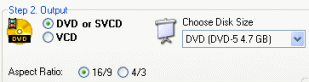 You just select the DVD or SVCD option as the Output. You will now be able to choose the output size to aim for while encoding. For example, DVD-5 means that the output size of the DVD-Video compilation will fit on a DVD-5 disc, or a standard single-layer DVD-R disc.
An Aspect Ratio for the output must now be set. Needless to say, the aspect ratio of the output should be the exact same choice as the input Aspect Ratio.
Avi2DVD Output Settings - Audio Bitrate & Format Conversion
 Adjusting the audio bitrate is based on how much priority you would like to give the output quality of your audio stream. Sticking to around 384kb/s is recommended for DVD-Video.
Make ISO allows you to create an ISO image of the entire output DVD if you should wish to. Pal Ntsc Convertion allows you to convert either NTSC to PAL or vice versa. Be careful with this setting as any framerate conversion will change the speed of the output video. NTSC is used in North America and Japan whereas PAL is the standard in Europe and Australia.
Avi2DVD Output Settings - Chapters
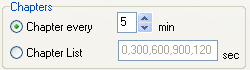 You can set Chapters which you can jump to using your DVD remote control. You have two choices, to automatically create a chapter every certain number of minutes or create a list of chapters to be created as specified seconds throughout the video stream.
Avi2DVD Output Settings - Output Folder
Next..
Now that the Output settings are taken care of, it's time to pick an encoder. Click the Step 3 Encoders tab and move to the next page.
Please go to the Next PageOn the next page, we will setup our subtitles (optional), video encoder and create a DVD Menu (optional); it is not near as complicated as it may sound. You are almost there now. Page 4 - Encoder, Subtitles & Menu Settings |
| Convert MKV to DVD with freeware | You are viewing Page 3 of 5 -- Go to page 1 , 2 , 3 , 4 , 5 |
Written by: James Delahunty
