
Editing With Cuttermaran
Once you have the necessary software installed and your video is demuxed to elementary streams you're ready to start learning how to use Cuttermaran. There are three basics steps to removing commercials. First you need to load your source (audio and video) files. Next you'll need to identify ranges of frames you wish to keep (usually everything except the commercials) and add each one to the cut list. Finally you'll output the cut list to new video and audio files. It sounds easy, and in fact it is.
1. Sources

There are two Open buttons for opening sources. To begin with only the one above the file list is active. This button loads a video source. When you select a video source Cuttermaran will automatically look for audio files with the same name and add them automatically. If your audio isn't automatically added you can use the Open button to the left of the file list to select an audio source.
2. Navigation Slider
When your sources are loaded you can turn your attention to the slider just above the cut list. This slider can be used to navigate through the video. The arrow buttons on each end of the slider bar can be used to move forward or backward one frame at a time.
3. Navigation Panel
To the right of the video display is an assortment of buttons for navigation and setting cut points. Using the buttons marked with <I, <P, or <B you can navigate backwards through the file to the next frame of the type listed on the buttons. The I>, P>, and B> buttons move forward to the next I, B, or P frame respectively. The In and Out buttons navigate to the In or Out cut point that's currently set (but hasn't been added to the cut list).
4. Cut Points
The In button sets the current frame being displayed as the frame in a range (clip, scene, or whatever you prefer to call it). Assuming you have Cuttermaran set to use encoding mode you'll be able to designate any scene as the In point. However, if you're not using encoding mode your choice of frames is limited. Although you can cut on some P and B frames, it depends on whether some of the frames you'd be removing would be required to decode frames you're keeping. You can always cut on an I frame. If you're using QuEnc you can select any frame as the first or last in a range. The Out button sets the last frame in a scene.
Use the Add button, which is located below the Out button, to add the currently selected range to the cut list. Once added, the In and Out point on the slider are cleared. Each scene in the cut list is also highlighted behind the navigation slider. Once you have your cut list completed you can create your output files.
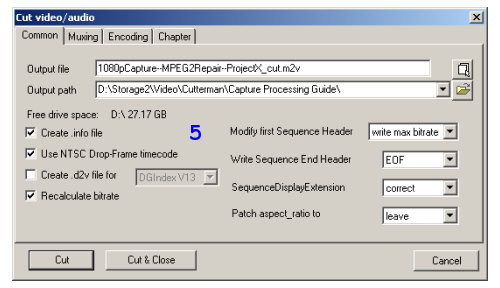
5. Cut video/audio
Once your cut list is complete you can select Cut video/audio from the Actions menu. You'll see the Cut video/audio dialog, which has two text boxes at the top. The first one shows the name to be used for the output files. Below that is the path (folder) that the output files will be written to. You can use the Browse button (with the folder on it) to select a different folder to write the output to. The name can be edited directly in the text box.
If you've configured Cuttermaran to use the ImagoMPEG muxer on your output files it will create either a MPEG file or one or more VOB files in the same directory as the elementary streams.
Where to go from hereCreating MKV files with mkvtoolnix
Encode TS Captures To AVC With Super (Coming Soon)
Version History v1.0 2008.02.25 Original version by Rich "vurbal" Fiscus
previousIntroduction
Written by: Rich Fiscus
© 1999-2025 AfterDawn Oy. All rights reserved
AfterDawn is powered by
|
