
AviSynth
AviSynth is a unique editing tool. It's unique for many reasons, but one of the most important is that it performs edits on the fly using instructions from scripts instead of rendering files. A script is essentially a series of commands for AviSynth that tell it what information to deliver as a frame (or field) of video. Although AviSynth can do some very complex editing, we're going to stick to the basics here because we just need to perform edits relevant to the audio. That means framerate conversions that involve speedup or slowdown need to be applied.
You may not need to use AviSynth to get all your audio. DGIndex is actually a better tool for just demuxing audio from an MPEG file, but if any speed changes are needed you're better off opening them with AviSynth. We'll cover instructions for using both tools.
Scripting Basics
You can find basic information about scripting with AviSynth in our guide on the subject. It uses a different tool called AVSEdit and has some out dated information, but will give you a basic background to be able to follow what we need to do here.AVSP
To help write our script, and generally make our lives easier, we'll be using a program called AVSP. It's an AviSynth editor that has some nice features for automating the script writing process. There's no substitute for the human touch when writing very complex scripts, but for ordinary processes a program can be very helpful.
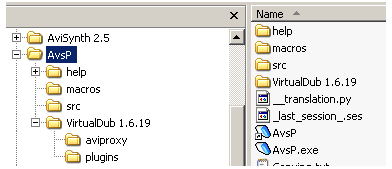
AvsP doesn't have an installer. Instead, just unzip the files to wherever you'd like to run them from and run the program (AvsP.exe). AvsP has some nice syntax highlighting and completion features. In layman's terms this means it recognizes what you might be trying to type and can help you type it, as well as helping browse for files. Invariably complex scripts require user intervention to write correctly, but a simple script can sometimes be written much faster with a GUI approach.
Using AvsP
Make sure you have AvsP copied to where you want to run it from. I recommend also making a folder inside the AvsP folder to unzip the VirtualDub archive into. VirtualDub is small enough that there's no reason not to have a separate copy for each program that uses it.Basic Script Lines
As the AviSynth guide notes, a script contains commands that tell it to do something related to either opening or transforming video and audio. The basic command format is as follows:Filter(argument1, argument2, etc.,...)
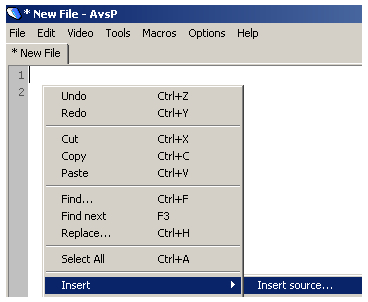
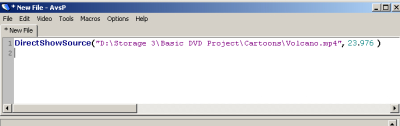
AvsP can help us add lines to the script. Since we're only doing basic things, the program will be able to do most of the work for us. Basic filters can be added by right-clicking on the white (text editor) area of AvsP. That will bring up a list of options that includes Insert that has it's own list of options. Select Insert Source from that list and browse to the video file you need to open. You'll need to change Files of type to read All Files or you won't see them to select. A line of text will appear in the white text editor area. You can directly change the text on the line to add the file's framerate. modify the line to end with fps=29.97:
DirectShowSource("filename.mp4",fps=29.97)If the file you're opening has a different framerate, like 23.976fps you'll need to specify that instead of 29.97.
Configuring AvsP's External Viewer
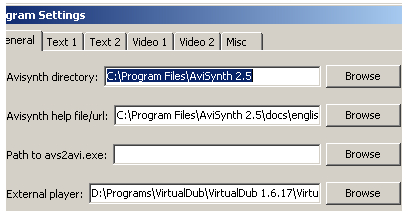
You could write your AviSynth scripts and then start VirtualDub and open each one. Instead, I recommend putting a folder with a copy of VirtualDub in a subdirectory of the one AvsP is running from. You can tell AvsP to use it as an external player instead by selecting Program Settings from the Options menu. Now you can use the External Player option from the Video menu to open the script with VirtualDub as a sort of preview. This will allow us to demux audio using an AviSynth script without leaving AvsP.
Demuxing With VirtualDub
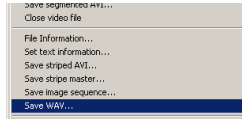
Either use the option off the Video menu or press the [F6] key on your keyboard to open the current file in VirtualDub. Once VirtualDub finishes opening it, select Save WAV from the File menu. Select the folder to save it in, give the output file a name, and click the Save button. The audio, as decoded by ffdshow from the original file, will be saved uncompressed. Once you've done this with all your MPEG-4 files you're ready to start converting everything to AC-3 that isn't already.You should be left with WAV files for The Arctic Giant, Jungle Drums, The Mad Scientist, Volcano, Terror On The Midway, and The Underground World. We'll also have MPA files for Destruction Inc., The Mummy Strikes, Secret Agent, Superman, The 5000 Fingers of Dr. T, The Amazing Transparent Man, Attack of the 50 Foot Woman, The Deadly Mantis, and The 39 Steps.
