
Opening Files
Our scripts can be broken down into steps that will be repeated in future scripts. We'll be covering each as a standalone process to show how to add it to an existing script, allowing you to mix and match these and other script snippets to make new scripts from. Like traditional scripting for anything from operating system functions to web pages, the best way to learn AviSynth scripting is to copy from people who know more than you do.Although we'll be opening our MPEG-4 files the same way as we did to demux the audio, our method for opening MPEG-2 files will utilize DGIndex and an AviSynth plugin that comes with it called DGDecode. You should already have used DGIndex to demux audio from some MPEG files. In the zip file containing DGIndex should be another file called dgdecode.dll. Make sure a copy of this file is in your AviSynth plugins directory. If you don't know how to do that, you can find instructions for AviSynth plugins in our AviSynth guide. Although that guide utilizes a different tool (AVSEdit) than we'll be using (AvsP) to write scripts with, it does explain the basics of AviSynth plugins and using them.
DGIndex
In order to read our MPEG-2 files with AviSynth we'll start by creating DGIndex projects for them. Projects are simply text files with a D2V extension that contain a sort of index or map of an MPEG file, including VOB files from DVDs and other files from and for different standalone players. Before we start opening files though, we'll want to run DGIndex to set some options.Video Menu
 On the video menu there are two important settings. The first is the iDCT algorithm. This algorithm is essentially the formula for decompressing individual frames. The better the algorithm used, the better the decoded picture looks. Which one to use depends on your computer's CPU. For most computers 32-bit SSE2 MMX should be used. If you have a pre-P4 Intel or a 32-bit AMD CPU you should use 32-bit SSE MMX. Computers that don't support SSE probably shouldn't be used for video processing, but for very old CPUs you can try plain MMX.
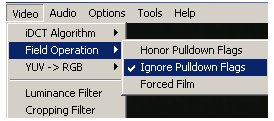
Still on the Video menu, Field Operation should be set to Ignore pulldown flags. We're interested in reading the video exactly as it was encoded and pulldown flags duplicate fields on the fly.
Audio Menu
On the Audio menu, Output Method should be set to Disable. That will stop DGIndex from demuxing the audio into a file when you create your D2V project. You should already have all your audio assets before reaching this point.Options Menu
Under Playback Speed, the first item on the Options menu, select Maximum. Our intent is to get things done quickly. Unless we need to visually examine the contents of frames we should always keep this set as high as possible.Previewing MPEG-2 Files
Start by loading the MPEG file for Destruction Inc. Follow the instructions from part 3 of the project. Once the file is loaded press the [F5] key on your keyboard. An Information window will appear and a preview of your video file, playing at the speed you selected on the Options menu. The Information window will show you quite a bit of information you should already know from GSpot. It also shows you the field order (Bottom or Top) and colorimetry. Pay attention to the field dominance for every interlaced file. In this case that's all of them.For colorimetry, the options are ITU-R BT.709 (aka Rec.709), SMPTE 240M, ITU-R BT.601 (Rec.601), or SMPTE 170M. If you're using CCE Basic for your MPEG encoder in step 5 you'll want to make a note of any video files that use Rec.709 or SMPTE 240M. The colorimetry will need to be changed before encoding.
Saving A Project
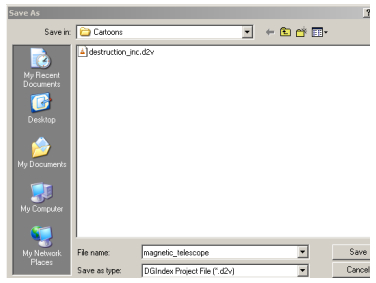
Once you've seen the necessary information, you need to create a D2V (project) file to read in AviSynth. From the File menu select Save Project. In the Save As window, browse to the directory where you want to store your D2V file. I prefer to keep D2V files in the same folder as the original MPEG, but you can save them wherever you want.Movie Trailer D2V Projects
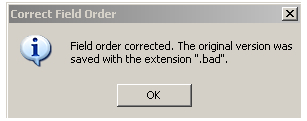 When you save your D2V projects for the movie trailers you'll get a message from DGIndex that a field order problem was corrected. Since it happens on all the trailers it suggests that perhaps there was a problem with dropped frames from analog transfer, or some editing resulted in only a single field from a frame being included. It's good to at least remember you got this error in case there are problems later, but for now we won't worry about it.
Opening MP4 Files In AviSynth
Our files will be opened in different ways, depending on whether we're using a DGIndex project file or not. The MP4 files will still be opened just like in the previous guide. Right click in the editor, select Insert Source, and set Files Of Type to All files to see your media files. You'll also want to add lines to remove the audio to reduce the amount of data being processed as output. Simply add .killaudio() to the end of the DirectShowSource line. It should look something like this:
DirectShowSource("D:\Wherever\whatever.mp4, fps=29.97).KillAudio()
Opening MPEG-2 In AviSynth
The D2V files we created for our MPEG files are the key to opening them. Right click and use the Insert Source option again, but this time you don't have to browse for all file types to see the D2V files. Simply double click on one and you'll get a line similar to this one:
MPEG2Source("D:\Storage 3\Basic DVD Project\Cartoons\Destruction Inc.d2v", cpu=0)Although there's no audio to kill, you mays still need to do some manual editing. If you're going to be encoding the video with CCE and you determine that the video's colorimetry isn't Rec.601 you'll need to make sure AviSynth will read the colorimetry hints from DGIndex. They're automatically embedded in the D2V file DGIndex creates. In order to read these hints you need to add the following to the end of your MPEG2Source filter, just inside the parentheses:
, info=3
The entire line should now look something like this:
MPEG2Source("D:\Storage 3\Basic DVD Project\Cartoons\Destruction Inc.d2v", cpu=0, info=3)