
Re-encoding using SUPER
Open up SUPER and we will get right into it.
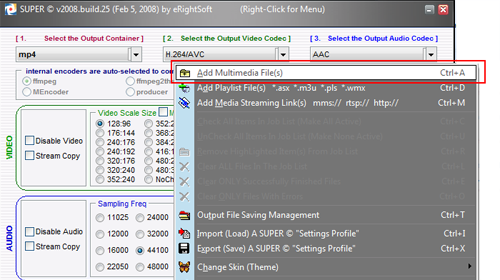
There are a couple of ways to open up your file in SUPER but the easiest way is to simply drag and drop the file into the program. You can alternatively right click anywhere on the program and hit Add Multimedia Files. Alternatively again, you can press Ctrl+A to add the file. Browse for your file and add it by hitting Open. The file should now be added and you can confirm that by looking at the active files in the bottom half of the screen.
Ok now since we want to make this file playable on the Touch or the iPhone we need to make specific settings.
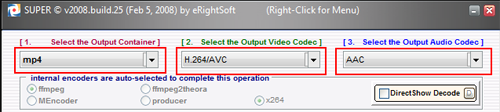
For 1. Select the output container hit MP4.
For 2. Select the output video codec hit H.264/AVC.
For 3. Select the output audio codec hit AAC.
This next section is the most important and will have everything to do with the quality of your file after it gets re-encoded. Open up Media Info and make it accessible.
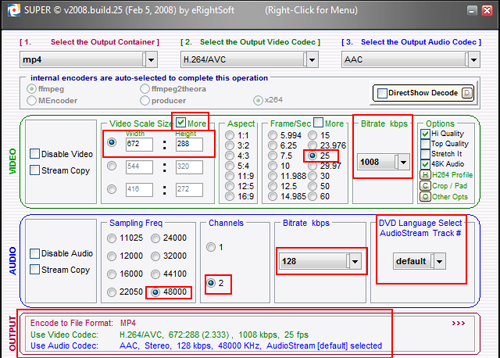
In the Video section of SUPER under Video Scale Size you will need to hit the More check box twice until you get to manual resolution. Now take the original video resolution that we figured out using Media Info and input it in the Width and Height boxes.
For Aspect, if your aspect ratio does not fit into one of the ones posted there then leave it blank and it will do it automatically.
The Frame/sec is the FPS we noted earlier. Select the FPS of your file. For my example the file has 25 FPS, which means it is a PAL source.
For the next option, bitrate we again look at Media Info. For my example the bitrate is 970 kbps and so I've chosen to encode at 1008 as it is the closest option and will not lose any quality.
We can now move on to the Audio section.
The Sample Frequency is the KHz we noted earlier so check off which one your file is. Take note that 48 KHz is the same as 48000 for the sample frequency.
For Channels, always select 2 unless you have a video file from a very old movie that you know is only in mono and not stereo.
For Bitrate, I normally leave the option at 128 kbps to save extra bitrate for the video, but for blockbuster films that have great sound, I would recommend 192.
For the final option, the DVD track # option, once again take a look at Media Info. If your file has multiple languages then you will want to select the language of choice. If there is only 1 audio stream or 1 language then leave this setting at Default or 1.
Confirm all you settings are correct by looking in the Output section right under the Audio section.
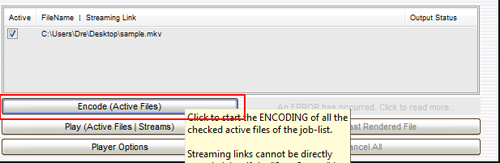
You are finally ready to begin encoding, so all that is left to do is hit Encode (active files) and sit back and watch your file re-encode.
I would recommend doing this process before bed then letting it go through the night because it can be a resource hog even if you have a stacked computer.
Finishing Up
All that is left to do is move the re-encoded file into iTunes and sync it over to your iPod or iPhone and enjoy :) If you have any questions please post in our iPod Discussion forums or iPhone Discussion forums.
Version History
v1.0 -- 27th February, 2008, First version online.(DVDBack23)
previousUsing Media Info
Written by: Andre Yoskowitz
