
| Customize x264 Profiles with MeGUI | You are viewing Page 2 of 5 -- Go to page 1 , 2 , 3 , 4 , 5 |
Creating Your Own Profile
Before we start making any changes to the profile we have loaded we'll want to create our own profile to hold the settings in. You should never modify an existing profile, but rather save the settings to your own profile, and modify that. This will help avoid confusion if you need to get help, as well as ensuring your customizations don't get overwritten during an update.
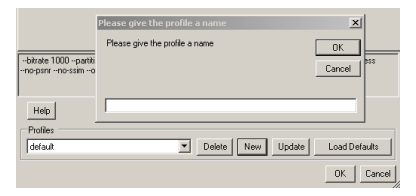
At the bottom of the Video configuration dialog is a list of available profiles, as well as buttons to Delete, Update, or create a New profile. Click the New button and you'll be prompted for a profile name. Try to choose something descriptive, as well as something that will stick out when you're looking for your profile later on. Since MeGUI lists profiles alphabetically you may want to start all your custom profile names with the same word or characters, such as your name or initials. This will cause MeGUI to group them together. Once you click the OK button your profile is saved and active. When you make changes to your profile you can save them with the Update button.
Main Tab
Now that your custom profile is loaded you can start looking at encoder settings. Settings may be chosen based on hardware requirements, storage space or media, quality, or encoding speed. If you're encoding with a particular type of hardware in mind for playback you should try to start with a proifle specific to that device such as PD-iPhone or SA-Blu-ray so that hardware specific options are already set for you. Hardware oriented profile settings such as VBV buffer options and Profile/Level selection should be left alone to ensure compatibility.
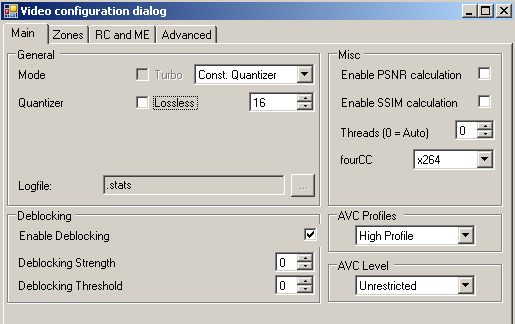 |
Profile and Level

The first thing to consider is Profile and Level. While these should almost always be set to High and Unlimited respectively if you're output files will be played on a computer, if you're starting with a profile customized for a particular piece of hardware, like an iPhone or Blu-ray player, these should be left alone so you don't include features that will make your file unplayable.
As a general rule, mobile devices and others with little CPU power will use Baseline Profile. For devices designed for SD (standard definition) video either Main Profile or High Profile may be used. For HD video High Profile is standard.
While the Profile setting controls the availability of certain encoder features, the Level is an indication of what limits are placed on settings like bitrate. Once again, this is for hardware compatibility and should be set to the specifications of the playback device, or to Unlimited for computer playback.
Encoding Mode
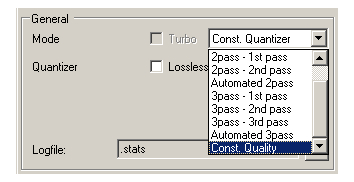
Next you'll want to consider the encoding strategy your profile will use. You can encode in a single pass, or make up to 3 passes. Quality decisions may be made on output file size, a constant quantization factor, or internal quality metrics intended to produce constant quality output. If the profile you've copied uses the same Mode you prefer you can leave this setting alone. Otherwise, the following is a brief description of each:
ABR | ABR, or Average Bitrate encoding is a single pass mode that will output a file with a predictable size, but unpredictable quality. ABR encoding is generally more suitable to very high bitrate encoding where there is little improvement to be gained from a second pass. |
Const. Quantizer | Constant Quantizer encoding attempts to maintain consistent quality by using the same quantizer for every frame, meaning each frame is treated as though they were equally complex. A lower quantizer means more details are kept at the expense of a higher bitrate (larger output file). Unless you're using an exceptionally low quantizer you should expect quality to suffer at least a little compared to multipass encoding, where bits will be saved by raising the quantizer for less complex frames.
Quantizer should never be set lower than 18. If you're familiar with XviD or DivX quantizers this is equivalent to a quantizer of 2 in those codecs. |
2 Pass Encoding | If you need to hit a specific output size or want to use a specific bitrate you should generally encode in 2 passes. This can be automated by selecting Automated 2pass or configured in two separate profiles; one with a Mode of 2Pass - 1st Pass for the first pass, and a subsequent job with a mode of 2Pass - 2nd Pass and another for the second. Automated 2pass only requires that a single encoding job be added to the MeGUI queue and 2 passes will be performed automatically. This is also the only type of multipass profile compatible with AutoMKV, which isn't designed for the degree of encoder control offered in MeGUI. |
3 Pass Encoding | Passes beyond the second can be added for multipass encoding. In some cases, particularly for extremely detailed or high action images a third pass may give you a slight quality improvement. In 3 Pass encoding the second pass not only generates a video file, but also updates the Stats file created by the first pass as a sort of blueprint for compressing the video. This is followed by what would normally be the second pass to generate the encoded output. Theoretically the middle pass can be repeated as many times as you want, but it's generally accepted that there are no improvements after the third pass.
Like 2 Pass mode you can use a single Automatic 3Pass profile, or a separate profile (and job) for each pass. |
Const. Quality | Constant Quality mode uses x264's internal quality metrics to keep quality consistent throughout your video. This is more efficient than using a Constant Quantizer because a higher quantizer can be used for less complex frames. Output size is unpredicable, although output file size is unpredictable. The Quality setting, which equates to the CRF number for the command line. This should generally be set no lower than 18 (highest quality / most unpredictable file size). |
Deblocking

One of the areas where AVC is a big improvement over previous encoding standards is its handling of blocking artifacts. Blocking results from the square groups of pixels, or macroblocks, that each frame must be divided into during the encoding process. Due to potential differences in how adjacent blocks are encoded they boundary between them may be visible, which is what's called a blocking artifact. Deblocking doesn't actually alter the encoded video, but rather analyzes the video and saves deblocking hints for the decoder to use in a deblocking filter. This should be turned on for almost all encoding.
The strength settings should generally be left at their default values, although animation in particular may require lower settings (lower numbers for Deblocking Strength and Deblocking Threshold).
Continued On Page 3Next we'll be looking at the RC (Rate Control) and ME (Motion Estimation) tab. The settings there affect the quality of your encoded video, encoding speed, CPU requirements for playback, and how bits are distributed through the video. Page 3 - The RC and ME Tab | |
| Customize x264 Profiles with MeGUI | You are viewing Page 2 of 5 -- Go to page 1 , 2 , 3 , 4 , 5 |
|
|
Written by: Rich Fiscus
