
Complete guide for using VSO CopyToDVD
In this guide we will teach you how to use the excellent shareware program CopyToDVD to manage all your backup needs. This includes backing up your music library, burning DVD-Video folders, as well as burning full data discs to protect your information in the event of a computer failure. You can also create Audio CDs that are compatible with any CD player on the planet.
Introduction and Requirements
There is only one obvious requirement for this guide and that is the program VSO CopyToDVD.
CopyToDVD- Here you can download the the latest version of the software. Be reminded however, that is shareware and not all options are available using the free trial. You can buy the full version and support Afterdawn by using this link here.
Getting Started
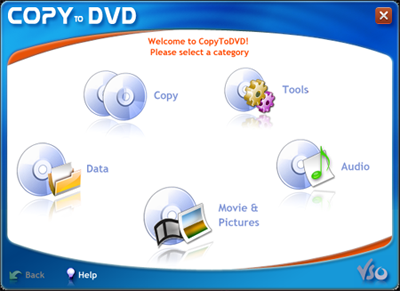
Ok so now that you have downloaded and installed the program lets open it up for the first time and check out the interface. There are only 5 options and each one is pretty straightforward, but we will go over each in depth.
Tools
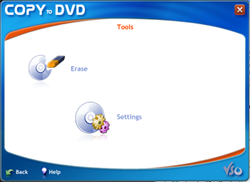
If you select Tools from the Menu, you will be greeted with a new screen with only two options on it. Erase and Settings. In the Settings there is nothing that I have found needs to be changed from default, but to access your settings, hit Settings first. Then switch to the CopyToDVD tab and finally hit CopyToDVDSettings. From there you will be greeted by all the settings, nicely arranged in 10 or so tabs.
Erase
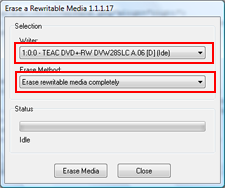
The Erase section is a very useful tool if you have any re-writable CDs or DVDs, known as CD-RWs or DVD-RWs. The tool allows you to erase, either quickly or more fully so that you can write them again. When you have inserted the disc you want to be erased, select the drive you inserted the disc in (if you have more than 1) and hit Erase Media. It is as simple as that.
Audio
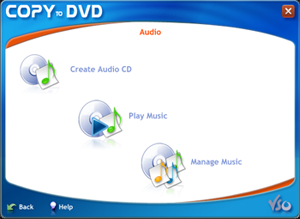
The next subsection of the program (I will be going clockwise) is Audio. In the audio category there are three more options, Create Audio CD, Play Music and Manage Music. The Manage Music section needs you to have an ID3 tag editor already installed so we will skip that section.
Create Audio CD
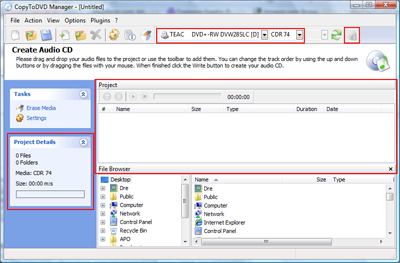
The Create Audio CD option allows you to search through your MP3 collection to find tracks you want to make a CD with, a CD that can be played back on any stereo, computer, CD player or car stereo.
There are two ways to add file to your audio CD. You can either hit File->Add files or simply drag them in to the Project window. There are a few more things to take note of while making the CD. On the top right there is the option to pick the drive you will be using to burn the CD (if you have multiple) and even more important, to the right of that, is the option to switch what kind of CD-R you have. If you have a 74 minute CD, hit CDR 74, if you have a higher capacity CD, then select one of the other options.
Once that is done, you can add music to your Project but make sure to take note of the project Details window on the left, it will tell you how close you are to filling up the CD. The bar will remain green until the CD is full. If you go over the capacity the bar will go red and you will have to remove some music. When you have the CD full, hit Burn and let it go.
Play Music
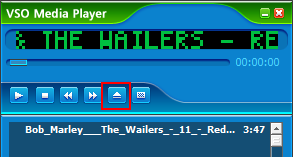
The Play Music is pretty straightforward, it is a media player to play your music files with :) When you hit Play Music, a new small VSO Media Player will show up. From there you can drag and drop your music files in, or hit Open (view picture ->) and add your files that way. The rest of the controls are simply for playback, such as Play, Stop, Next, etc.
Movie and Pictures
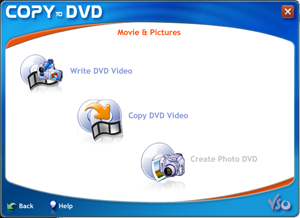
The next sub section is Movies and Pictures and once again there are three options. However, to create a Photo DVD, you need more downloads from VSO so well be skipping that option. For the middle option, CopyDVDVideo you will be redirected to the VSO website to download software that can bypass protected DVDs and CD. Therefore, we cannot and will not review that option either.
Write DVD Video
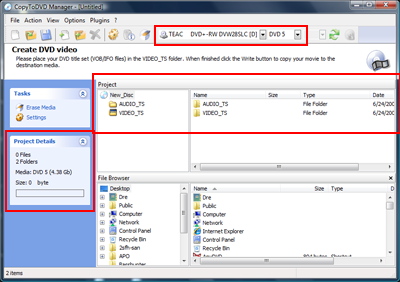
This option is similar to that of creating an Audio CD, but this will involve DVD Video, as well as DVD-Rs and with a few different options. If you have DVD Video files, most likely created from using VSO's other excellent software, ConvertXtoDVD and hopefully from following this guide here: How to convert video files to DVD-Video using VSO ConvertXtoDVD. DVD Video files will consist of a VIDEO_TS folder that inside will have VOB, IFO and BUP files. If you have one of these file folders lying around, then simply drag all the contents from your VIDEO_TS folder to the VIDEO_TS folder in the Project Window. The AUDIO_TS folder needs to remain empty so please just leave that empty.
If your VIDEO_TS folder is over 4.36GB large, then you will need to change one option before burning. In the top right, there is the dropdown menu for selecting whether you want to burn to a DVD5 (single layer DVD) or DVD9 (dual layer DVD). Of course, to be able to burn to DVD9, you will need a dual layer DVD-R, otherwise known as a DVD-R DL. Of course, make sure to use the Project Details window to make sure you do not go over the capacity of your chosen disc.
Once you have all that set, hit Burn and choose your burning speed. As a rule of thumb, 8x is the optimal speed to burn DVD-Rs at and 4x for dual layer discs.
Data
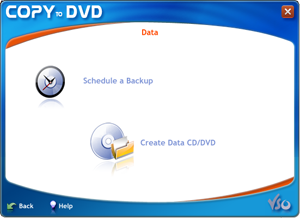
For this subsection there are only two options but each can be very useful. These options are Schedule a backup and Create CD/DVD
Schedule a Backup
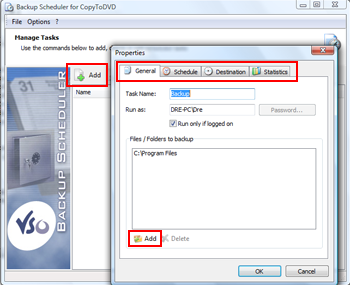
This option allows you to set up a time to backup certain folders on your computer to optical media, either CD or DVD. Hit Schedule a Backup and a new screen will pop up. Note: Vista users, you might get an error saying it cannot backup, disregard, it works just fine. Hit Add and you will led to the Properties screen. From here there are multiple tabs but we will start at the General tab.
Name the task you want to create in the Task Name box, and make sure the computer name is correct and you are under the correct user. Then hit add, and browse for the folder or folders you want to backup. It is important to note here that you can check the Statistics tab to see how big your folders are, and whether it will fit on the optical media you have inserted.
Once you have selected the folders and inserted your blank media, head over to the Schedule tab and select when you want to backup your chosen folder and whether this is a one time deal or a daily, weekly, or monthly routine. You also get to pick what time you want the backup to start, so you can even go out and come back to have your disc burnt as asked. Finally go to Destination tab and select the DVD burner you want to use and the speed to burn at. As a personal taste, I use 16x for CDs and 8x for DVDs. If you don't want to schedule the backup and want to do it instantly, skip the Scheduling tab and go back to the original screen . From there hit Backup Now and your disc will start automatically.
Create Data Disc
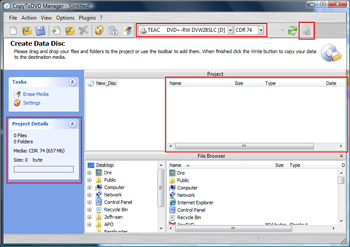
The Create Data Disc window is pretty much exactly the same as most of the other windows we have gone through, but with a couple of extras. Data discs allow you to fill up an entire CD or DVD with any type of data you may want and some DVD players even have the ability to play video files that have been saved on data discs, thus skipping the need to convert to MPEG-2 DVD.
There are two ways to add files to your data disc. You can either hit File->Add files or simply drag them in to the Project window. There are a few more things to take note of while creating the data disc. On the top right there is the option to pick the drive you will be using to burn the disc (if you have multiple) and even more important, to the right of that, is the option to select what kind of optical media you are burning to. If you have a 74 minute capacity CD, hit CDR 74, if you have a higher capacity CD, then select one of the other options. For DVDs they have DVD5 (single layer DVD) or DVD9 (dual layer DVD). Of course, to be able to burn to DVD9, you will need a dual layer DVD-R, otherwise known as a DVD-R DL. You have 6 options to burn to so make sure you choose correctly.
Once that is done, you can add the files to your Project but make sure to take note of the project Details window on the left, it will tell you how close you are to filling up the chosen disc. The bar will remain green until the CD/DVD is full. If you go over the capacity the bar will go red and you will have to remove some files. When you are satisfied, hit Burn and let it go.
Copy
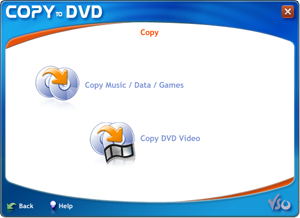
The Copy section has two other subsections, Copy Music/Data/Games and Copy DVD Video. The first section will bring you to a trial version of the Blindwrite software which only lasts 21 days whereas the second section leads you to VSO's site to download pay-for programs that can bypass copy protection. Therefore we will not be going over the second section.
Copy Music/Data/Games
There are three more options here, Copy, Read and Write.
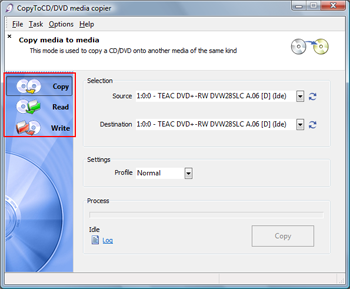
Copy
Copy is the mode you want to use to copy media to media, aka, reading from a DVD or CD with your data and then writing to another DVD or CD. Using this option, you will be making a 1:1 copy of your inserted disc. This option can only be used if you have multiple drives. If you do, then for Source select the drive you have inserted the disc to be copied and for Destination select the drive with the blank CD/DVD. If you do not have multiple drives, you will need to move onto the next option, Read.
Read and Write
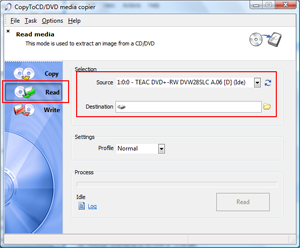
Read is the option you would use if you want to create an image file of whatever is on the disc you want to copy on your Hard Drive for later burning or for use. Select the drive you are reading from under Source and for Destination browse until you find the folder you want to save the image in. When you are satisfied, hit Read.
For Write the process is even easier. Select the image file you want to burn in the Source and select the drive to burn with under Destination. When satisfied, hit Write. Be reminded that this program will burn any compatible Image File you may have, but the program is a 21 day trial.
Finishing Up
Alright, well we have used up all the options available to us in CopyToDVD and I hope you have learned how to use this program as well as learned some important terms such as DVD5 and CD-R. If you have any questions or problems, please visit our Discussion Forums and post it there.
Also please remember that if you like the program, support Afterdawn and VSO by purchasing it from this link here.
Version History
v1.0 -- First Version Published-- by DVDBack23 (28/06/2008)
Written by: Andre Yoskowitz
