
Convert video files to play on the Nintendo Wii
In this guide we will teach you how to convert your video files to a Wii-supported video file that can be placed on an SD card and then played back through your Nintendo Wii. For the guide we will be using only one very easy to use freeware, Wii Video 9, which was recently updated to version 5.0.
Introduction & Requirements
| Software you must download and install | |
| Wii Video 9 | |
| Required: Please download Wii Video 9 here and install it. Download! |
Getting Started
There are very little other requirements for the guide, except for the video file that you want converted for playback and sufficient enough HDD space.
The Wii can only read the MJPEG format and using the converter, you can convert the files, transfer them, and watch video through the picture channel on your Wii.
Now that you have the program installed, open it up and check out the interface for a minute. It is very simple to use and there are only a few options we will need to go through to get your video from its original state to something that can be played back on the Wii via an SD card.
Settings - Encoding
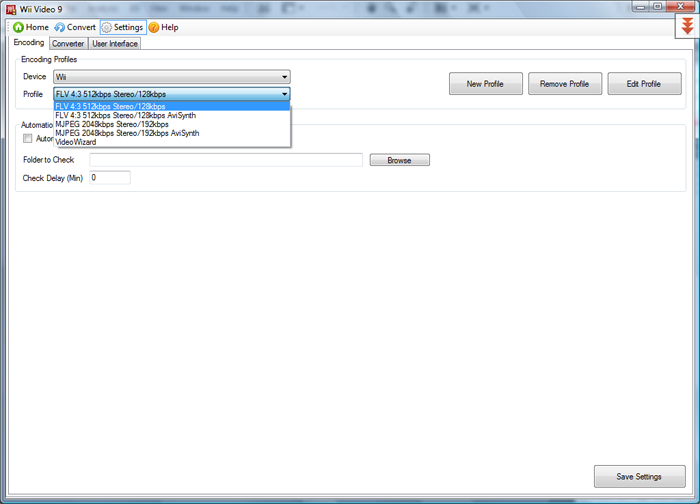
First off, we will explore the Settings. Hit the corresponding tab and the first tab will be Encoding. Under Encoding Profiles select Wii and then check the different Profiles. The Wii will playback MJPEG or FLV, and each has their own pros and cons. MJPEG will be larger filesize but quality will be higher when compared to FLV, which uses a smaller bitrate, especially on the default profiles. To keep higher quality as well, you will certainly want to select the AviSynth options.
Settings - New Profile
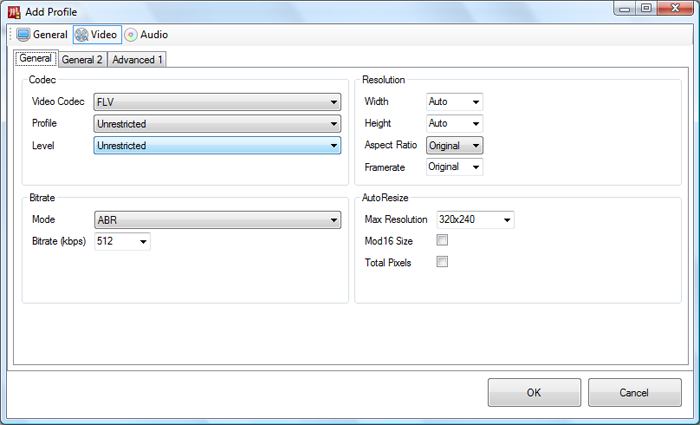
If you are not satisfied with the default profiles however, Wii Video 9 allows you to create new ones, using manual settings. Hit the New Profile button. Under General - Encoder, you will want to select either Generic 1-pass or Generic 2-pass. One pass will be quicker but two-pass will give you noticeably better quality in the final encode. Under Video- General you can choose what codec you want, from either MJPEG or FLV. As noted before, the MJPEG option will render you better quality, but larger file size. You can set the Resolution and Framerate as well as the Bitrate. If you are unsure, leave the Resolution and Framerate on Auto, and most likely you well never need a bitrate above 2048 unless you are converting an HD film.
On Video- General 2, hit Enable AviSynth as well as Auto FPS.
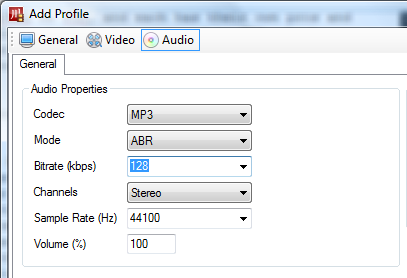
Under Audio - General you can set the audio standards, with 128 kbps being the most likely bitrate setting. I personally use 192kbps. You can also boost the volume of the audio here, in the percentage column, especially handy if it is low to begin with, you can boost the volume to 200 percent.
Settings - Converter
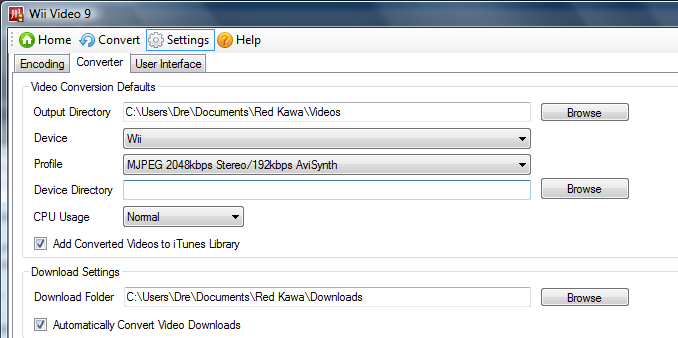
Head over to Settings - Converter and select your output directory as well as your usual video folder. You can also choose the directory where your SD card (D: drive or E: drive, etc) so that the output video saves right to the card. Do that under Device Directory.
Convert - Video File

Head over to Convert - Video File tab and you will be asked which one of two settings you want to choose. Those are:
Normal Mode - Takes you step by step through the video conversion process with both text and graphical instructions. Lets you change the basic parameters of your conversion via sliders, like video quality, and gives you a basic idea of how these parameters effect the resulting video.
Power Mode - Is designed for power users who are familiar with digital video and want as much control over their conversions as possible. In order to tap the full potential of power mode you will need to create and edit your own conversion profiles.
We will go over both.
Normal Mode
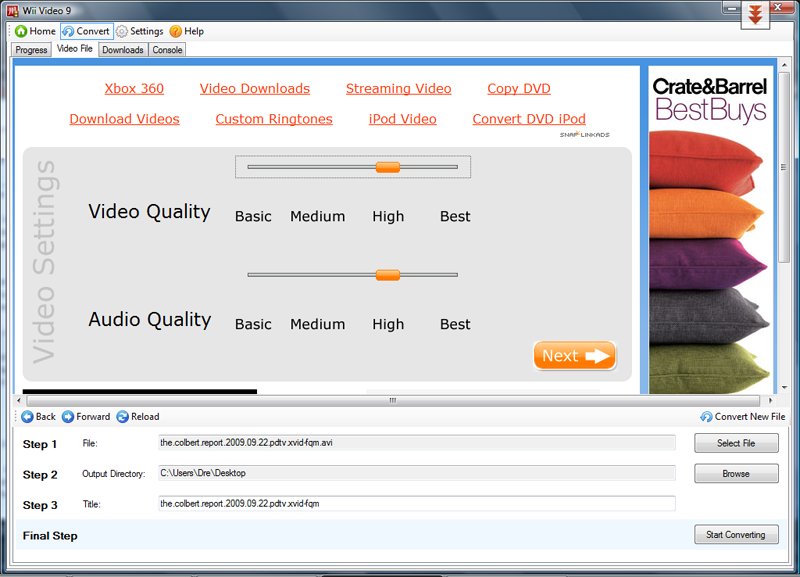
Normal Mode is about as straight forward as possible.
Step 1: Browse for the file you want converted.
Step 2: Select the output folder if you did not in the settings page.
Step 3: Rename the title (optional) for the file, making it how you want it to show up on the Wii.
Step 4: Use the slider bar to set the Video and Audio Quality from four different settings. Basic will give you the fastest encoding time, the smallest file size, but by far the worst quality. Best will give you the complete opposite. I usually select Medium or High, depending on how much I care about the actual video.
From there, hit Start Converting if you want to begin the conversion process.
Power Mode
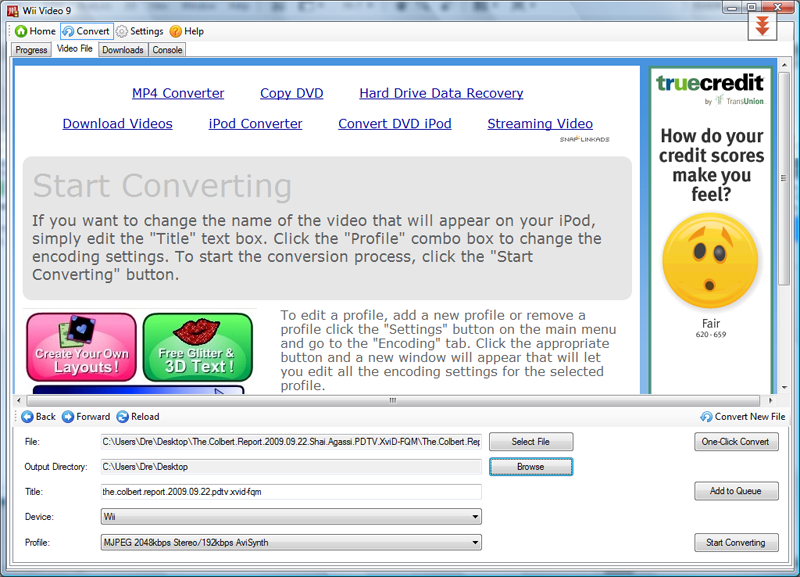
Power Mode is made for those who want to use their own profiles, like we did in Settings earlier.
Step 1: Browse for the file you want converted.
Step 2: Select the output folder if you did not in the settings page.
Step 3: Rename the title (optional) for the file, making it how you want it to show up on the Wii.
Step 4: Select your profile. I normally select MJPEG 2048/192-AviSynth, or you can use a custom profile like we created earlier.
From there, hit Start Converting if you want to begin the conversion process.
Conversion Progress
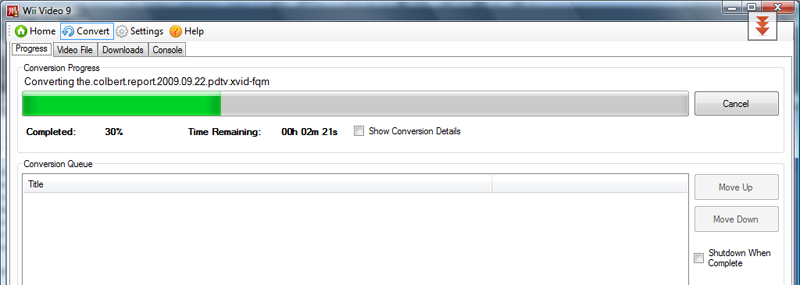
Check your progress or add more files to be converted. Conversion time is dependent on your PC and other activities but in the example, the file is about 200 MB and took 5 minutes to convert.
When you are done, throw it on your SD or SDHC card and play it back on the Wii.
Related Guides
How to watch YouTube & Internet Video on Wii (Fullscreen) - Nintendo's Wii console has got a Web Browser and is capable of playing flash content like YouTube. It runs into problems however when you try to view content full screen, and not all types of Internet video are supported by the Wii console. This article looks at using the Wii's wifi functionality to share Internet video with the console that will be displayed in a full-screen view.
Stream Multimedia to Nintendo Wii with TVersity - The Nintendo Wii console doesn't support much multimedia functionality at all. In fact, it can't even play DVDs, it is dedicated almost solely to gaming. You can play files form a flash memory card in the MJPEG format, but that format is very bulky and simply inefficient. If you have a wireless home network however, then you are in luck. TVersity can use the console's Internet channel to stream content from almost any kind of file (AVI, DivX, XviD, MKV, MP4, MP3, FLAC, AVC, etc.) directly to the Wii over the network in very decent quality.
Stream SopCast video to Nintendo Wii - In this article we will cover streaming video content from the P2P-based TV sharing program SopCast to the Nintendo Wii console, using TVersity as a media sharing server and VLC to prepare the stream.
Version History
v2.0 - Redone for v5, completely new layout, all new info, full additions, September 28th, 2009 by Andre "DVDBack23" Yoskowitz
v1.0 - First Version Online, 27th of March, 2008 by DVDBack23
Written by: Andre Yoskowitz
