
| Stream multimedia to Nintendo Wii with TVersity | Viewing Page 2 -- Go To |
Configuring TVersity Settings
 On this page we will look at TVersity's settings. Going over these settings is the best idea but if you want to speed things up, then you can go right ahead to Adding Content to the TVersity Library on page 3 and it should work with the Nintendo Wii IF you have already used the configuration wizard during setup.
Below are pictures (photoshopped to fit the page) with red numbers and boxes marking out areas of the settings in TVersity. Below the screenshots will be a list with the corresponding number and an explanation of the options. To get to the settings, run TVersity from the Desktop or from the Start Menu.
Once running, click Settings. If you get an error message about TVersity Media Server, then click the "Start Server" button. In order to be able to change further settings, after starting the server, click Library, wait for a couple of seconds and then click Settings again and the options should now be changeable like in the pictures below.
TVersity - General Settings
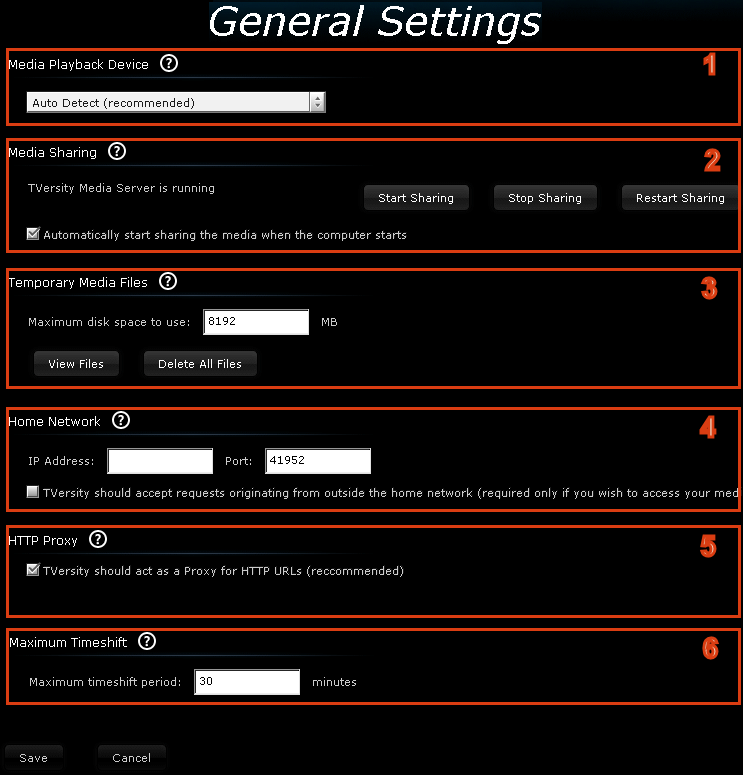
Note: Below are settings that correspond to the selected and numbered areas on the Image above. You can change whatever you want. For your convenience, anything we consider important, we have marked as IMPORTANT so you can feel free to ignore the rest (but we recommend you check them all, it will only take a few minutes.)
- 1. "Media Playback Device ". Left at Auto it will detect the device itself, but you can set it to Nintendo Wii if you want to.
- 2. IMPORTANT "Media Sharing ".
- "Start Sharing" --> Click to Start Sharing when the Media Server is stopped.
- "Stop Sharing" --> Click to Stop Sharing when the Media Server is running.
- "Restart Sharing" --> This will stop the Media Server and start it again. This is useful for when you experience problems.
- "Automatically Start Sharing.." --> This option, when checked, will start the Media Server on Windows boot.
- 3. IMPORTANT "Temporary Media Files ". These are settings for temporary file storage
- "Minimum disk space to use" --> Here you can set a limit on the capacity for temporary storage.
- "View Files" --> This will open the folder containing temporary files.
- "Delete All Files" --> This will delete all temporary files.
- 4. IMPORTANT "Home Network ". These settings let you limit sharing to one Network Interface and set a port number for the Media Server.
- "IP Address" --> Only set an IP address to restrict sharing to a single Network interface. Otherwise leave blank.
- "Port" --> This is the port that mediaserver.exe will use to share media. The default (41952) is fine unless you have problems.
- "Accept requests from outside local network.." --> Make sure to tick this if you intend to share over the Internet itself.
- 5. IMPORTANT "HTTP Proxy".
- "Act as a proxy for HTTP URLs" --> This will allow playback on more media devices, keep it selected.
- 6. "Maximum TimeShift".
- "Maximum TimeShift Period" --> This is the amount of history of a live stream for TVersity to keep temporarily, allowing you to pause and rewind live streams on media devices.
TVersity - Media Library Settings
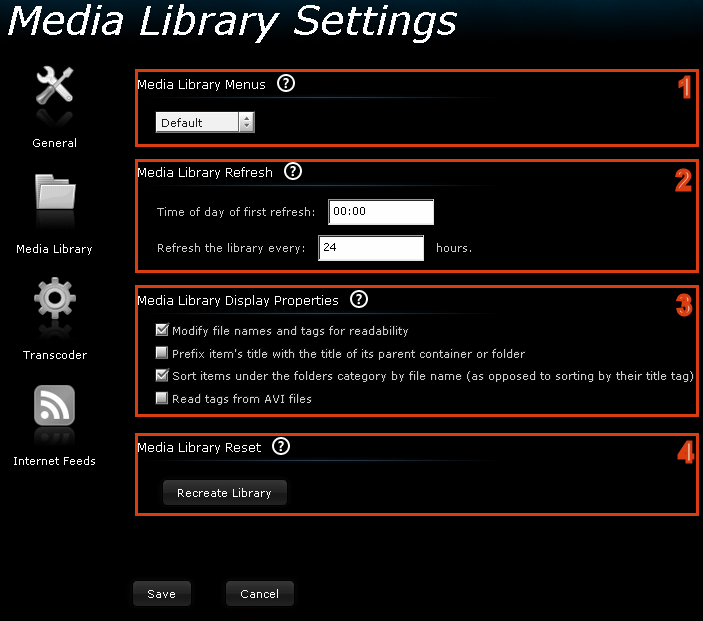
Note: Below are settings that correspond to the selected and numbered areas on the Image above. You can change whatever you want. For your convenience, anything we consider important, we have marked as IMPORTANT so you can feel free to ignore the rest (but we recommend you check them all, it will only take a few minutes.)
- 1. "Media Library Menus". Choose between the default Media Library or just a File System view. Custom libraries can also be created but that is not covered in this article.
- 2. "Media Library Refresh". TVersity can automatically refresh your library of content based on these settings
- "Time of day of first refresh " --> Choose the time of day to first automatically refresh the TVersity library. Leave at zeros to disable.
- "Refresh the library every... hours" --> Set the number of hours between refreshes after the first is carried out.
- 3. "Media Library Display Properties ". These settings determine how the Media Library presents your shared content.
- "Modify file names and tags for readability" --> This will modify file names and tags within the Media Library for browsing purposes.
- "Prefix item's title with..." --> This option will paste the folder or container text in front of the filename in the Media Library.
- "Sort Items by Filename" --> When accessing the Media by folder structure this will sort items by filename.
- "Read tags from AVI files" --> This option, when selected, will read tags from AVI files to present them better in the Media Library. Unless your AVI files have useful tags, keep this unselected.
- 4. "Media Library Reset". Click the Recreate Library button to Recreate the library at any time.
TVersity - Transcoder Settings
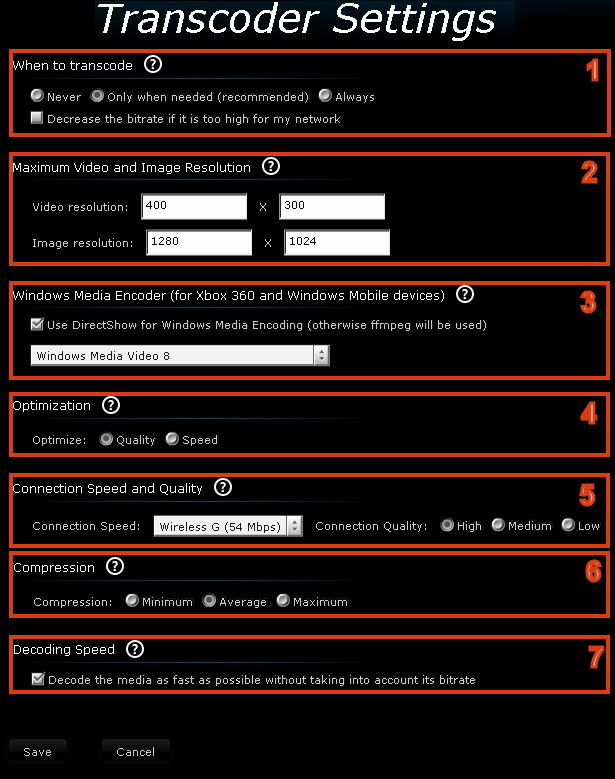
Note: Below are settings that correspond to the selected and numbered areas on the Image above. You can change whatever you want. For your convenience, anything we consider important, we have marked as IMPORTANT so you can feel free to ignore the rest (but we recommend you check them all, it will only take a few minutes.)
- 1. IMPORTANT "When to transcode". TVersity can transcode video content not supported by the device you are streaming to. In the case of the Nintendo Wii console, this will be almost always the case, except for maybe flash video files.
- "Never" --> With this option selected TVersity will never transcode video while streaming. This will stop playback in many cases.
- "Only When Needed" --> This is recommended. It will only transcode if TVersity determines the content to be unsupported.
- "Always" --> This would force TVersity to transcode video regardless of whether the device supported it or not.
- "Decrease the bitrate when too high for network" --> This option exists for older (usually wireless) networks, or a network with bad range. It will reduce the video bitrate if it has playback problems due to the load on the network being too high.
- 2. IMPORTANT "Maximum video and image resolution ".
- "Video Resolution " --> This only applies when transcoding. Here you can set the maximum resolution that a video can have while being transcoded. A lower resolution (like the default) means faster transcoding and more stable playback as a result, while a higher resolution means better quality but demands more resources.
- "Image Resolution " --> The same as above except for still images / photographs. The higher the Maximum Resolution the better.
- 3. "Windows Media Encoder ". Here you can select the version of Windows Media Video to use. Older versions may encode faster and might help if using a slower computer but could be unsupported by an Output device. You can keep DirectShow selected to decode media.
- 4. IMPORTANT "Optimization". What do you want to prioritize when transcoding?
- "Quality" --> Prioritizing quality means the transcoding will take longer and so the video might have a longer delay starting.
- "Speed" --> Optimizing speed sacrifices quality a little bit to start the video as fast as possible.
- 5. IMPORTANT "Connection speed and quality ".
- "Connection Speed" --> Select the kind of network you are using.
- "Connection Quality" --> How do you rate the quality of the connection to your network? If you are using a wired LAN then it should always be excellent. A good wireless signal is also excellent but if you have problems with a wireless network, try Good or Low and TVersity will optimize transcoding based on your input.
- 6. "Compression".
- "Compression" --> The higher the compression, the lower the bitrate and quality. Lossy compression removes detail from the video to make it smaller in size. It is smaller because it has a lower bitrate. Lower compression will result in higher quality but a higher bitrate, which might be a problem on your network. Keep it at Average unless you need to change it.
- 7. "Decoding Speed ".
- "Decode the media as fast as possible " --> Decoding the media as fast as possible will result in smoother playback, but this can cause some problems with certain types of media. Keep it selected, but remember it later if you run into trouble.
TVersity - Internet Feed Settings
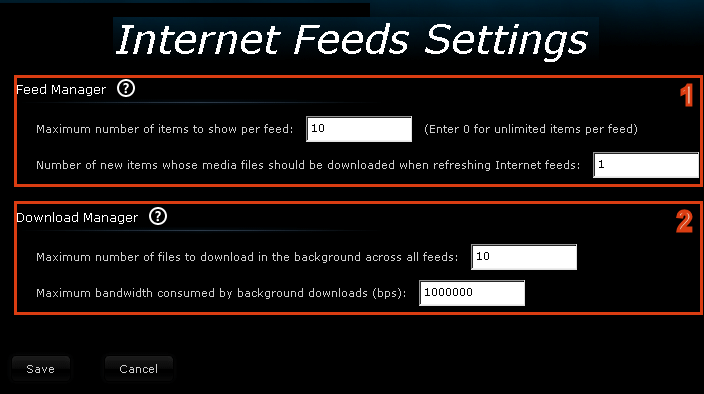
Note: Below are settings that correspond to the selected and numbered areas on the Image above. You can change whatever you want. For your convenience, anything we consider important, we have marked as IMPORTANT so you can feel free to ignore the rest (but we recommend you check them all, it will only take a few minutes.)
- 1. "Feed Manager ". These settings apply to Internet content feeds that you add to your library.
- "Maximum number of items to show per feed" --> This lets you set the maximum amount of new items on a feed to show with 0 being unlimited. This can be useful when dealing with extremely active feeds.
- "Maximum number of items who's media files should be downloaded.." --> This setting can be very useful. It will pre-download media items from a feed you have in your Library to make it easier to stream / transcode later. 0 will disable this feature.
- 2. "Download Manager".
- "Max. number of downloads.." --> This number sets the maximum amount of concurrent downloads TVersity can grab.
- "Max. bandwidth consumed.." --> Here you can set the maximum amount of bandwidth that TVersity can use while downloading content from Internet feeds.
What next?
The next logical step is to move to Page 3 and add content to the TVersity Library. You can also go back to Page 1 if you wish using the select box in the navigation bar below.
Page 3.: Add multimedia to the TVersity Library --> This page covers adding your files, folders and links to TVersity's library, making it possible to share with the Nintendo Wii.
Page 4: Play Shared Multimedia on Nintendo Wii --> When you add content to the TVersity Library, then play it on the Nintendo Wii with these instructions.
Appendix A: Get the Wii Internet Channel --> This is an optional part of the guide for those that need to get the Internet Channel / Web Browser for the Wii console.
| Stream multimedia to Nintendo Wii with TVersity | Viewing Page 2 -- Go To |
previousPage 1 - Introduction, Requirements & Installation
|
nextPage 3 - Add Multimedia Content to TVersity
Written by: James Delahunty
