
| VSO PhotoDVD Guide | Viewing Page 2 -- Go To |
Add Pictures to PhotoDVD
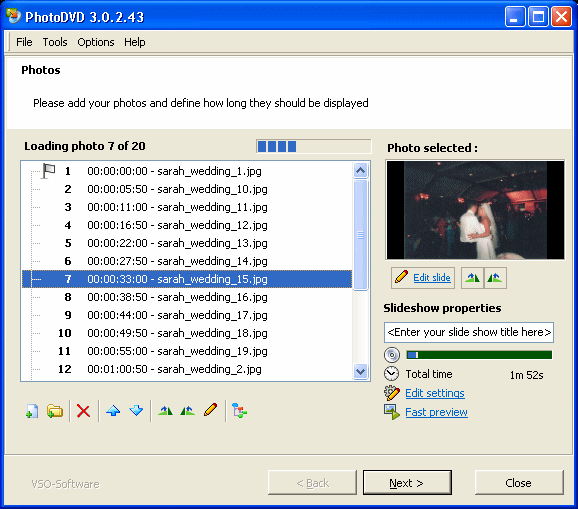
The next step is to load photographs into VSO PhotoDVD. You can do this in three different ways. There are two buttons underneath the photo list that allow you to add photos. The first is the "Add Files" button (the first from the left), which will allow you to add file by file. The second is an option to "Add Folder", which will allow you to select a folder full of pictures to add all at once. This is the best option as it saves time. The third way to add pictures is very easy; simply use your pointing device to drag and drop photo files or folders into the photo list.
Once you have populated the list you can use the buttons below to move pictures into any order you wish them to be displayed on the DVD disc. Also notice that when you click any of your photos, they are shown in a preview pane on the right side of the program. Below this, there are buttons to rotate the pictures 90-degrees to the left or to the right if you need to do that.
There is also a button you can click called Edit Slide, that allows you to change settings picture by picture. Select any picture and click Edit Slide.
Edit Slide
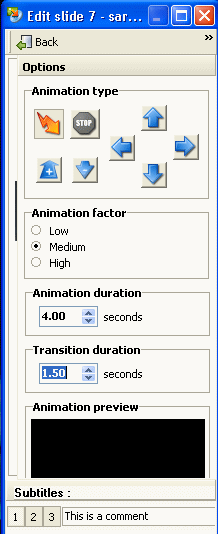
When you click Edit Slide, a small window will pop-up. We need to take a quick look at some of the settings this allows you to edit, as they are very important.
Animation Type: There are eight buttons available in these settings. When a picture is displayed on the resulting DVD, it can be animated in some way. For example, the four direction keys will determine which way the focus will pan across the picture while it is being displayed, so if you click left, then the picture will appear to slide from right to left slowly during its display. The up and down arrows displayed under the STOP option will add a zoom affect, with the "+" indicating Zoom In, and "-" indicating Zoom Out. The STOP option means there will be no animation effect, the picture will just display as it should. The Lightning Bolt icon means the animation will be "Automatic" - in other words, PhotoDVD will pick at random.
Animation Factor: There are three options here, and they basically determine the intensity of the animation. If you choose High, for example, the animation will appear slower and less intense, whereas low produces a fast animation. Medium is the default setting and is usually the way to go.
Animation Duration: This allows you to set the Animation Duration, which is basically the amount of time a picture will be displayed on the screen.
Transition Duration: There is a transition effect between each picture that PhotoDVD creates and this setting determines how long the transition from one picture to the next lasts on the Output DVD.
Subtitles: For each picture you can choose to add comments in the form of subtitles, with a maximum of three possible Subtitle streams that you can select with the DVD remote control. The three different options could be, for example, different langauges or comments made by different people.
Once you have made settings for your photo, press the Back button.
Previewing your Slideshow
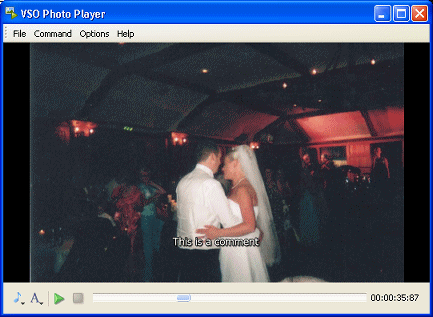
You will notice that PhotoDVD's main window has an option for a "Fast Preview". This will build a preview in real-time allowing you to see all the animation and transition effects that you choose. It has options to change the Subtitle stream that you are looking at too, or load audio as background music. Press the Next button on the main PhotoDVD program.
Add Audio and Start Process - Move to Page 3On the next page, we will look at adding background audio to the DVD slideshow, changing some settings for the Output and starting the Output process.Page 3 - Background Audio & Output |
| VSO PhotoDVD Guide | Viewing Page 2 -- Go To |
Written by: James Delahunty
