
A Basic Script Walkthrough
In order to illustrate how to use AvsP's various GUIs to write simple scripts I'll walk through the process from beginning to end. The following script will open an AVI file, remove some frames from the middle of the file, and resize to square pixels for MPEG-4 encoding.
Open The Source
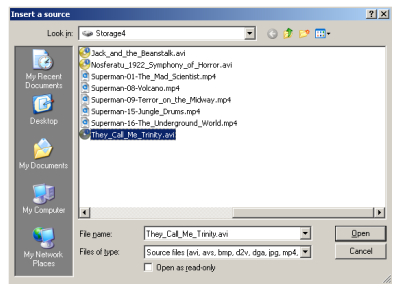
As with any video editing operation, the first task is to open the source file. Press F9 on your keyboard, navigate to your source file and double click on it. You should get a line similar to this one (assuming an AVI file):AVISource("D:\Storage4\They_Call_Me_Trinity.avi")Cut Out Frames
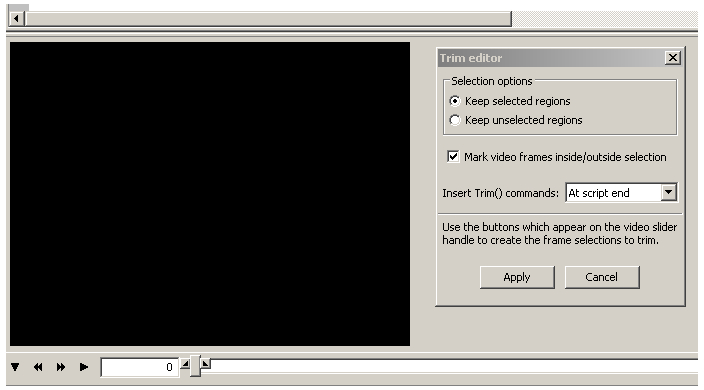
On the Video menu select Show Trim Selection Editor. The Trim Editor gives you the option to either Keep Selected Regions or Keep Unselected Regions. With whichever you prefer selected you can use the slider below the video preview to navigate through the file. When you reach the beginning of the region you want to select click the smaller button with a triangle to the left of the slider. When you get to the end of the selection click the button on the right side. You can select as many sections as you'd like. Each one will be highlighted in blue above the slider. Click the Apply button to add the line to the end of your script.
Here's my script after this step:
AVISource("D:\Storage4\They_Call_Me_Trinity.avi")
Trim(0, 31498) ++ Trim(59324, 74010) ++ Trim(77102, 102416) ++ Trim(119807, 127343)
Crop Borders
Using the Crop Editor from the Video menu you can crop lines around the borders of the frame. The Crop Editor is very straight forward to use. Simply enter the number of pixels to crop from each side and click the Apply button.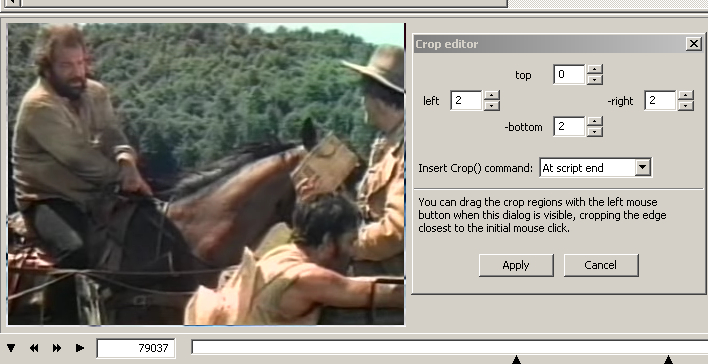
After cropping 2 pixels from 3 sides of the image I had this script:
AVISource("D:\Storage4\They_Call_Me_Trinity.avi")
Trim(0, 31498) ++ Trim(59324, 74010) ++ Trim(77102, 102416) ++ Trim(119807, 127343)
Crop(2, 0, -2, -2)
Resize
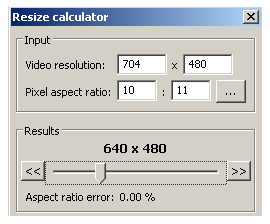 Select Resize Calculator on the Tools menu to get the resize GUI. You'll see the original resolution (minus the pixels cropped off earlier) and Pixel Aspect Ratio (PAR) of the source. If the PAR isn't correct, or you suspect it isn't, click the button to the right of the PAR and select the type of source. Use the slider to adjust the resolution (using square pixels) while keeping the original aspect ratio.
After this step I ended up with this final script:
AVISource("D:\Storage4\They_Call_Me_Trinity.avi")
Trim(0, 31498) ++ Trim(59324, 74010) ++ Trim(77102, 102416) ++ Trim(119807, 127343)
Crop(2, 0, -2, -2)
LanczosResize(360, 274)
Using The Script
After saving the script (Save Script from the File menu) it can be used in place of a video file in a video encoder or even media player. As no files have been rendered with these edits I still need the original file as well. If I wanted to use a real AVI file as a source I would save using AVS2AVI, which AvsP has an interface for.
Next: Using AvsP's built-in GUI for AVS2AVI to save your script's output as a real AVI file instead of a script
Written by: Rich Fiscus
