
Rendering Your Script As An AVI
Although an AviSynth file can be used directly by most video encoders and editors, there are times it's better to simply render an actual AVI file to use in another program. If you're going to use the file in a program that can't read AviSynth files or on a computer that doesn't have AviSynth installed you would probably be better off with an actual AVI. You may also want to consider this option if you have a very slow script that you plan to encode in more than one pass. By rendering an AVI using a lossless codec, like HuffYUV, you can save AviSynth's output to an intermediary file that may be far faster to access, and therefore faster to encode as well.
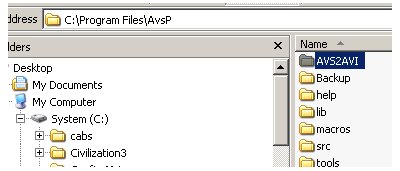
Setting Up AVS2AVI
If you haven't already you'll need to download AVS2AVI. Like AvsP there's no installer. Just copy it to a folder of your choice. I keep a separate copy inside the AvsP folder. There will alsoHuffYUV
If you're using a VfW codec, like DivX, to compress your video you can use AVS2AVI to do that right out of AvsP. If you want to just save the output of the AviSynth script to load into another program it's best to use a lossless codec instead. The most common codec for this is HuffYUV. There are two major versions of the HuffYUV codec. One is a standalone VfW codec, while the other is built into ffdshow and accessible through its VfW interface. You can find links to both on the first page of this guide.
Saving Your AVI
Before rendering your script as an AVI you'll need to save it. If you haven't saved it you'll get a message that the script has unsaved changes and you'll have to save before continuing. AVS2AVI uses the saved script as input so this is a necessary step. Select Save Using AVS2AVI from the Tools menu. The first time you do this you'll be prompted to locate AVS2AVI. Browse to the location and double click avs2avi.exe (you may not see the .exe extension).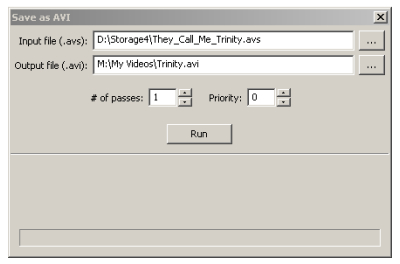
Select Destination
The source AVS file will be selected automatically from your script. The destination will default to the location of the source script. You can change it before creating your AVI. Click the Run button to continue.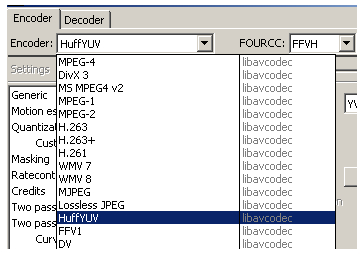
Video Compression
When the Video Compression dialog appears you need to select the codec to use. If you're using ffdshow's implementation of HuffYUV you'll need to select ffdshow Video Codec. This will bring up the ffdshow Video Encoder Configuration window, where you'll need to select HuffYUV from the Encoder dropdown menu. Click OK. Finally click Ok on the Video Compression Window and encoding will begin. If you're encoding to a lossless format it should be a fairly fast operation, but it will use a lot of disc space. As long as you have around 40GB of hard drive space available for every hour of video you want to save you should be fine.Version History
v1.0 2007.12.31 Original version by Rich Fiscus
v1.0.1 2008.1.2 Formatting changed by Rich Fiscus
previousA Basic Script
Written by: Rich Fiscus
