
| Convert DVD to AVC with TMPGEnc 4 Xpress | You are viewing Page 2 of 3 -- Go to page 1 , 2 , 3 |
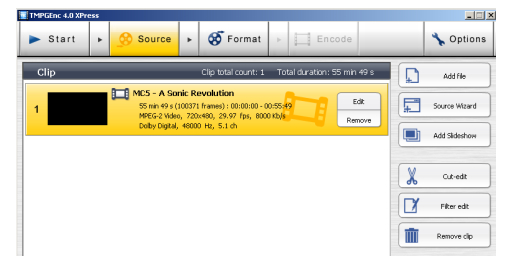
Loading Your Source
The first step in converting from a DVD is to load the video. TMPGEnc Xpress provides an easy wizard interface to do this. The Source Wizard will walk you all the way through the process of choosing DVD files, selecting the title and audio track to encode, and even gives you the option to apply filters (like deinterlacing) at the end.
Source Wizard
Use the Source Wizard button to select and load your DVD files.
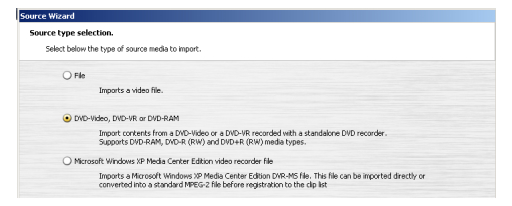
Select the center option, DVD-Video, DVD-VR, or DVD-RAM, to open a file browser where you can select the folder containing your DVD files.
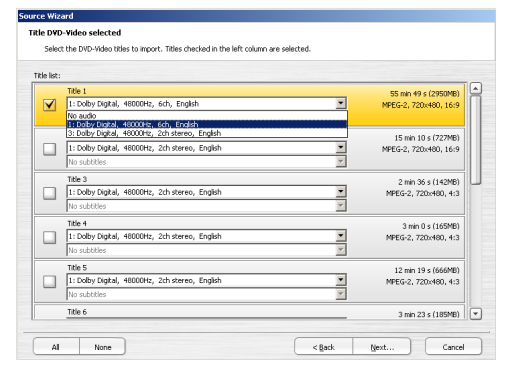
TMPGEnc Xpress will read through the DVD's IFO files and give you a list of titles found on the disc. Although you can select any title in the list, you'll probably be looking for the biggest one, which will usually be the main movie. Both the length and total file size of each title is listed on the right side of the Source Wizard window.
You can select one audio track and one subtitle (if present on the DVD) from the dropdown lists under each title. Since the audio encoder in TMPGEnc Xpress can't only encode either 1 or 2 channel (mono or stereo) audio, in most cases you should select a stereo track here. Otherwise it will be downmixed later.
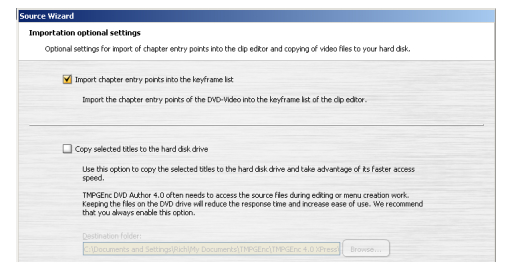
The final step in the Source Wizard gives you the option to import chapter points as mandatory I frames. Although not all players support them, MPEG-4 AVC files can have chapter points. Like the MPEG-2 files used in DVD, chapter points for AVC chapters must be placed where there is a complete picture which can be decoded without the frames before or after. This means an I frame.
If your files are on a DVD, rather than on your hard drive, it's best to check Copy selected files to the hard disk drive to avoid damaging your DVD-ROM drive. In some cases this will also result in faster encoding.
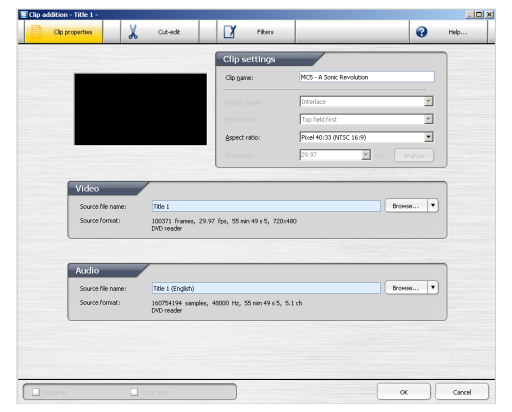
Clip addition
The Clip addition window will appear after TMPGEnc Xpress has finished some analysis of your DVD's video, including creating a list of chapter points to create I frames during encoding. It's a good idea to change the Clip name in order to make it more identifiable. This name will be used internally for a number of things, including what filename your final AVC (MP4) file is named.
Deinterlacing
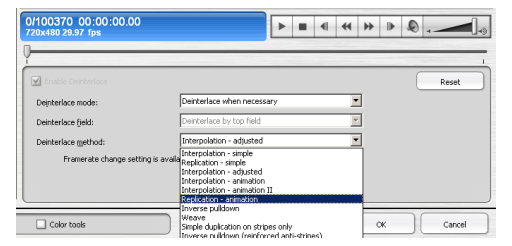
Depending on your source video, bitrate and quality requirements, and even the display you'll be watching your output (AVC) video on, you may need to deinterlace. In general, if you'll be watching your video on a progressive display, such as a computer monitor or 720p HDTV, you should deinterlace. If your going to be watching it on an interlaced display like an old fashioned analog TV (NTSC or PAL) you may get noticably better results by leaving interlaced video the way it is. Deinterlacing settings are available by selecting Filters from the top of the Clip Addition window.
If you don't see the options for the Deinterlace filter as soon as you get to Filters you need to select it from the list on the left side of the window. It should be at the top of the list, and automatically selected with a checkmark.
If your source DVD is formatted for NTSC (ie North American) TVs it's also possible to have a film source that's encoded as interlaced video with a pulldown pattern to adjust the framerate. In these cases it's almost universally better to deinterlace. Make sure to set the Deinterlace method to either Inverse pulldown or Inverse pulldown (reinforced ant-stripes).
For true interlaced sources you should avoid the Inverse pulldown options. Although the other settings include some specifically designed for animation, it's generally better to treat animated sources as film since that's generally how they're created originally.
Continued On Page 3In the final section of the guide you'll learn how to select and configure the MainConcept AVC encoder and create an MP4 file. Page 3 - Encoding | |
| Convert DVD to AVC with TMPGEnc 4 Xpress | You are viewing Page 2 of 3 -- Go to page 1 , 2 , 3 |
Written by: Rich Fiscus
