
The Main Tab
Depending on how much time you want to put into your encoding, you might only rarely need to look at any tab besides Main. This is where source and destination files are specified, and where most of the settings that are likely to change from one job to another can be accessed. It's also a good place to start troubleshooting if you run into problems. All settings can be restored to their default values, and version information about HC, as well as some supporting programs, can be found.
Before starting to look through HC's settings, look at the space above the Encode, Exit, and About HC buttons at the bottom. This area displays messages and information from HC, including tooltips and notifications as settings are changed. It's a good idea to check this area whenever you change a setting if you have any questions.
File Locations
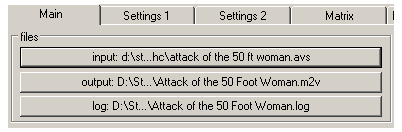
At the top of the Main tab are buttons used to specify file locations. Source, Destination, and log file locations can all be set using the buttons on the left. On the right are buttons for saving or loading either general program options or settings for a particular job.
Input
The top button on the left sets the source file to be encoded. HC requires either an AviSynth script or D2V (DGIndex) project as a source. Accepting AVS files (AviSynth scripts) adds flexibility to HC because very complex editing and filtering can be done on the fly, much like some encoders use their own built-in editor and filters. If your source is an MPEG file of some kind, you can skip AviSynth and simply use a DGIndex project (D2V) file to load it as a source. While there is some basic overlap in functionality between AviSynth and DGIndex, in general it's best only to load D2V projects when no editing needs done. If any sort of IVTC, deinterlacing, resizing, or other modification needs performed you'll want to use AviSynth.Output
The middle button on the left sets the location and name of the output file. Since HC only creates elementary MPEG-2 video files, the extension is set to M2V automatically.Log
Like the output file, the log file location and name can be specified by selecting the bottom button from the three on the left. It's automaticall assigned a file extension of .LOG.INI Files
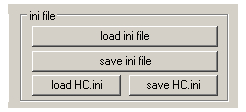 INI files are used both for HC's program settings and specific encoding job settings. The HC.ini file is loaded each time HC starts, and is stored in the same folder as the HC program files. The first time you run HC it's a good idea to go through the settings with no source, output, or log file specified, and then use the save HC.ini button in the top right corner of the Main tab. You can re-load the settings in HC.ini using the load HC.ini button. If you save HC.ini with source and output files specified, those settings will automatically be loaded by HC's Batch Encoder GUI.
The buttons marked load ini file and save ini file are for encoder settings associated with a particular encoding job. Unlike HC.ini, these settings are saved under a filename of your choosing, although automatically given an INI extension, and in a folder you must select.
Bitrate

Assuming you're doing standard 2 pass VBR encoding, HC will need to know what the minimum, average, and maximum bitrates should be. Average can either be set explicitly, or by adjusting the File length, which is given in kilobytes.
Frames
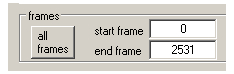
By default, the start frame will be 0 (first frame) and the end frame will be set to the last one in the source video. If you want to trim frames from the beginning or end of the file, you can adjust these numbers. The All frames button sets them back to the first and last frame of the source.

Profile
HC has three encoding profiles, not to be confused with MPEG profiles, which offer varying levels of speed and quality. The faster a profile is, the lower the quality will be. You should experiment with different profiles to see which one best meets your needs in terms of speed and quality.
DC Precision
Frames in an MPEG file are built from a series of estimations representing 16 pixel x 16 pixel blocks of a still image. DC Precision indicates how precise some of those calculations will be. It can be set to 8, 9, 10, or 11 but only 8-10 are generally used due to standalone compatibility and format compliance issues. If your source is an MPEG-2 or MPEG-1 file, you should try to match the precision in the original, since exceeding it will increase bitrate without a corresponding quality gain.
Aspect Ratio
The aspect ratio determines the shape of each frame, and is independent of the resolution unless 1:1 is specified. For television viewing the standard aspect ratios are 4:3 for fullscreen and 16:9 for widescreen. With the exception of 1:1, all aspect ratios are for the display. This means that they're independent of resolution. 1:1 indicates a Sample Aspect Ratio, meaning each pixel will be displayed with the same height and width, making the DAR (Display Aspect Ratio) equal to a frame's resolution.
Miscellaneous
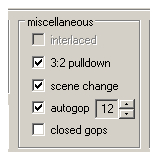
Interlaced
If your source is interlaced video you should check this box. You'll also want to verify field order, which can be done on the Settings 1 tab.3:2 Pulldown
If you're encoding material for NTSC playback that was originally on film you should be starting with 23.976fps video that must have pulldown flags added to make it read at 29.97fps. This checkbox enables pulldown for 23.976fps sources, but doesn't add any flags to video at other framerates.Scene Change
Checking the Scene change checkbox tells HC to start a new GOP once a threshold for changes in a frame is reached. Unless you need a fixed GOP size this should always be enabled.AutoGOP
Enabling AutoGOP tells HC to decide what the appropriate GOP structure for your video is. I prefer to set GOP options manually to achieve about two GOPs per second. This means using a GOP size of 12 for PAL or properly encoded film with pulldown flags added or 15 for NTSC video (at 29.97fps). Although HC's default GOP sizes are larger than I recommend, you can change the GOP size using the arrow keys to the right of the GOP size.Closed GOPs
Unless you're doing advanced video encoding for ILVU blocks on a DVD or planning to do a lot of GOP accurate editing, you should always have closed gops unchecked. Closing GOPs means they can't rely on any frame from a different GOP to be decoded correctly.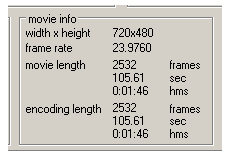
Movie Info
Movie Info shows you information about your source file, with video length displayed separately for the source and output. Resolution and framerate are listed at the top of the list. Since HC has no internal filters for tasks like resizing or deinterlacing/IVTC, those tasks must be done by another program before using video as a source for HC. Movie length and encoding length show the length of the original video, as well as the output file in frames, seconds, and standard H:MM:SS format.
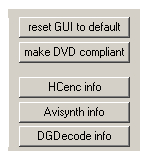
Program Info
There are three primary programs that may be involved in MPEG encoding with HC. The first is obviously HC itself. The other two are programs required to help read sources, AviSynth and DGIndex. There are buttons for each, which will provide version information in the info box at the bottom of the window. This information can come in particularly handy when someone is trying to help you troubleshoot a problem, and you want to let them know the exact version of each piece of software you're using.
Make DVD Compliant
The button marked Make DVD Compliant can be used to automatically adjust any encoder settings that fall outside the official DVD-Video specs. For example, if you set DC Precision to 11 and Aspect Ratio to 2.21:1, it would change DC Precision to 10 and AR to 16:9.
