
More Options
If you need to learn more about your MPEG file than an automated preview can tell you, DGIndex has additional tools and settings you can use.
Navigation Slider
 For manually stepping through your video you can use the slider at the bottom of the current frame being displayed. The right and left arrows navigate one I frame forward or backward. The left and right arrow keys on your keyboard will do the same. You can use the buttons with left and right brackets ( [ and ] ) to set beginning and end frames. This will allow you to easily isolate smaller sections of video to analyze.
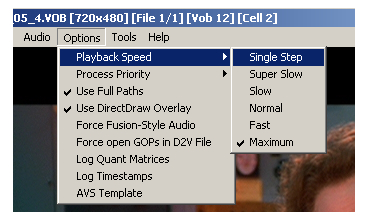
Playback Speed
Instead of manually navigating between I frames, you can set Playback Speed on the Options menu to something slower than maximum to change the Preview speed so you can visually inspect frames. You can even select Single Step, which works a little differently. When the Preview starts only the first frame will be displayed. You can step forward one frame at a time using the right arrow key next to the navigation slider. You can also use your keyboard's right arrow key, but only after you've moved forward one frame using the button on the program.Field Operation
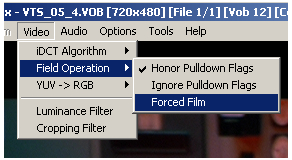 The Field Operation setting on the Video menu determines how pulldown flags in video will be handled. The top setting, Honor Pulldown Flags, will give you a good picture of how the file will playback, and should almost always be used when creating D2V projects. Ignore Pulldown Flags will deliver the original video, with no pulldown applied. This can be useful for spotting changes from 23.976fps progressive video with pulldown and 29.97fps interlaced video either from actual interlaced video or telecined film footage.
Forced Film is an option that should normally only be used with progressive video encoded at 23.976fps. It's generally used when saving a D2V project for progressive video with 2:3 pulldown that may include inconsequential amounts of 29.97fps interlaced video in places. Frames will be inserted or removed to create this framerate.
Specific Issues
Examining Telecined Video
If you have film content encoded interlaced with a telecine pattern, you can set the Field Operation to Force Film to evaluate it. While this isn't recommended for D2V projects, it will allow you to find out the severity of combing artifacts you might have to deal with in an IVTC operation. If your video consists of both progressive video with pulldown and telecined interlaced video, you can also set the beginning and end frames around the interlaced portions to see what they'd look like if played this way.Determining Whether PAL Video Is Interlaced
Since much PAL video is improperly flagged as interlaced when it's actually encoded progressive, the only way to be sure is to look for combing artifacts. With Field Operation set to either Honor or Ignore Pulldown Flags, use the navigation slider and arrows to examine frames in motion sequences. Since interlaced fields are separate pictures, interlaced encoding of progressive frames will result in straight edges that become jagged lines. If the Information window indicates interlaced video, but there are no combing artifacts, you should assume it's actually progressive and treat it that way for future editing and playback. If, however, you do find combing artifacts, it may need some simple post processing, similar to what telecined video requires when an IVTC operation is performed to recover film frames.Field Blending
For PAL video, you may also run into a situation where everything is encoded progressive, but one frame out of every 25 is a combination of frames on either side, also known as a field blend. It's generally considered optimal to remove the extra frames and speed up the remaining video to 25fps if you're going to re-encode. This will also require speeding up the audio.Animation
Animation can be particularly tricky to analyze because there are often identical frames in the original source. It's also fairly common to find animation, anime in particular, that's poorly converted to MPEG-2 for DVD. This often results in the worst possible quality for the video, and can be very difficult to fix.
Written by: Rich Fiscus
