
D2V Projects
The most common output from DGIndex is a D2V project. These files can be used by editing programs, video encoders, and even some media players to decode an MPEG file. They're primarily used for editing and encoding. For more information you should read the DGIndex Manual, which comes in the same Zip file as DGIndex.
D2V Output Options
One advantage to using D2V projects to read a video file is the abillity to change playback from the original. Cropping, luminance adjustment, and even MPEG decoding options can be changed to prepare the video for use in other programs.Video Menu
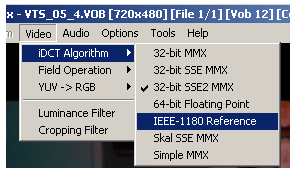
iDCT Algorithm
The iDCT Algorithm is a sort of formula used to decompress frames. MPEG-2 doesn't use a single algorithm, but rather defines a standard and acceptable amount of error. As long as an algorithm is within the error limit it's considered acceptable for MPEG-2. DGIndex allows you to choose between several. Most vary only by which set of CPU instructions, from MMX to SSE and SSE2 are used. As a general rule, SSE2 is faster than SSE, which is faster than MMX. IEEE-1180 is the slowest and more accurate option. 64-bit Floating Point is the second most accurate, but is still slower than other algorithms. Generally it's recommended that you use the fastest instructions supported by your computer.Field Operation
As stated previously, if your video consists primarily of film content encoded at 23.976fps, which inconsequential amounts of NTSC video at 29.97fps that you want to perform crude IVTC on, use Forced Film. For all other situations set it to Honor Pulldown Flags. If you have 23.976fps film combined with NTSC video you wish to keep encoded the same way, you can create multiple projects using the navigation slider and marking the beginning and end frames at boundaries of progressive or interlaced sections. When you're done you'll need to add pulldown flags to the progressive sequences and join them to the true interlaced video with an MPEG editor of some kind. Since the beginning and end of each file will be at a GOP boundary, you'll need a GOP or frame accurate MPEG-2 editor for this.YUV -> RGB
Some software that works with D2V projects requires RGB video instead of the YUV stored in an MPEG file. The YUV -> RGB option determines whether the color values remain limited to values between 16 and 235 (PC Scale) or expanded to 0-255 (TV Scale). Since most programs open D2V files in YUV colorspace, this option doesn't usually affect anything.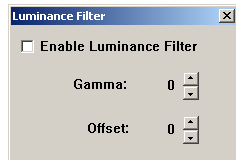
Luminance Filter
Selecting this menu option displays the Luminance Filter dialog. Enabling the luminance filter allows you to change the gamma and brightness of the video. Changes gamma adjusts the curve used to weight luma values. You can find more details about gamma in our Color Formats guide. The Offset value raises or lowers brightness. Be careful adjusting brightness as it can cause already bright scenes to appear washed out.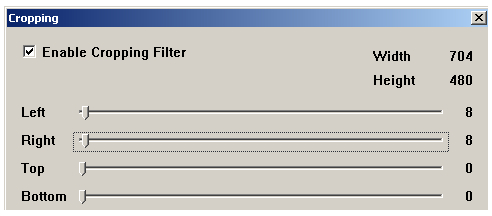
Cropping Filter
The Cropping Filter menu option opens the Cropping dialog. pixels can be cropped from any side of the video frame, but only in groups of four. This is due to MPEG-2 calculations using 4x4 blocks of pixels. Cropping with this function removes entire columns or rows of blocks. This is generally only suitable for playback as other software you would process a D2V project with should have cropping functionality.Audio Menu
Output Method
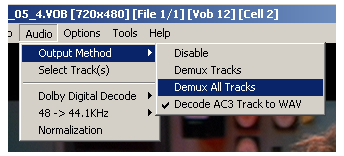 This determines what, if any, audio files DGIndex gives you during D2V file creation. Disable will stop audio files from being created. Demux Tracks enables the Track Number list on the Audio menu. Tracks checked in the Track Number list will be demuxed into elementary audio streams with names that tell you what delay to use when muxing them with a video stream. You can select as many or few track numbers as you want. Demux All Tracks gives you a file for each audio stream in the MPEG file. Decode AC3 Track to WAV decompresses Dolby Digital audio (like most DVD-Video audio streams) to standard Windows WAV files. Like Demux Track, this option uses the Track Number list. There are a number of programs that are better suited to processing AC3 audio than DGIndex, so this last option isn't used very often.
Dolby Digital Decode
When creating WAV files from AC3 streams, there are some automatic assumptions. The first is that the output will be a two channel WAV file, regardless of the number of channels the original AC3 stream contains. If Dolby Digital Decode is selected, the channels in the WAV will be encoded so a Dolby Pro Logic capable device can decode them as left, right, center, and surround channels. For two channel (left and right only) playback leave this unchecked. Dynamic range control is a feature of Dolby Digital that allows very quiet sounds to be heard at a volume acceptable for very loud sounds. Since this Dynamic Range Compression is additional data beyond the audio, it can be ignored when decoding to WAV or replaced with a different level of compression using the options under Dynamic Range Control. Off gives you the original audio's full volume range, while Light, Normal, and Heavy apply varying levels of compression to the volume.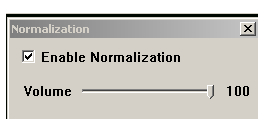
Normalization
If, instead of compressing the dynamic range of a WAV file decoded from AC3, either raise or lower the volume you have two options. Both use the Normalization option at the bottom of the Audio menu to determine how high to set the peak volume. The volume of the rest of the file is scaled relative to that point. Pre-Scale Decision is the superior method, and should be the only one you need to use. Before you do, however, you need to select Normalization from the Audio menu. Leave the checkbox unchecked, and select the level you want to use. Once you've done that you can select Pre-Scale Decision under Dolby Digital Decode and DGIndex will read the entire audio stream to determine a factor to adjust the volume level by. The calculated value will be used when the output audio file is created during D2V generation. With no way to preview the volume, and higher quality audio processing available from a number of sources, it's best to skip this and simply demux the desired audio streams.
48 -> 44.1kHz
This option was originally intended to assist in audio preparation for VCD and SVCD, as both formats require CD's 44.1kHz audio instead of DVD's 48kHz. A setting of Off preserves the original samplerate, while any other setting converts to 44.1kHz. Low, Mid, High, and UltraHigh all describe the quality of the converted output. Low is the fastest, while UltraHigh gives the highest quality.
Options Menu
Playback Speed
DGIndex can playback (Preview) videos at varying speeds. Which speed you should use depends on what you're trying to accomplish. If you're having DGIndex read through the file to get basic information, you should set it to Maximum. If you want to closely examine each frame you should set it to Single Step. To examine frames for combing artifacts you might use Super Slow or Slow. See the Detailed Analysis section of this guide for information about using Single Step mode.Process Priority
 DGIndex can have different effects on other running programs, depending largely on what CPU priority is used. CPU Priority. While a higher priority may give you marginally better times for various DGIndex operations, they can also affect other programs, causing them to run slowly as more CPU cycles are given to DGIndex. A priority of Low will marginally decrease performance, but will allow you to run other programs at the same time with relatively few performance issues.
Use Full Paths
Each D2V file contains a line giving the name of the MPEG file it's intended to help read. Traditionally these names have included the full path to the file, as in:D:\Wherever\Whatever.mpeg
However, if you save your D2V files in the same directory as the related MPEG, you can uncheck this box so DGIndex uses just the filename without the path. This will allow you to move the MPEG file and D2V file to any directory, as long as they stay together.
Use DirectDraw Overlay
This should only be unchecked if you have problems previewing video.Force Fusion-style Audio
There is some optional information about audio that may or may not be present in an MPEG file. It's present in all DVDs. DGIndex will normally automatically determine if you have audio with this extra information, and treat it accordingly. See the DGIndex manual included with the program for more information.Force Open GOPs in D2V File
Some MPEG files have open GOPs that have headers indicating they're closed. This will cause display problems for some frames during random access (skipping frames). If random access through the D2V project gives you blocking artifacts, try enabling this option to see if it's fixed. If it doesn't help, uncheck it again as it causes performance problems.Log Quant Matrices
The quantization matrices used to encode an MPEG file are embedded in it. They can be extracted by DGIndex, allowing you to look at them or even load them into some MPEG encoders as custom matrices. When you save your project, the matrices will be written to a text file with the same name as your D2V project. Instead of project_name.d2v, it will be project_name.quants.txt.Log Timestamps
This tells DGIndex to create a text file containing timestamps found in the MPEG file. The text file will be named project_name.timestamps.txt and saved in the same directory as the D2V project. Each timestamp is in milliseconds. This option could be helpful in tracking down an audio sync problem, but generally is only for experts.AVS Template
Chances are good that you'll be opening your D2V files with AviSynth. If so, you may want to take advantage of this feature to automatically create an AviSynth script when a D2V project is saved. This is particularly handy if you have a lot of similar files you want to create AVS files (scripts) for. Replace the name of the D2V file with __vid__ (2 underscores on each side of vid) any place you want it to appear in your script. An audio source can also be substituted using __aud__. For example, you might have a template for telecined film that looks like this:MPEG2Source("__vid__", cpu=0)
tfm(d2v="__vid__")
tdecimate()The template needs to be saved in a text file named Whatever.AVS. You can use more than one template for different settings.
There are three buttons in the AVS Template dialog that appears when you select the menu option. They change DGIndex's behavior regarging AVS templates. The default setting of Don't Use Template turns off this functionality. Change Template File gives you a Windows File Open dialog to select a template to be used. The template (AVS file) you select will also be set as the default for future projects. Keep Current Template retains the settings being used already.
