
The Environmental Settings Explained
This section will explain the Environmental Settings of TMPGEnc. Beginner users can completely skip this part if they wish.
The Environmental Settings - General
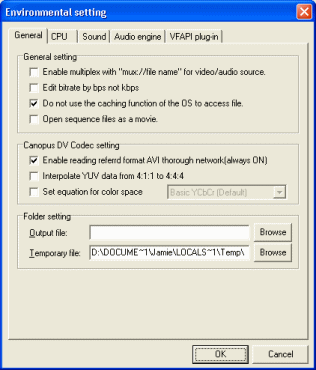 The General Environmental settings are the first settings you will see when you open the Environmental Settings. The first section is called General settings. Enable multiplex with mux://file name for video audio source will is disabled by default, all it means is that it will enable using the form mux:// to mean multiplex streams in source file edit boxes. Edit birate by bps not kbps should not be selected as most of the world DV site (including AfterDawn) use kbps instead, it's become sort of a standard and is easier to understand. Operating Systems (like 2000/XP) read files into Memory for quicker access but in the case of TMPGEnc, this option should be left ticked as the file needs to be accessed directly. Open Sequence files as a movie means that sequence files (that you might get from some DVCam's) can be opened and encoded as a single stream with TMPGEnc.
The next settings here are the Canopus DV Codec settings. Enable reading referred format AVI thorough network (always ON) CANNOT be disabled at all. Interpolate YUV data from 4:1:1 to 4:4:4 is an option you should tick if you import captured DV video because DV Video is captured at 4:1:1 which can mess up the reds coloring on the screen. TMPGEnc will change this to 4:4:4 and fix the problem. This only needs to be selected if you use the Canopus DV Codec. Set equation for color space is another option for the Canopus DV Codec, your options are Basic YCbCr, CCIR-601 or normal YUV.
The folder settings just lets you set an output folder and filename for a video and select a temporary folder for TMPGEnc, but make sure its on a disc that has a lot of free space as the folders tend to fill up fast. Now we can move onto the CPU tab.
The Environmental Settings - CPU
 The CPU settings more than likely wont need adjustment. The CPU settings are the first section we see under this tab. MMX and MMX-2 should always be enabled. SSE should always be enabled and if you have the option of SSE-2 you should not deselect it. 3D Now is available only to AMD processor users. If you have multiple processors and would like TMPGEnc to use the multiple processors, then select Use multi-thread. If you use Multi-thread, you have some more settings under the Multi-thread setting section. Enable pipeline if selected, will allow TMPGEnc to use multiple CPU's in MPEG processing, which will speed up the process and use more memory. Enable pipeline for Motion search uses multiple CPU's for motion search. Prefetch Video with synchronize reading video data so that data is always available to the process when it is needed. This may improve performance. The next tab is the Sound tab.
The Environmental Settings - Sound
There is no need for a screenshot here, the only option you have is selecting what file will be played when the encoding process is finished.
The Environmental Settings - Audio Engine
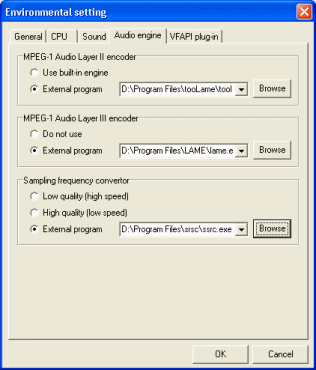 The audio engine lets you pick what you want to handle your audio encoding. TMPGEnc has built in audio encoders but you have the option of using external encoders which produce higher quality. The MPEG-1 Audio Layer II (MP2) encoder settings allows you to choose between the built in engine or an external program. In my case, I am using tooLame as an external program. The MPEG-1 Audio Layer III encoder (MP3) settings allows you to either not use an encoder for MP3 audio or to use an external program. I am using the LAME MP3 encoder as my External encoder. The Sampling frequency converter settings allow you to either use a built in high speed low quality encoder, a high quality low speed encoder or an external program. I am using SSRC as my external Sampling Frequency Converter. The next tab is the VFAPI plug-in tab.
The Environmental Settings - VFAPI plug-in
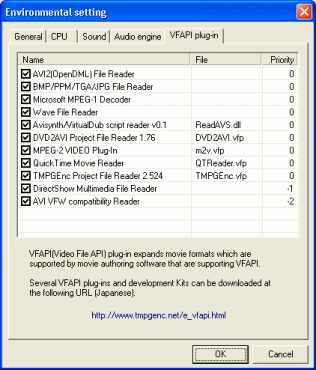 The VFAPI plug-in tab has a list of plug-ins that TMPGEnc uses. They all have a set priority, mostly 0 that you can raise easily by selecting the plugin, right-clicking and clicking Higher Priority (or Lower Priority). You can download VFAPI plug-ins from the Internet and place them in the same folder as TMPGEnc. A couple of good downloads would be the m2v VFAPI plugin to read MPEG-2 Video files with TMPGEnc and the Quicktime Reader plug-in to read quicktime .mov files. The m2v file you download should be opened with WinRAR and extracted into the TMPGEnc folder. Then run the m2vconf.exe and click OK and the plugin should work. The QTPlugin file should be opened with WinRAR and extracted into the same folder as TMPGEnc and it should work no problem. The next thing we will look at is the project wizard, so click OK and Click File --> Project Wizard.
Written by: James Delahunty
