
Introduction to MPEG Tools
One of the best features of TMPGEnc is the MPEG Tools it offers. With these tools you can, Multiplex files, De-Multiplex files and merge and cut files. To access the MPEG Tools, just click File --> MPEG Tools. We'll take a walk through them now.
MPEG Tools - Simple Multiplex
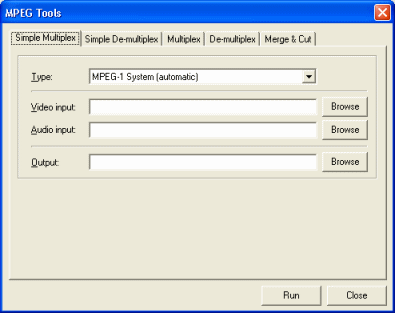 The first thing you can do is a Simple Multiplex. For those not familiar with Multiplexing, it simply means putting an audio and video stream together as one MPEG stream. The files you can use in multiplexing have to be elementary video and audio files, like mp2 files and m1v files. The Type that you choose is very important. Your options are MPEG-1 System (automatic), MPEG-1 System (VBR), MPEG-1 VideoCD, MPEG-1 VideoCD (non-standard), MPEG-2 Program (VBR) and MPEG-2 Super VideoCD (VBR). It is important that if you are using this to multiplex files for VideoCD that you use the VideoCD option. One little trick worth mentioning here, is selecting MPEG-1 VideoCD (non-standard) for MPEG-2 SVCD files. If your DVD Player doesn't support SVCD but does support VCD, this might trick the DVD player into playing the file. It would have to be burned as VCD non standard in Nero Burning Rom also for that trick to work.
MPEG Tools - Simple De-multiplex
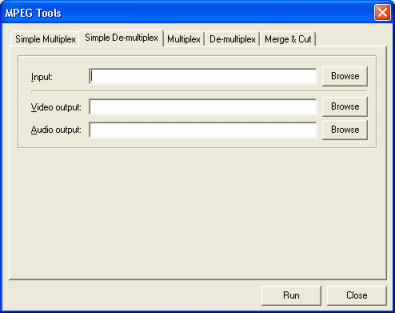 The second thing you can do is a Simple De-multiplex. For those not familiar with De-multiplexing, it means that you can separate a video and audio stream into separate files. It is important to remember that for the Simple De-multiplex option you have to be using a file with only one audio stream on it. It is very simple, all you have to do is click the Browse button beside the Input field and locate your MPEG file, it should then automatically put filenames and paths in the Video and Audio output fields, you can change these if you want to. Click the Run button then and it will save two files from the original file (without deleting the original file).
MPEG Tools - Multiplex
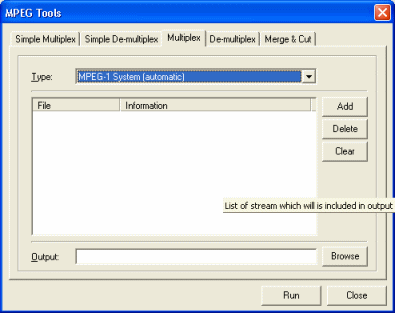 The third option is a proper Multiplex of Elementary Streams. Here to add a video or audio stream you can click the Add button. You can easily delete with the Delete button or delete the whole list with the Clear button. The Type that you choose is very important. Your options are MPEG-1 System (automatic), MPEG-1 System (VBR), MPEG-1 VideoCD, MPEG-1 VideoCD (non-standard), MPEG-2 Program (VBR) and MPEG-2 Super VideoCD (VBR). It is important that if you are using this to multiplex files for VideoCD that you use the VideoCD option. One little trick worth mentioning here, is selecting MPEG-1 VideoCD (non-standard) for MPEG-2 SVCD files. If your DVD Player doesn't support SVCD but does support VCD, this might trick the DVD player into playing the file. It would have to be burned as VCD non standard in Nero Burning Rom also for that trick to work. When you have added the files you want to multiplex into one mpeg file, click the browse button beside the output field to choose where to save the .mpg file. Click Run when you have added the files.
MPEG Tools - De-Multiplex
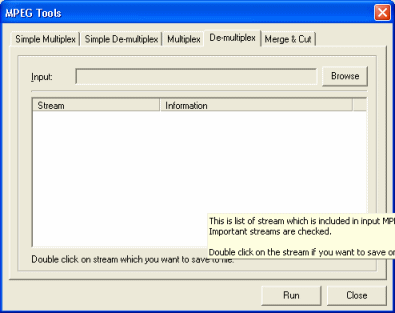 The fourth option you have with the MPEG Tools, is a proper De-multiplex. Here you click the Browse button beside the Input field. When it loads in properly, you will see all the streams that are in the mpg file appear, and to save one of those streams all you have to do is double-click it. This is useful for saving streams from files that have multiple audio streams like VOB files (DVD files).
MPEG Tools - Merge & Cut
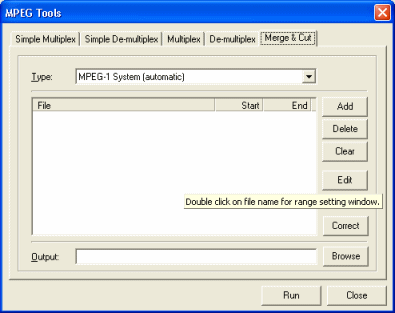 The last option you have with MPEG Tools is Merge & Cut. This basically means you can cut out certain area's of your MPEG files or merge multiple MPEG files into one long MPEG file. To merge files together simply add them in the order you wish them to be merged into one long file. Then choose the Type. Your options are MPEG-1 System (automatic), MPEG-1 System (VBR), MPEG-1 VideoCD, MPEG-1 VideoCD (non-standard), MPEG-2 Program (VBR) and MPEG-2 Super VideoCD (VBR).Then choose and Output file path and name and click run to merge them. To cut a file, add it to the list and select it with the mouse. Now click Edit. In the edit options you can select a part of the file and click OK. Then when you choose an Output and click Run, it will save an mpg file with just the area that you selected. Next we will look at how to use Templates.
Introduction to Templates
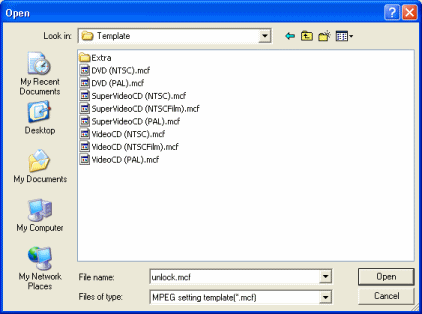 TMPGEnc saves templates as mcf files. There are many templates saved already that you can use at any time by clicking the load button and just selecting the template that you wish. When you select a template and click Open, you are then ready to encode immediately by just loading in your audio and video source and clicking Start. However, when you have a template loaded, your MPEG settings will be locked. In order to unlock them, click the load button and browse to the Extra folder. Now open the unlock.mcf file and you will now be able to change the MPEG settings. If you click the save button at any time it will allow you to save your current settings as a template. Next we will take a detailed look at the MPEG settings, so click the Setting button on the main TMPGEnc Screen.
Written by: James Delahunty
