
Project Wizard 1/5
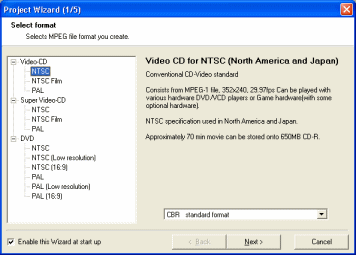 The Project Wizard consists of five main windows. The first window simply asks you to choose what type of MPEG stream you wish to create. You cannot really go wrong here as the Project Wizard explains to you what each option is for. One thing worth pointing out to you is that you have some extra options with some of your choices. For NTSC and PAL VCD, you can only use CBR encoding to keep it standard, same with PAL and NTSC SVCD (which is a pity, since VBR MPEG-2 encoding for SVCD is standard too). Your DVD options are wider however. You will notice you have the option of using a Low Resolution encoding, which basically means that your MPEG-2 stream resolution will be half the standard resolution size (352x240 for NTSC and 352x288 for PAL). If you have a widescreen source file, then pick a 16:9 option. You will also notice that you can choose between CBR encoding with Linear PCM audio or you can choose CBR encoding with MP2 audio. The main difference here is that Linear PCM audio is much larger than MP2 audio, however MP2 isn't standard for NTSC DVD, but usually works. For this guide I have chosen PAL DVD with MP2 audio. Click Next.
 Project Wizard 2/5
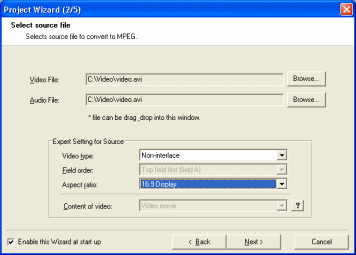 On the second screen of the Project Wizard you are asked to select a source file for encoding to MPEG. The source file I have selected is an 16:9 AVI file with MP3 audio. As you can see you can select a separate source for the audio and video streams. Below is Expert Setting for Source. You can select whether the source is Non-Interlace (most are) or Interlace. If you don't know what that means, click here. You can also select the source Aspect Ratio. If its full screen choose 4:3 display, if widescreen, 16:9 will work in most cases. For AVI files, programs like GSpot and AviCodec can help you determine what your Aspect Ratio is. When you are done here, click the Next button again.
Project Wizard 3/5
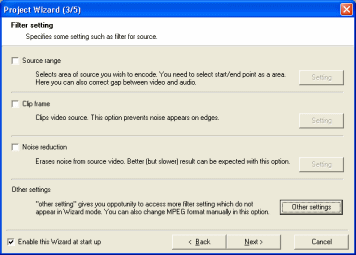 The third screen of the project wizard is quite important. When you are using a source AVI file for your encoding, TMPGEnc can often accidentally get the file length wrong. You can fix this problem before it happens by using Source Range here. Tick the box beside Source Range and a new window will pop up. Click Move To Start Frame and click Set Start Frame. Then click Move To End Frame and Click Set End Frame. When you have this done click OK, this will solve a lot of problems with file length before they even occur. You can also use Clip Frame to remove bits from the tops and sides of the Video. The most important thing however, is the Other Settings part. Click the Other Settings button and you will get the Advanced Settings. I highly advise changing Motion Search Precision to Highest Quality (Very Slow). Yes this will slow your encoding down to a crawl, but it will keep the quality as high as it can. Now click the Advanced tab and change Video Arrange Method to Full Screen (Keep Aspect Ratio), unless of course you wish to see a widescreen movie stretched horribly to Full Screen. Click OK now to return to the Project Wizard and click the Next button again.
Project Wizard 4/5
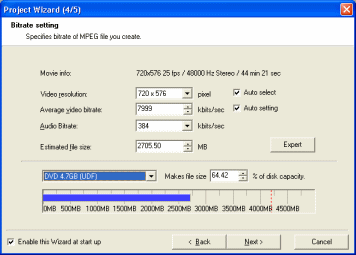 On the fourth screen you will get to change some settings. You will see that it gives you movie info. which will be what your encoded file will be, including the resolution of the video stream and the framerate of the video stream, it also has the sampling frequency of the audio and the full length of the video. You also have your options for Video Resolution, but you should stick with the default resolution you are giving as it will be standard. TMPGEnc Project wizard wont allow a video birate for DVD over 8000kb/s. The Audio birate can also be changed, 384kb./s is the highest option for MP2 audio. You will also now have an estimated file size. Please note that if you are using a FAT32 file system (you are definitely using FAT32 if you are running Windows 95/98/ME) that you cannot have files over 4GB. For this reason, you will have to lower the birate's until the filesize is under 4GB. You should see about an NTFS filesystem instead of FAT32. You can also change the type of blank media you are using. When you are finished here, click Next.
Project Wizard 5/5
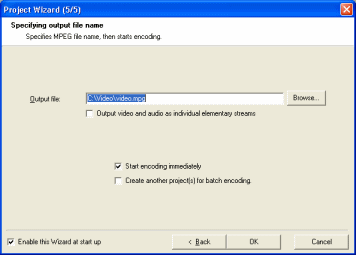 The fifth and last screen of the Project Wizard is just basically some last options and confirmation to begin encoding. One of the noticeable options is, Output video and audio as individual elementary streams. Elementary streams means that instead of getting one .mpg file you will get a .m2v (or .m1v for MPEG-1) and a .mp2 file. This option should be ticked if you plan on authoring a DVD after encoding. If you don't select it you will get a .mpg file with both streams in it. Start encoding immediately should be checked if you wish to start the encoding right now. Create another project(s) for batch encoding means that this current setting will be saved to the batch list and you will be able to begin a new project that will also be encoded. Now that the project wizard is covered we will look at MPEG Tools.
Written by: James Delahunty
